In a previous article, we spoke about why you need both Excel and SQL in your data management solutions, but how do you connect Excel to SQL Server? In this article, we’re going to show you the steps and highlight a key benefit of using an Excel add-in like SQL Spreads.
But, first, we’re going to re-cap the benefits of connecting Excel to data in SQL Server.
Benefits of connecting Excel to SQL Server
To demonstrate the benefits of connecting Excel to SQL Server, let’s look at an example.
This spreadsheet is used by Sales Reps at a manufacturing company to prepare quotes for customers. Each Sales Rep has a copy of the spreadsheet, which includes a list of inventory items and their prices. The list of inventory items and prices is extracted from the finance system by an administrator. The quote sheet uses some data validation lookup formulas to retrieve the prices when a Sales Rep selects an item from the dropdown.
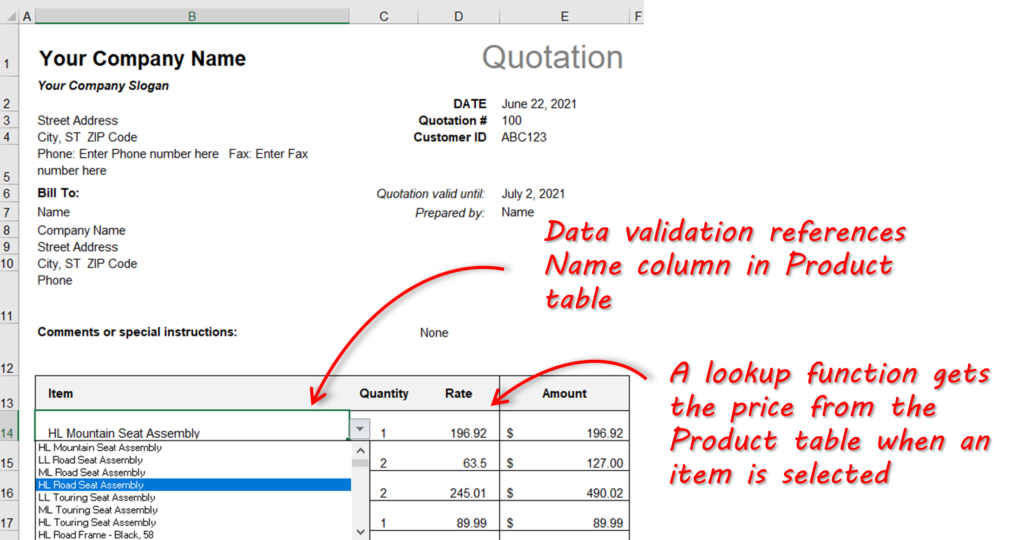
This works well until the organization needs to update the prices. In which case, each user would need to copy and paste the new pricing into the spreadsheet (or use a new copy of the spreadsheet). Also, when the Sales Rep creates the quote, they don’t know whether the items are actually in stock.
A better solution would be to connect the Excel spreadsheet to the inventory table in the finance system database. Each time the Sales Rep opens the quote spreadsheet, they are refreshing the price data from the live database. We can go one step further and make the connection to the database also bring back the current stock levels so that quotes can be prepared for items actually in stock.
So, to summarise, the benefits of connecting Excel to SQL Server are:
- we have access and can view up-to-date information
- we are using one single, trusted data source
- we can perform on-the-fly analysis or aggregation of the source data using simple Excel functions like pivot tables
Connect Excel to a SQL Server database : 3 easy steps
The easiest way to connect Excel to a SQL Server database is with SQL Spreads. SQL Spreads is a simple Excel add-in.
The SQL Spreads download can be found here, and the installation process is described here.
Step 1: Gather the database connection details
You’ll need the following information to connect Excel to SQL Server, so get the details as the first step:
- SQL Server Name
- Database Name
- Table or View that contains the information you need
- Login details (if not using Windows authentication)
The form of the SQL Server Name will depend on whether SQL Server is installed locally, on a network, or a remote location (note that this is the same name as when you connect to SQL Server in SQL Server Management Studio).
| Typical server name | Case |
|---|---|
| Localhost | When SQL Server is installed locally |
| localhost\sqlexpress | When SQL Server Express is installed locally |
| Domain\Servername | When SQL Server is installed in a corporate network |
| IP-address | When SQL Server is installed in a remote location |
Step 2: Connect to SQL Server
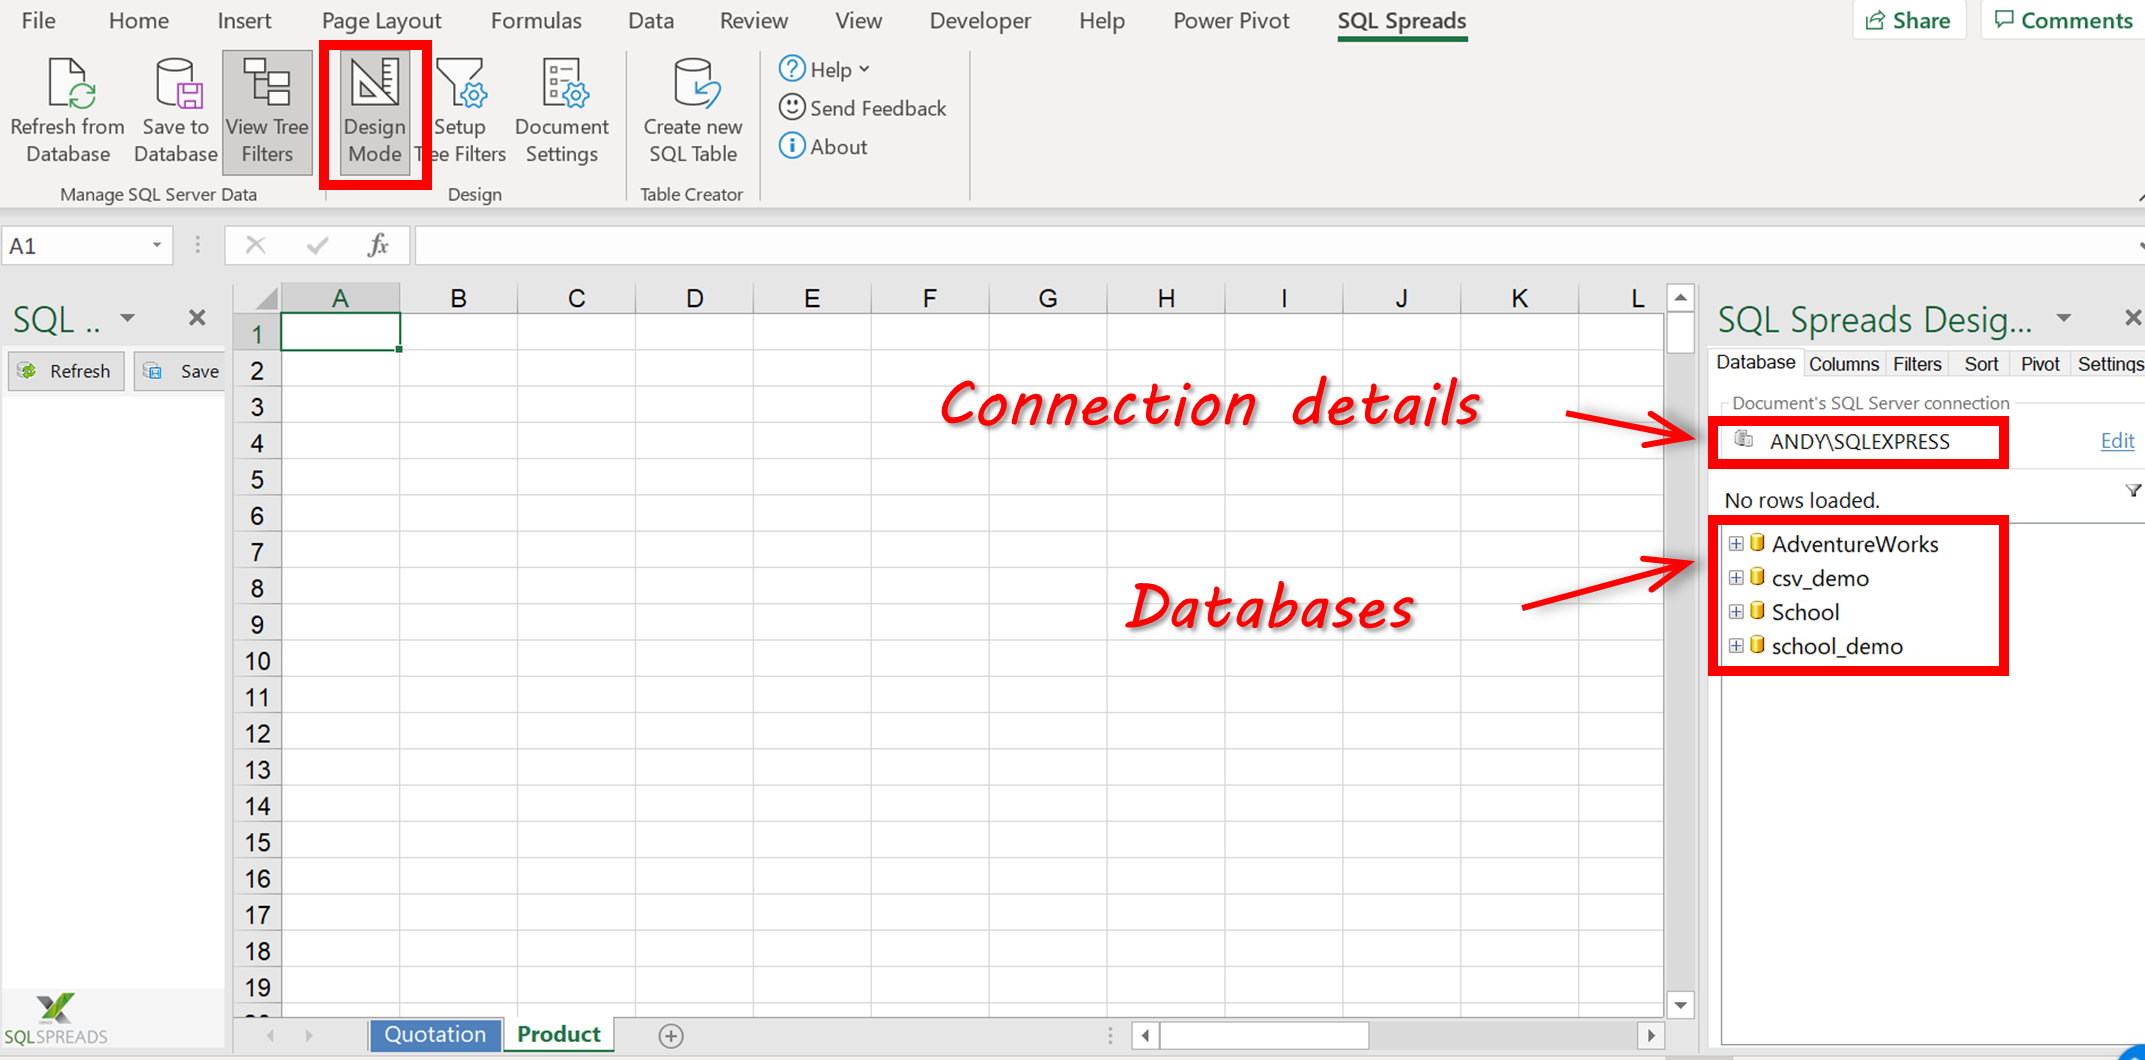
Once SQL Spreads is installed, you’ll see it as a new ribbon tab; go here and click the Design Mode button.

In the SQL Spreads Designer panel on the right side, click the Edit button to open the SQL Server connection dialog.
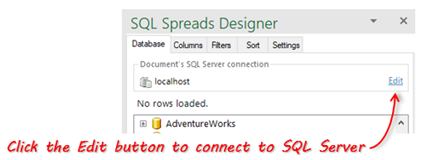
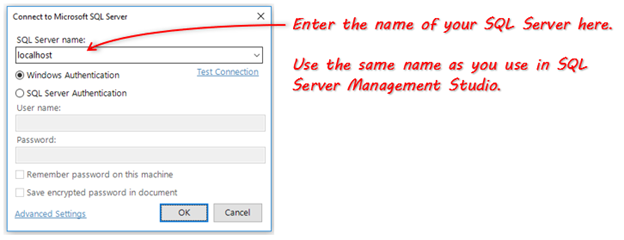
Enter the name of your SQL Server into the SQL Server name field:
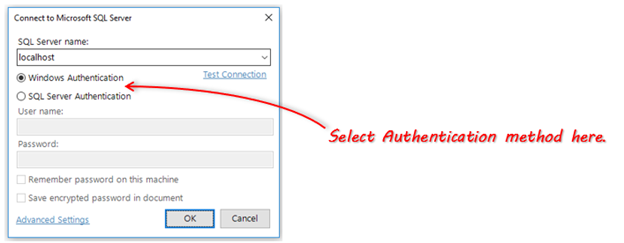
Select if you should connect using your Windows login (Windows Authentication) or enter a user name and password (SQL Server Authentication). Windows authentication is the more secure of the two options (see here for more information).
Click OK. SQL Spreads will try to connect to the database. If the connection is successful, your databases will show up in the SQL Spreads Designer panel.

Step 3: Select the relevant table in SQL Server
Now that we’ve created the connection from Excel to SQL Server, we can select which table of data we want to use in Excel.
In the SQL Spreads Designer, click on the database and then select your table.
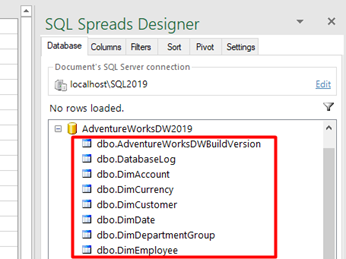
As soon as you select a table, the data in the table is populated in the Excel sheet.
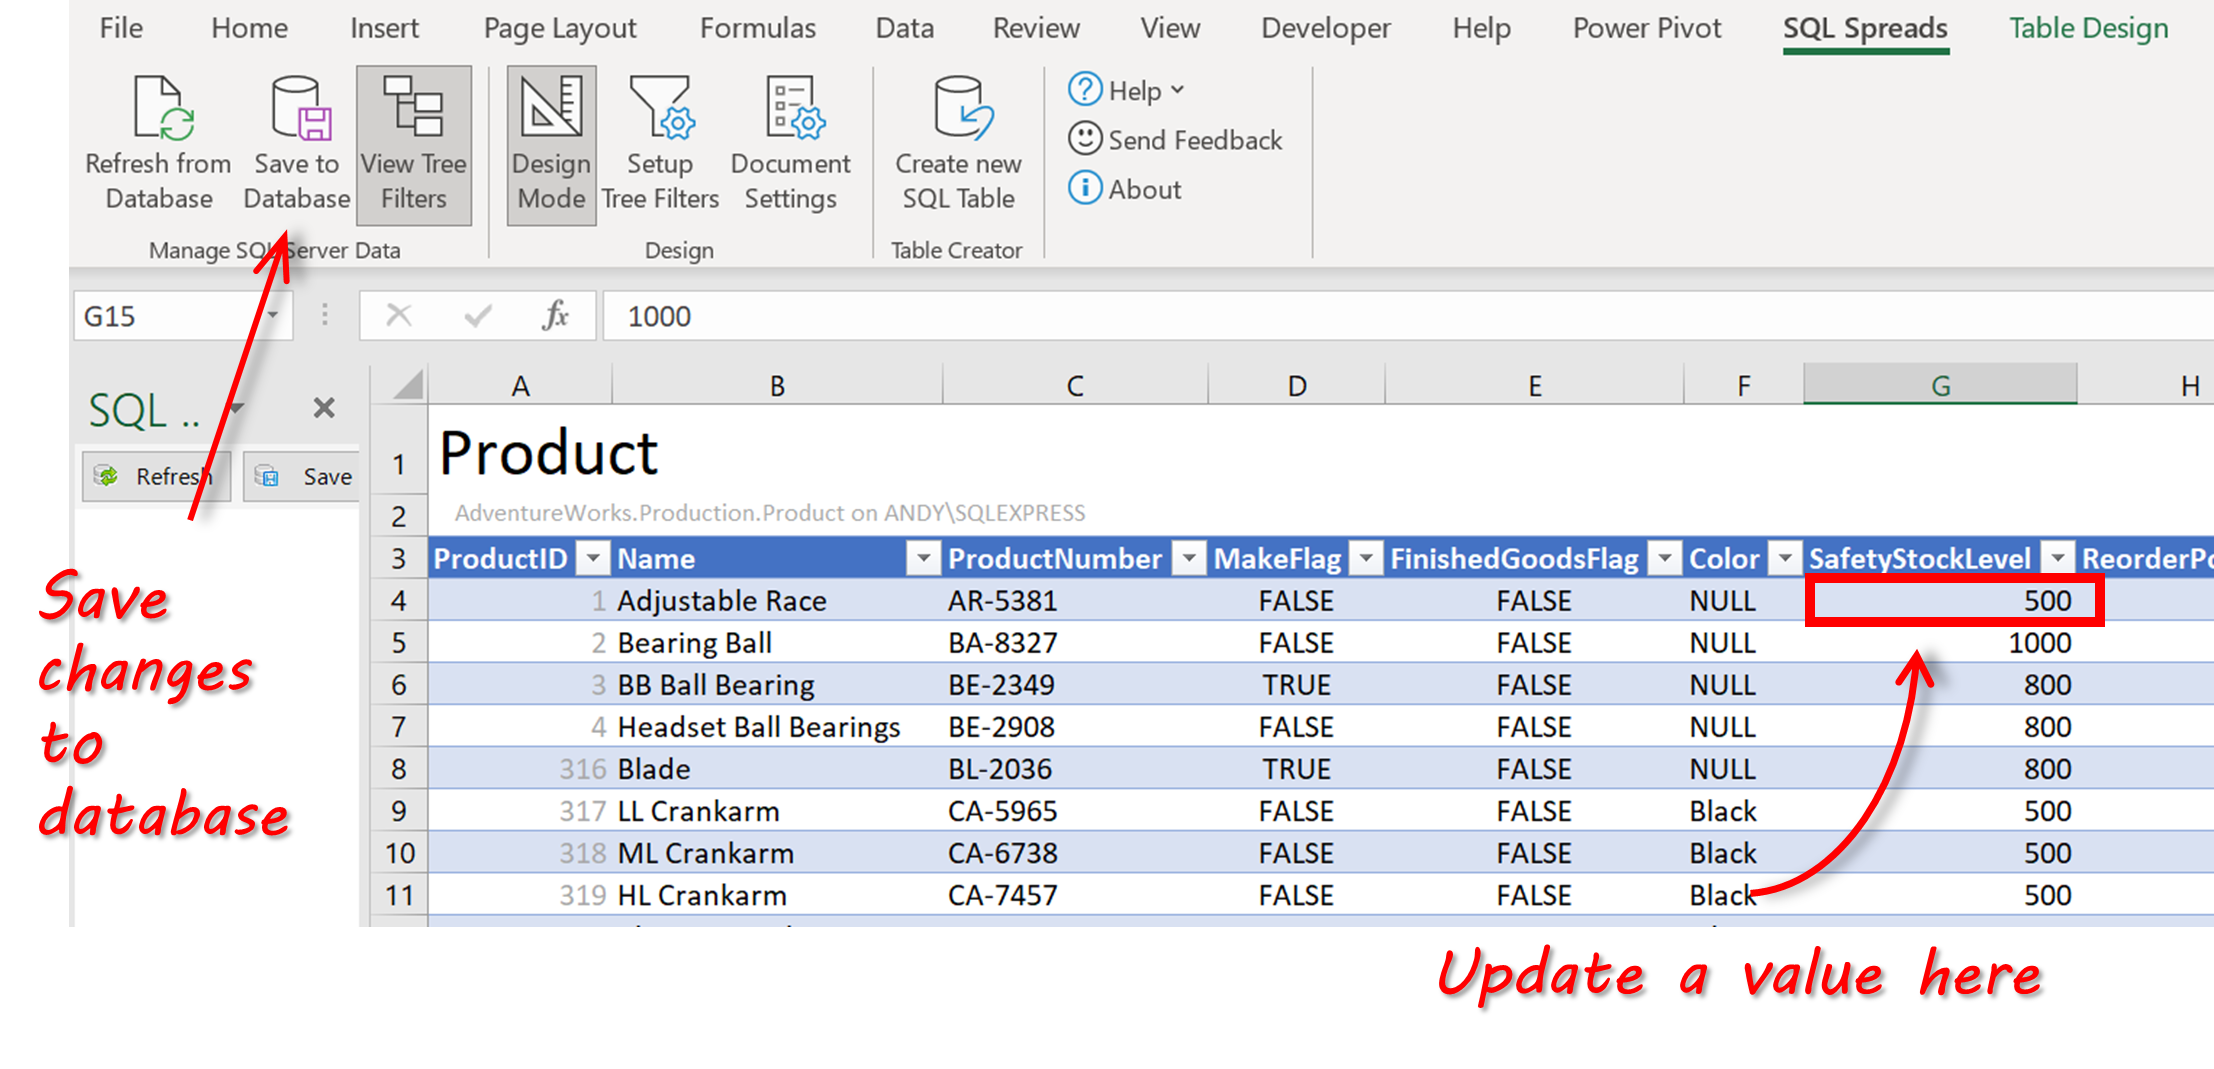
You can now see all the data in your SQL Server table and use it in your Excel workbook. The real power with SQL Spreads is the ability to update the data in the table in SQL Server direct from Excel. For example, I can update the prices in the product table directly in Excel, and save the changes back to SQL Server!
Example: A simple Quote form in Excel connected to SQL Server
Let’s go back to our earlier example of the quote form and the inventory list. We’re going to change this so that the quote form gets its data from the table in the SQL server instead of a static list in the spreadsheet.
If you want to follow along with this example, you’ll need to have access to the AdventureWorks sample database, which you can get from here.
First, we’re going to create a new sheet in the quote_sample workbook and leave it with the default name of Sheet2 – the data from SQL Server will be populated here.
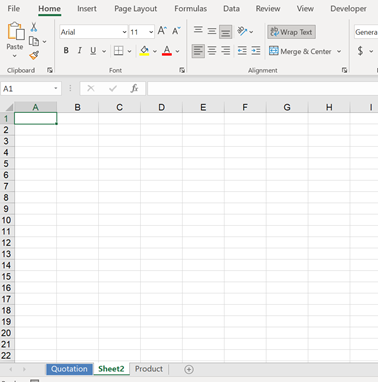
Next, we’re going to connect to the AdventureWorks database using the steps outlined above.
Step (1) : Connection details
Here are the connection details I’m going to use to connect to my SQL Server database:
- SQL Server Name: Andy\SQLExpress
- Database Name: AdventureWorks
- Table or View: Production.Product
- Login details: Windows authentication
Step (2): Connect to SQL Server
We want to connect to the Product table in SQL Server and populate the ‘Product’ sheet in the quote worksheet. To do this we click on SQL Spreads > Design Mode and enter the connection details and expand the correct database (in our case, AdventureWorks) so that we can select the relevant table (in our case, Production.Product).
Step (3): Select the Production.Product table in SQL Server
Click on the Production.Product table in the list and the data is automatically populated into the Product sheet.
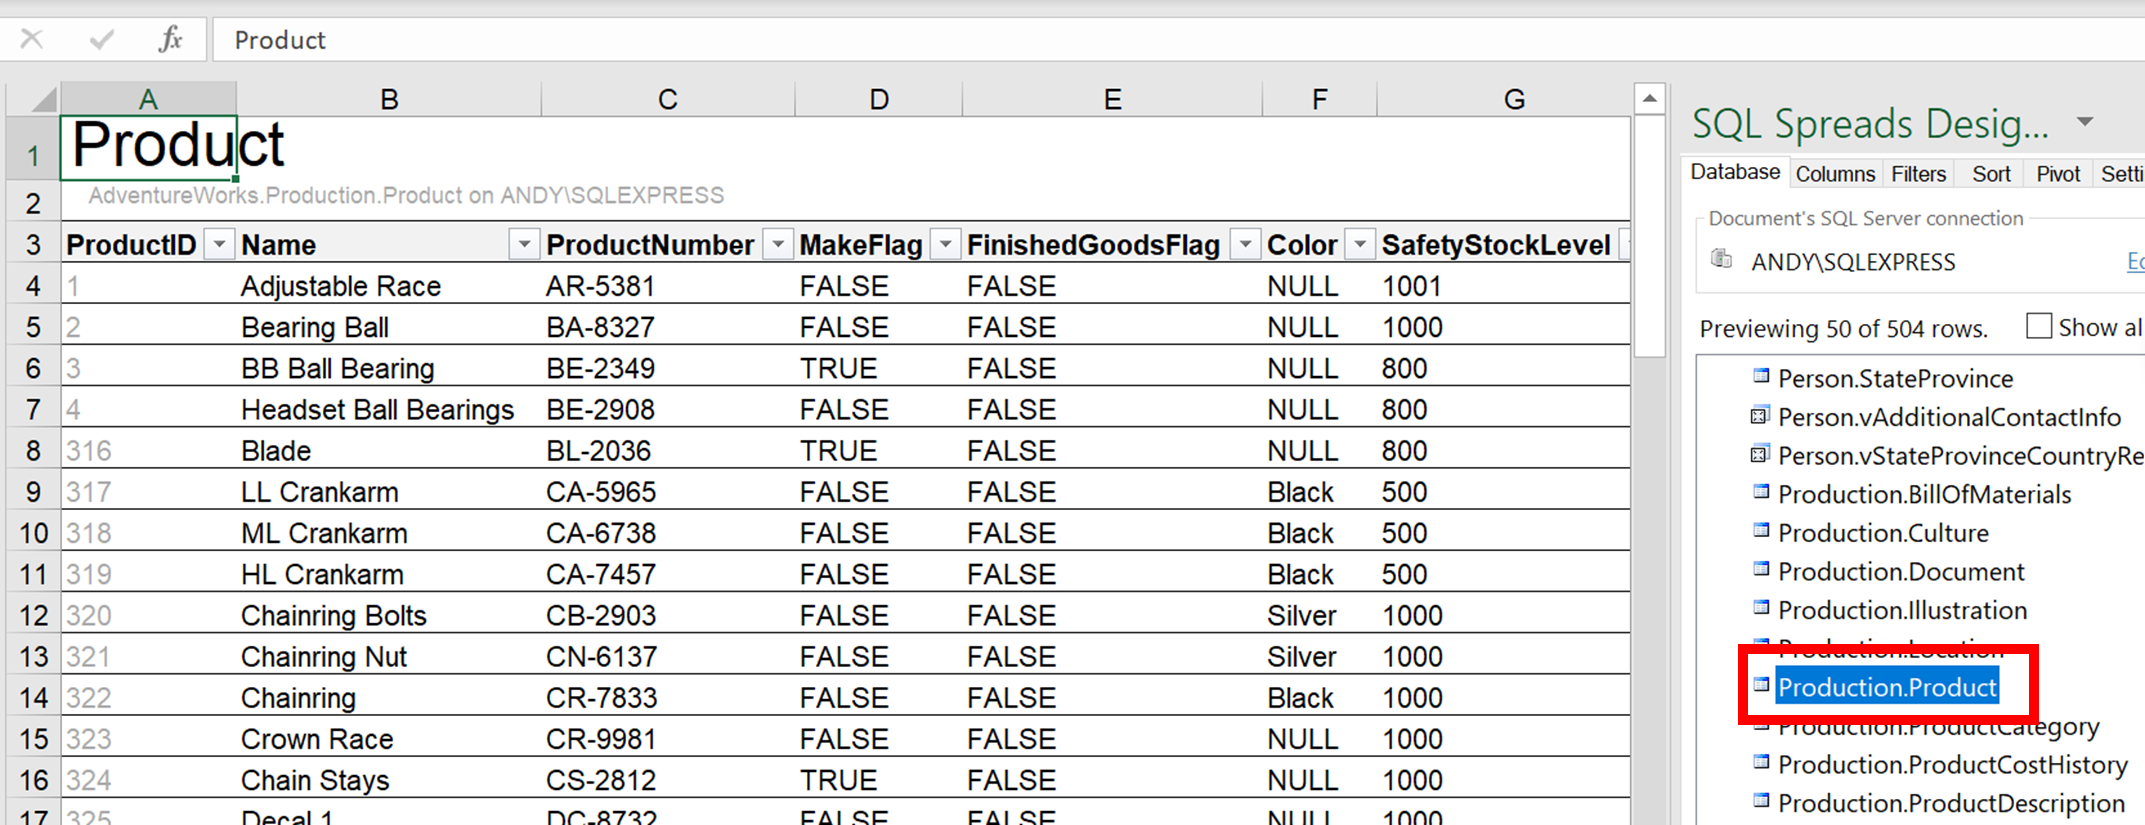
We can now use this data as the source for our lookups in the Quote template, but before we do, we’re going to look at how to filter the data returned from SQL so that only in-stock items are displayed.
Click on the Filters tab in the SQL Spreads Designer. Under the Filter Type option, we can select ‘Column’ or ‘Custom SQL’. We’re going to select ‘Custom SQL’ because we need to run a SQL query that will return only items in stock, and that means we need to join the Product table to the ProductInventory table.
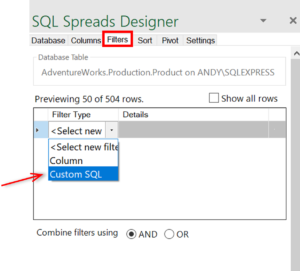
When you click the ‘Custom SQL’ option, a text box is displayed where you can enter the SQL query. For our use case, we want to return a list of products via a join query, we’ll need to use a Sub Query. So, we need to paste the following:
Name  in (SELECT P.Name AS Product
FROM AdventureWorks.Production.Product AS P
JOIN AdventureWorks.Production.ProductInventory AS PI ON P.ProductID = PI.ProductID
JOIN AdventureWorks.Production.Location AS L ON PI.LocationID = L.LocationID
where L.Name = 'Finished Goods Storage' AND PI.Quantity > 0
GROUP BY P.Name, P.ListPrice)
in the Custom SQL box:
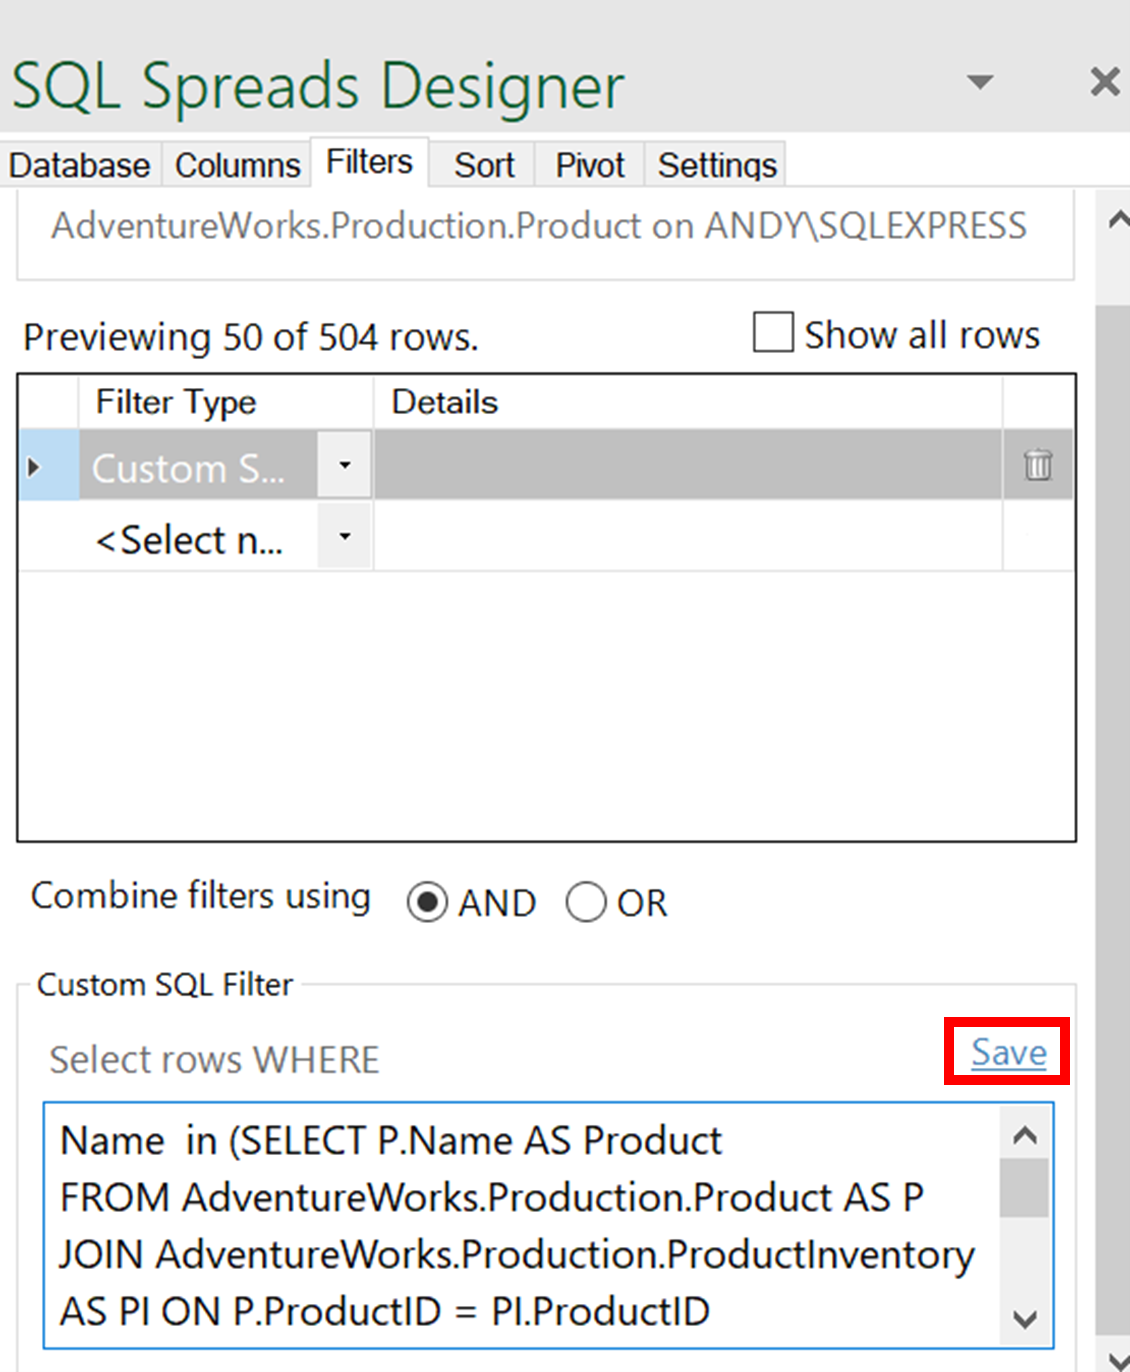
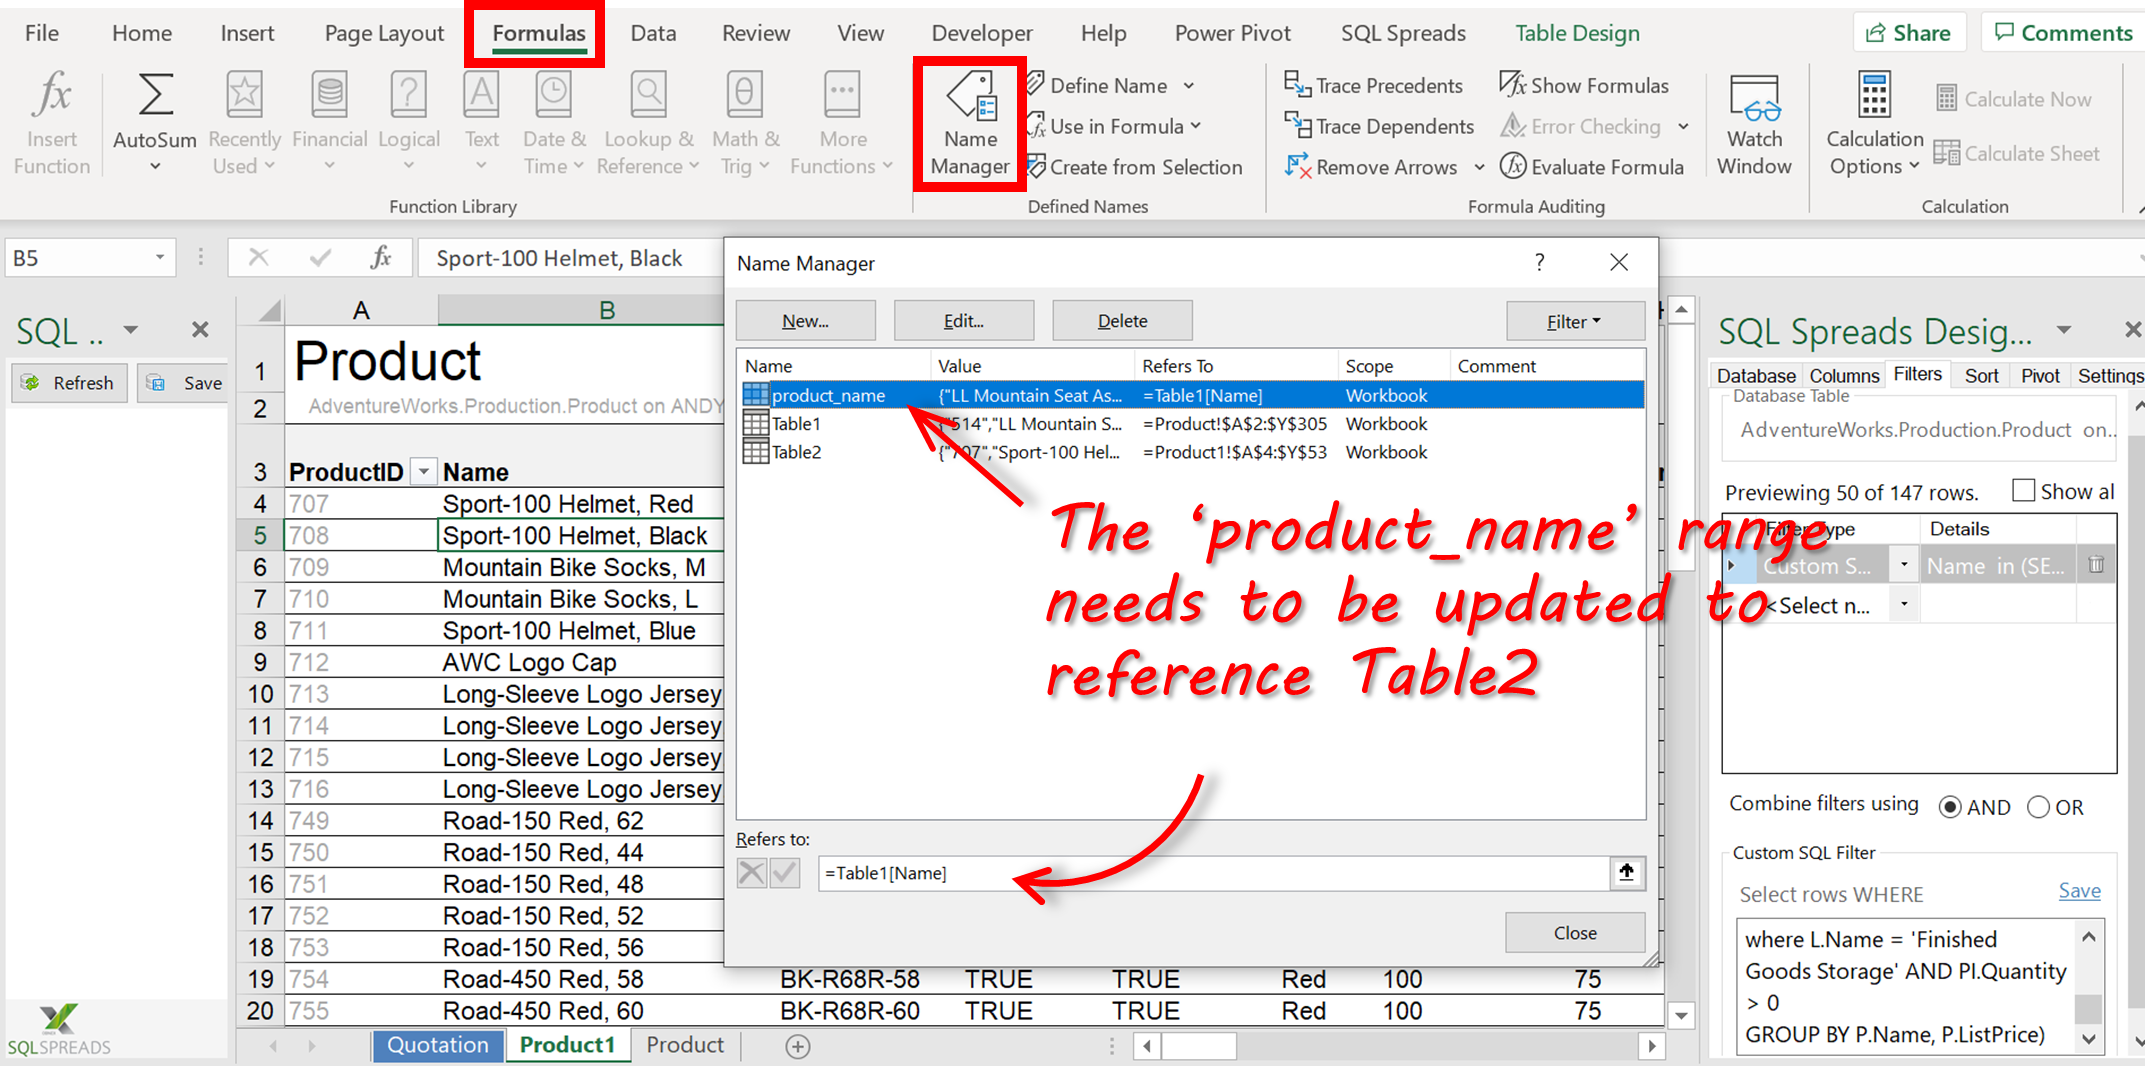
When you click ‘Save’, the data in the Product table is reduced to the filtered records. Finally, we’re going to update the named range that was used by the data validation lookups in the Quote sheet:
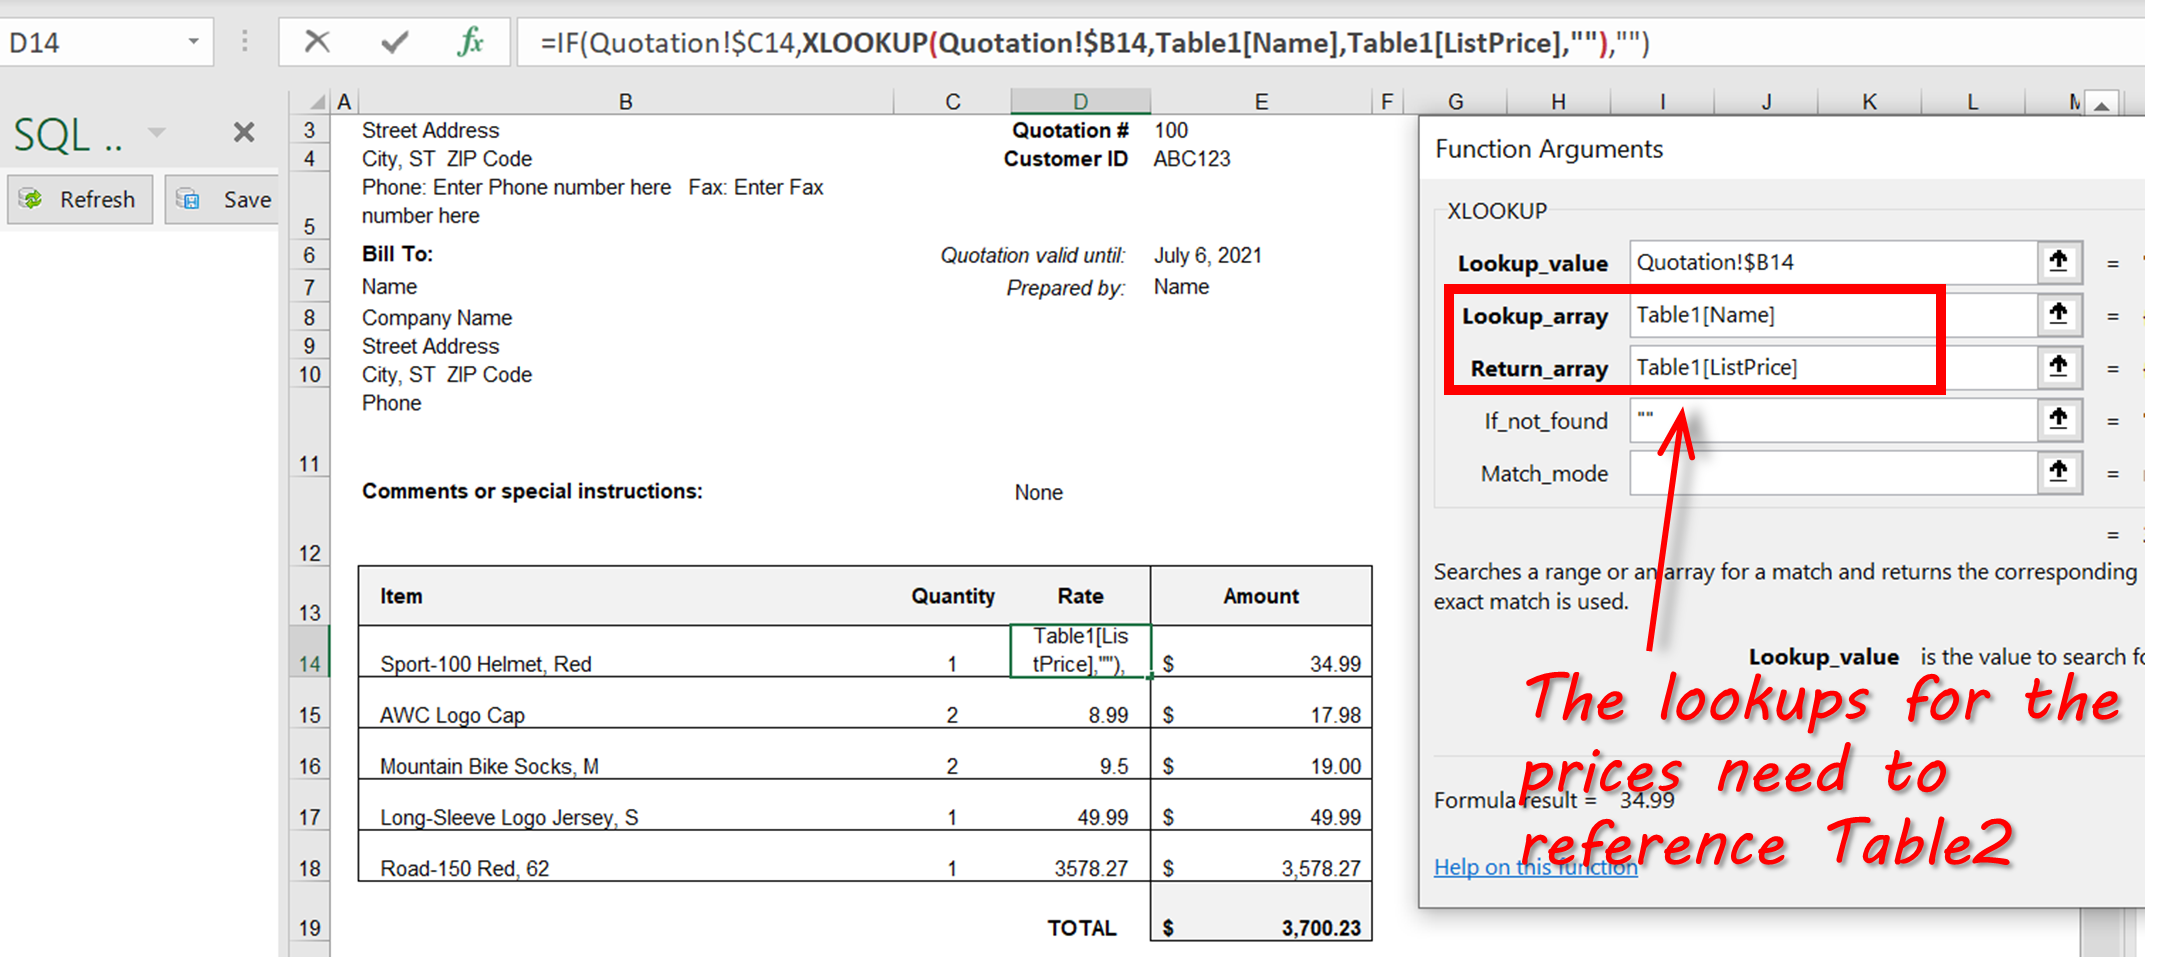
And, we also need to update the XLOOKUP function that the Quote sheet uses to get the price when a user selects an item – it needs to reference the new Table2 which is the data from SQL Server.
That’s it! Our Sales Reps can now create quotes based on up-to-the-minute prices for items that are currently in stock. Each time the Sales Rep opens the spreadsheet, the data will be refreshed from SQL Server.
Bonus Feature! Update prices in Excel and save to SQL Server
We have connected Excel to SQL Server so that our Sales Reps can create quotes based on up-to-the-minute prices and availability.
We can go one step further and provide the ability for a designated user (eg an Administrator) to update the Sales Prices of the items directly in Excel, and have the updates saved back to the ‘Production.Product’ table in SQL Server.
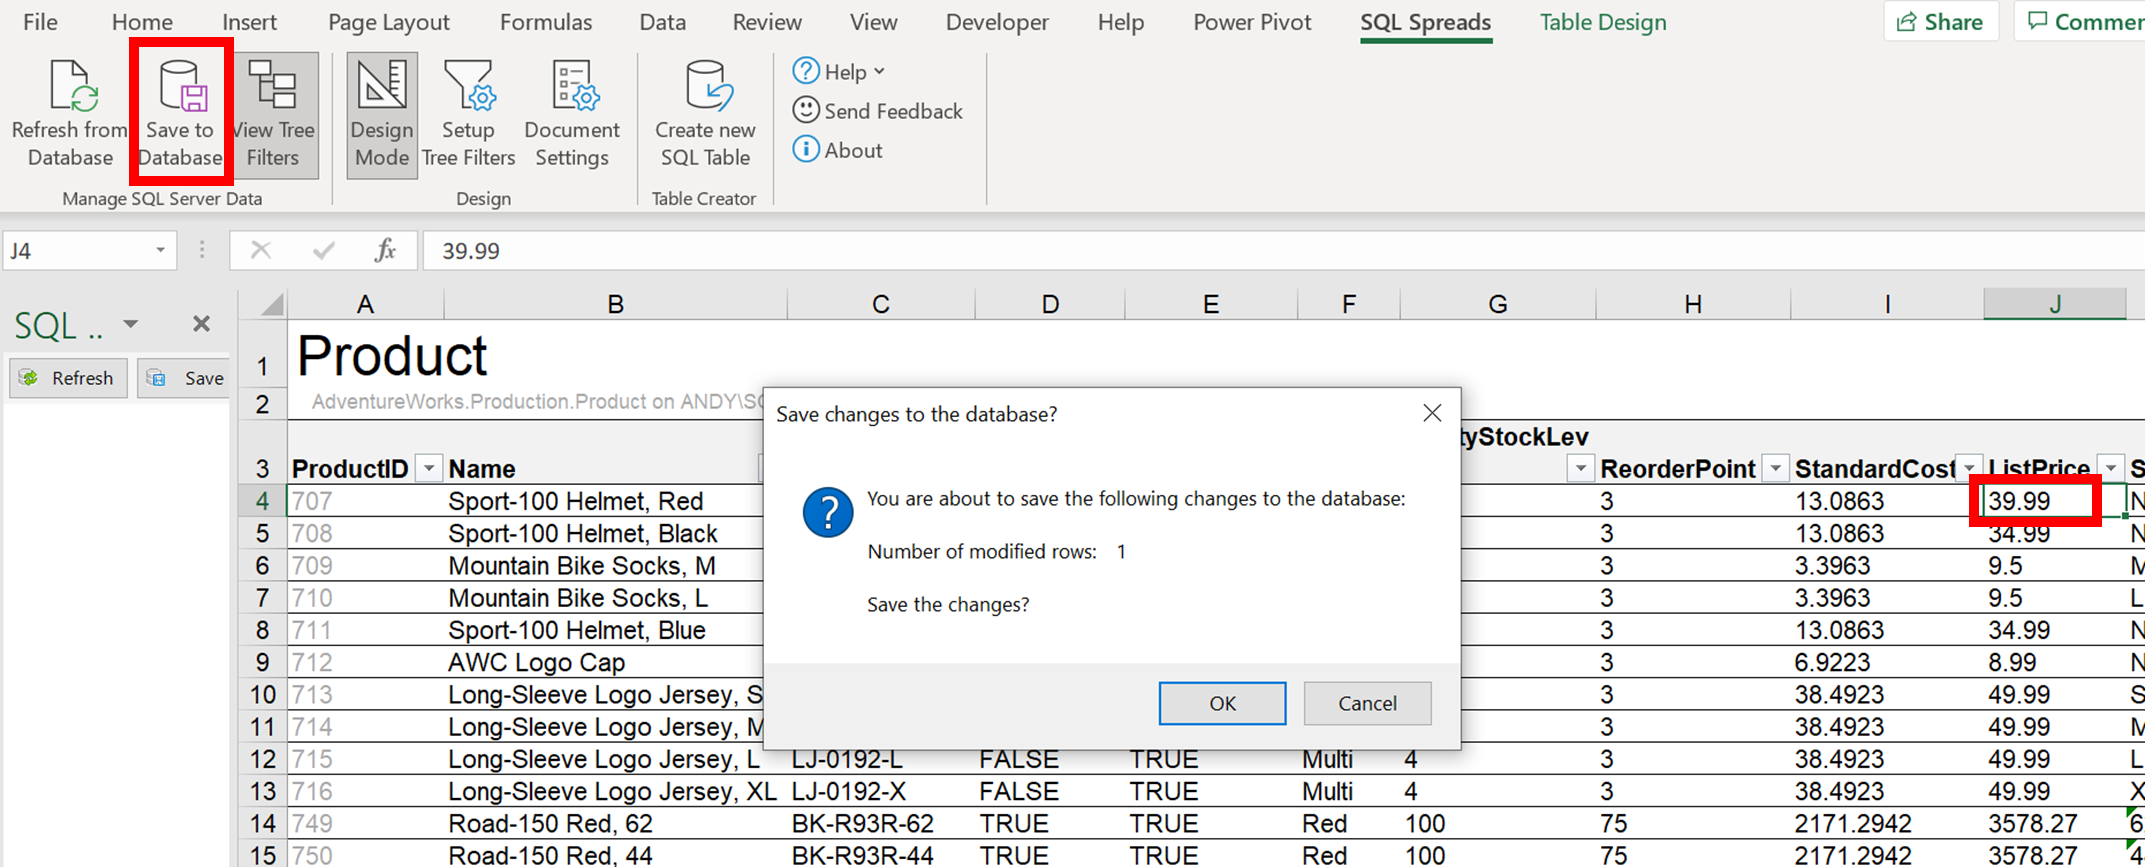
For example, if I wanted to change the price of the first item in the list to $39.99, I can type in the ListPrice cell and click ‘Save to Database’ – it’s that easy! Of course, we would want this capability locked down to certain users only, and this is easily done through SQL Spreads.
Summary
In this article, we’ve shown how easy it is to connect Excel to SQL Server using the SQL Spreads Add-In. We also went through an example to show how a simple quotes spreadsheet can use up-to-date sales price data from a SQL database, and how the prices in the database can also be updated directly from Excel.
Download the trial version of SQL Spreads and connect Excel to SQL Server today.
*This article was originally published on June 29, 2021 and was updated on May 6, 2022 to include some new screenshots.



Hi all
I have a question to ask if anyone can assist it will be highly appreciated.
Question.
Can excel be connected to any internet connection and retrieve your data back to excel. Meaning point A is the office and point B is anywhere in the country.
Just like to know if am at point B, I then connect to the internet from my laptop that it is possible in excel and excel vba forms to connect to my office sql data, connecting via sql authentication (server name, userid, password etc.) and retrieve my data in my database tables.??
Using a vba form to connect
Kind regards
Mornay
Yes, you should be able to do that if you can connect to your company’s network using a VPN connection (and firewalls etc are properly setup by IT).
SQL Spreads can be used offline and store the changes you do to the your SQL Server when offline, and you can then push the changes back to SQL Server when you are back in the office.