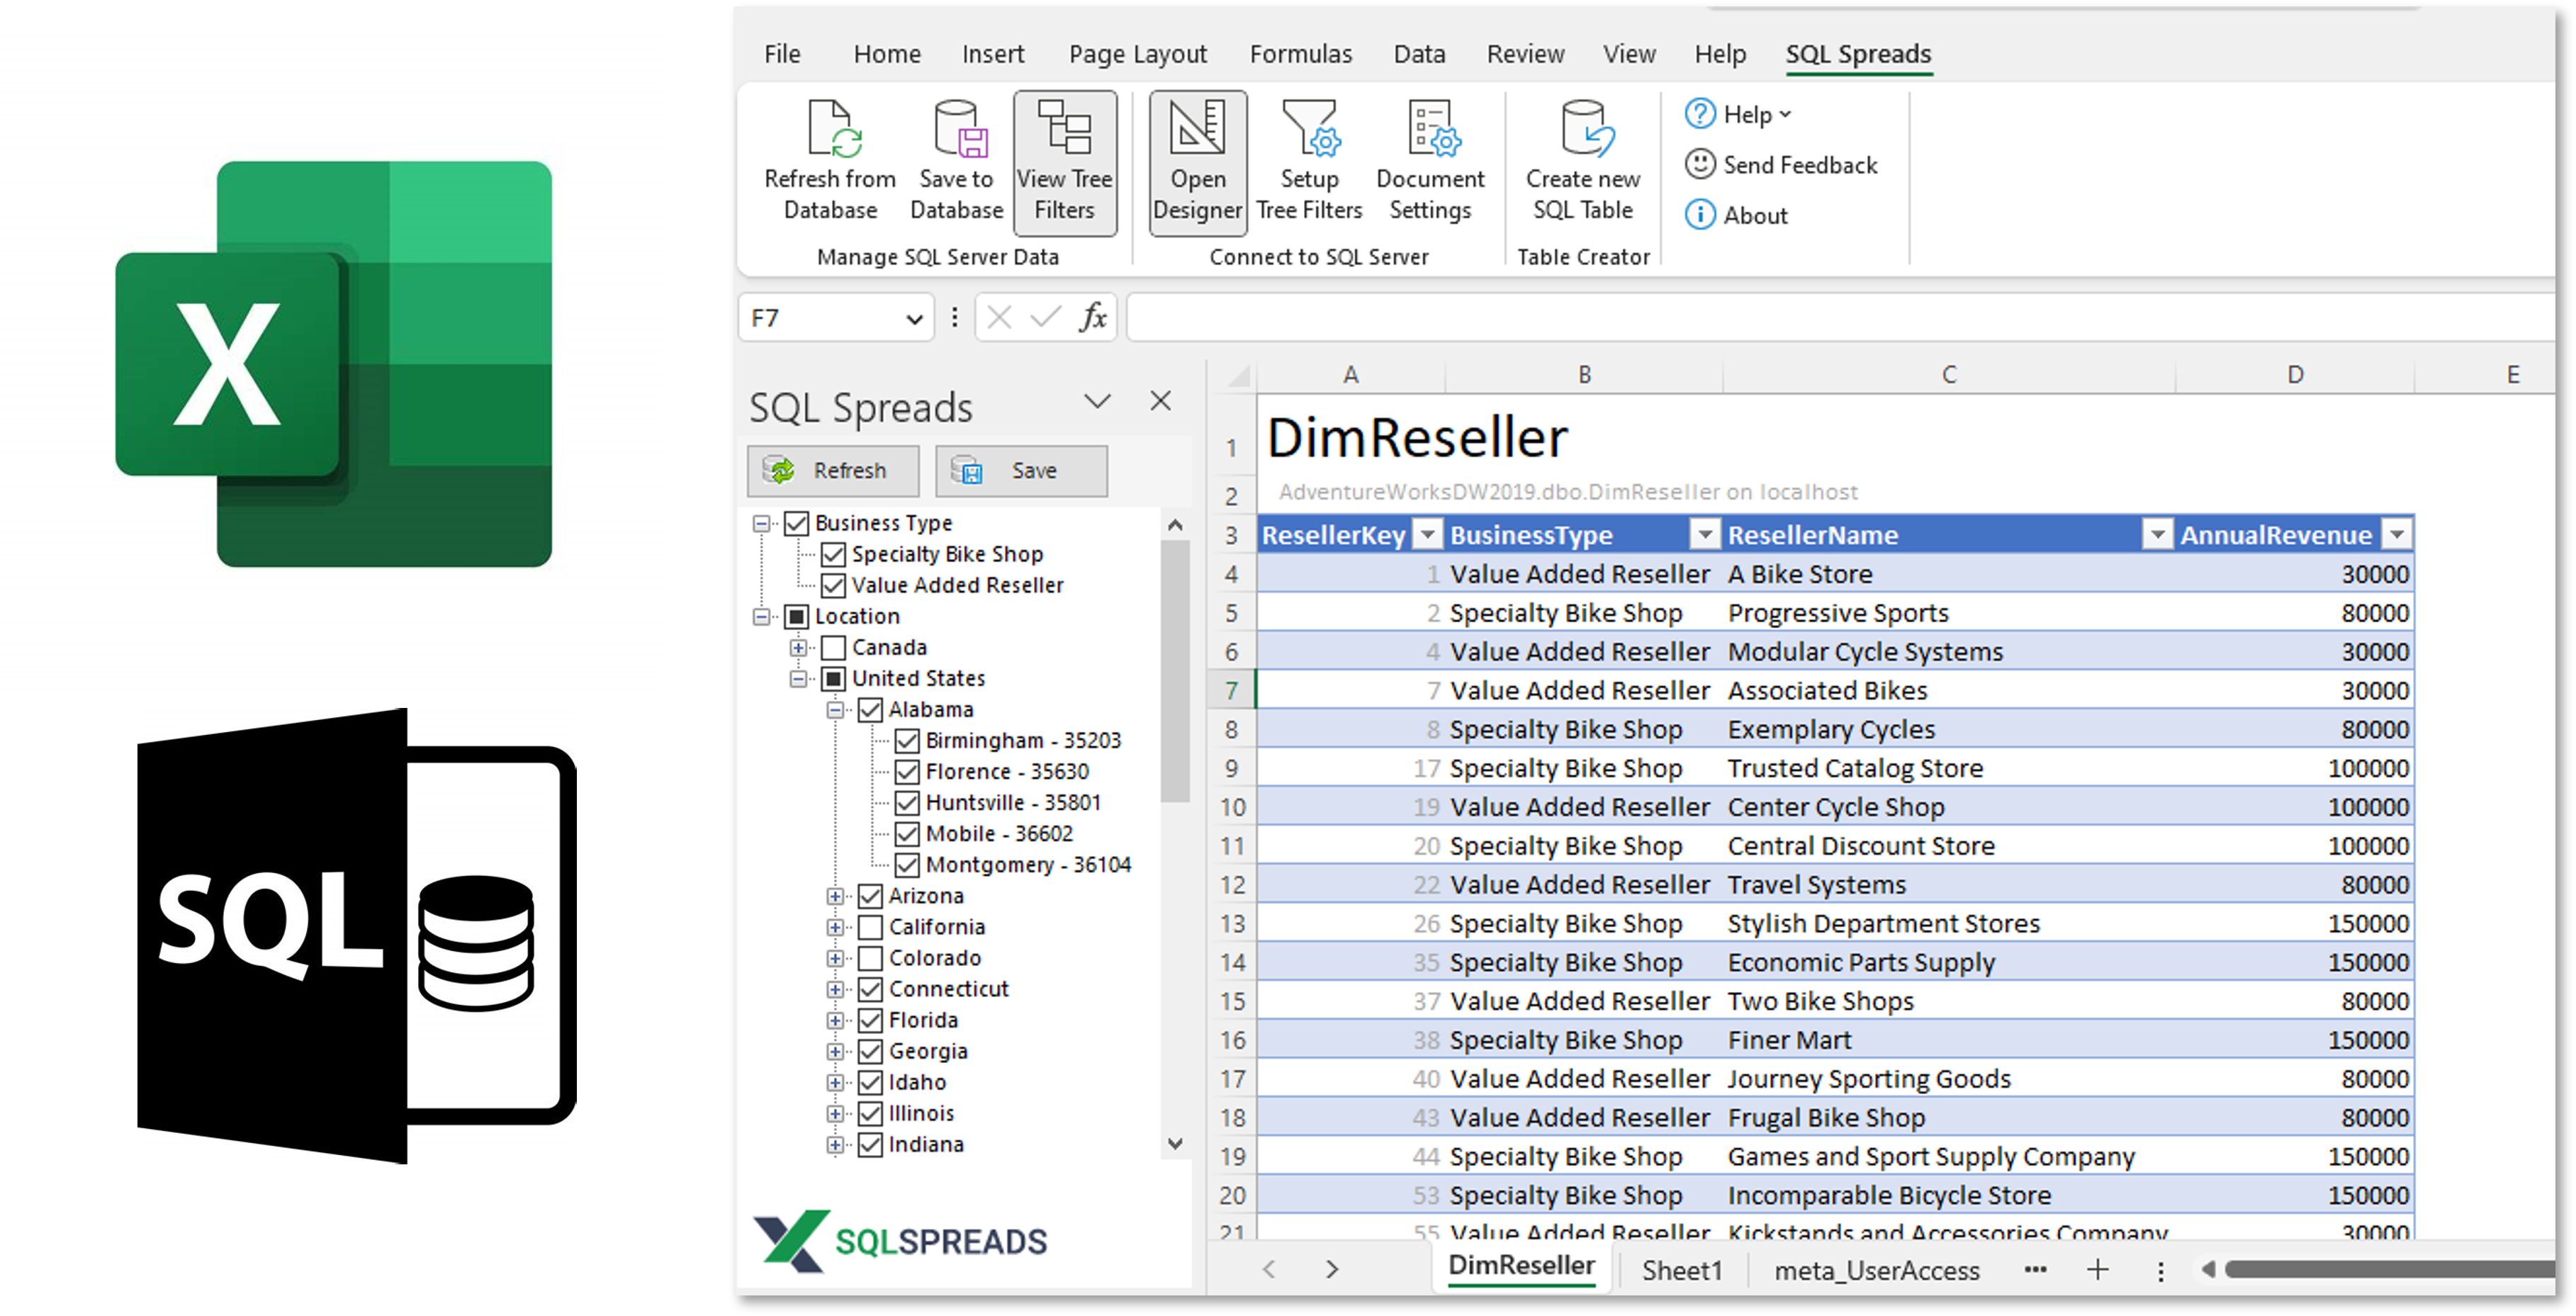
With the rise of data democratization in the workplace, more people across the organization are working with datasets on a day-to-day basis. SQL Spreads makes this easier for people by letting them use Excel to update and manage data in SQL Server. One of the reasons people enjoy working in Excel is the familiarity of the UI and the ease of use.
In this article we’re going to look at a great UI enhancement in SQL Spreads – tree filters in Excel that allow users to filter SQL data exactly as they need to see it.
What are Tree Filters?
Tree Filters are used in apps when users need to view a list of items, often in some sort of hierarchy. The most common use of the tree filter is, of course, File Explorer in Windows.
In SQL Spreads, Tree Filters can be added to your Excel worksheet used to make it easier for users to filter their data, as an alternative to normal table filters. Tree Filters can also be extended to include hierarchical structures and permissions-based options.
The Tree Filter is created in 2 steps:
- Define a SQL Query that will return the items to be displayed in the Tree Filter
- Add a filter in the SQL Spreads Designer to specify how the results will be filtered
In the following sections, we’re going to assume that you are setting up a data entry environment for your end-users. We’ll use the following tables in the AdventureWorks Data Warehouse in the examples:
- DimReseller
- DimGeography
Basic Tree Filters in SQL Spreads
In this example, we want to add a simple Tree Filter so that users can select which Business Types they want to display in the DimReseller table.
If you haven’t already downloaded and installed the SQL Spreads Add-In for Excel, you can get it here and then follow the instructions here.
Define SQL query to display the items in the Tree Filter
- Load the data from the DimResller table into Excel by connecting to the AdventureWorksDW database and selecting the DimReseller table in the SQL Spreads Designer.
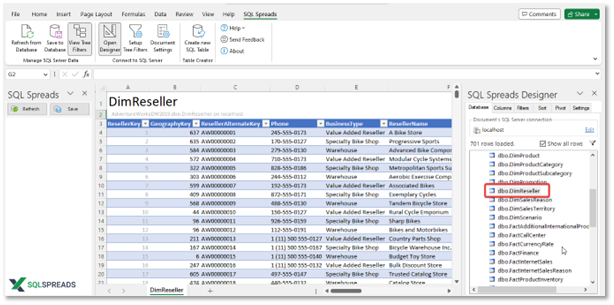
- Click on the Setup Tree Filters button and click on New in the Set Up Tree Filter. Enter the following query into the Edit Tree Filter dialog.
SELECT DISTINCT
[BusinessType] As 'Code',
[BusinessType] As 'Text'
FROM [AdventureWorksDW2019].[dbo].[DimReseller]
The Tree Filter SQL query must return two columns; Text and Code, where Text is the filter items shown to the user and the Code can be used as a key value when filtering the rows to load from the database. In our example we’re not using a key value, so the Text and Code values will be the same.
Note also that we need to include a DISTINCT statement to remove any possible duplicates from the list of returned filter items.
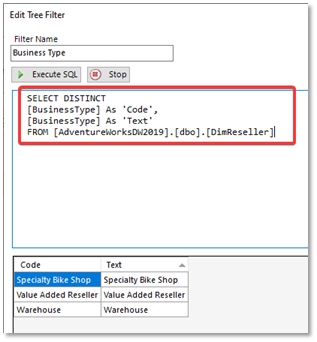
- Enter a name for the filter – e.g. ‘Business Type’ and click Ok. The name will be displayed on the Tree Filter, so it needs to be meaningful to the end user.
- Click Ok again to close the Set Up Tree Filter dialog. The Business Type filter will now be displayed in the left hand pane. The Tree Filter won’t work now – we still need to tell SQL Spreads to filter the table data based on the selection that the user has made.
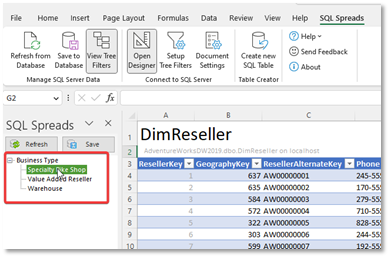
Add a filter in the SQL Spreads Designer
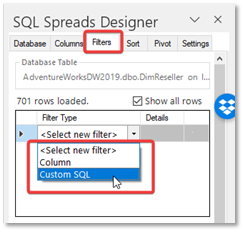
- Click on the Filter tab in the SQL Spreads Designer and select the Custom SQL option from the Filter Type
- In the Custom SQL Filter field at the bottom, add a filter query in the same format as a WHERE clause in a standard SQL query. In the WHERE clause, you need to specify the ‘Code’ parameter that we created earlier when defining the Tree Filter items. To do this, click the Insert button to select from the available parameters.
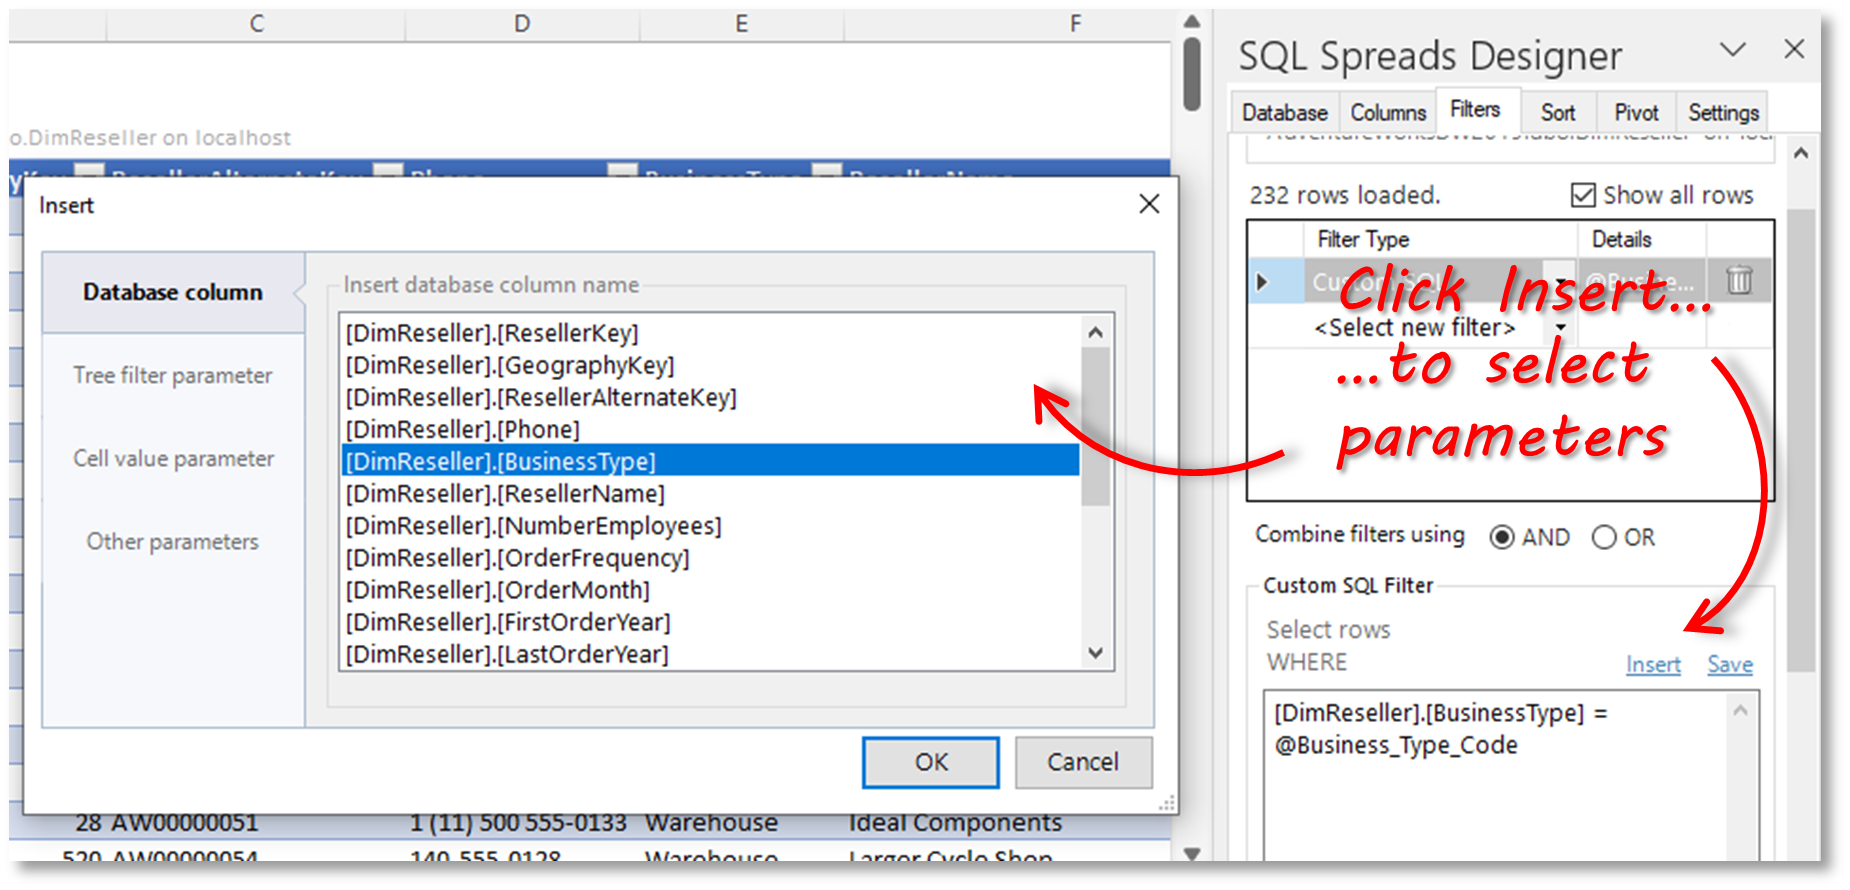
- The WHERE clause should be as follows:
[DimReseller].[BusinessType] = @Business_Type_CodeIn other the words, we want to filter the DimReseller table where the values in the BusinessType column in the table are equal to the value selected by the user in the Tree Filter (@Business_Type_Code).
- Click Save. Now our Tree Filter is working!
Hierarchical Tree Filters
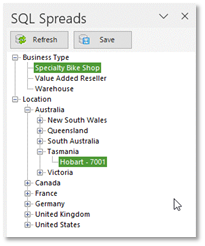
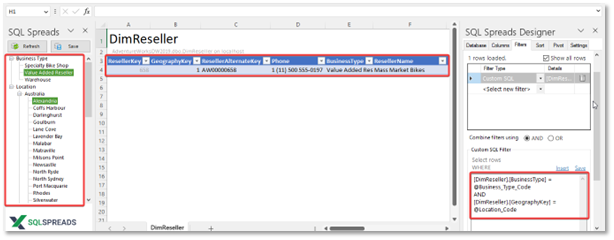
In this example, we’re going to add to our basic Tree Filter to include an additional list of filter items in a hierarchical structure. The end result will look like this – users can therefore filter on Location and Business Type:
Once again, we’re going to create the SQL query that will return the items for the Tree Filter first.
- Click on the Setup Tree Filters button and click on New in the Set Up Tree Filter dialog. Enter the following query into the Edit Tree Filter dialog.
SELECT
DISTINCT [City] + ' - ' + [PostalCode] AS Text,
[GeographyKey] AS Code,
[EnglishCountryRegionName] AS Group1,
[StateProvinceName] AS Group2
FROM [AdventureWorksDW2019].[dbo].[DimGeography]
ORDER BY Group1, Group2, Text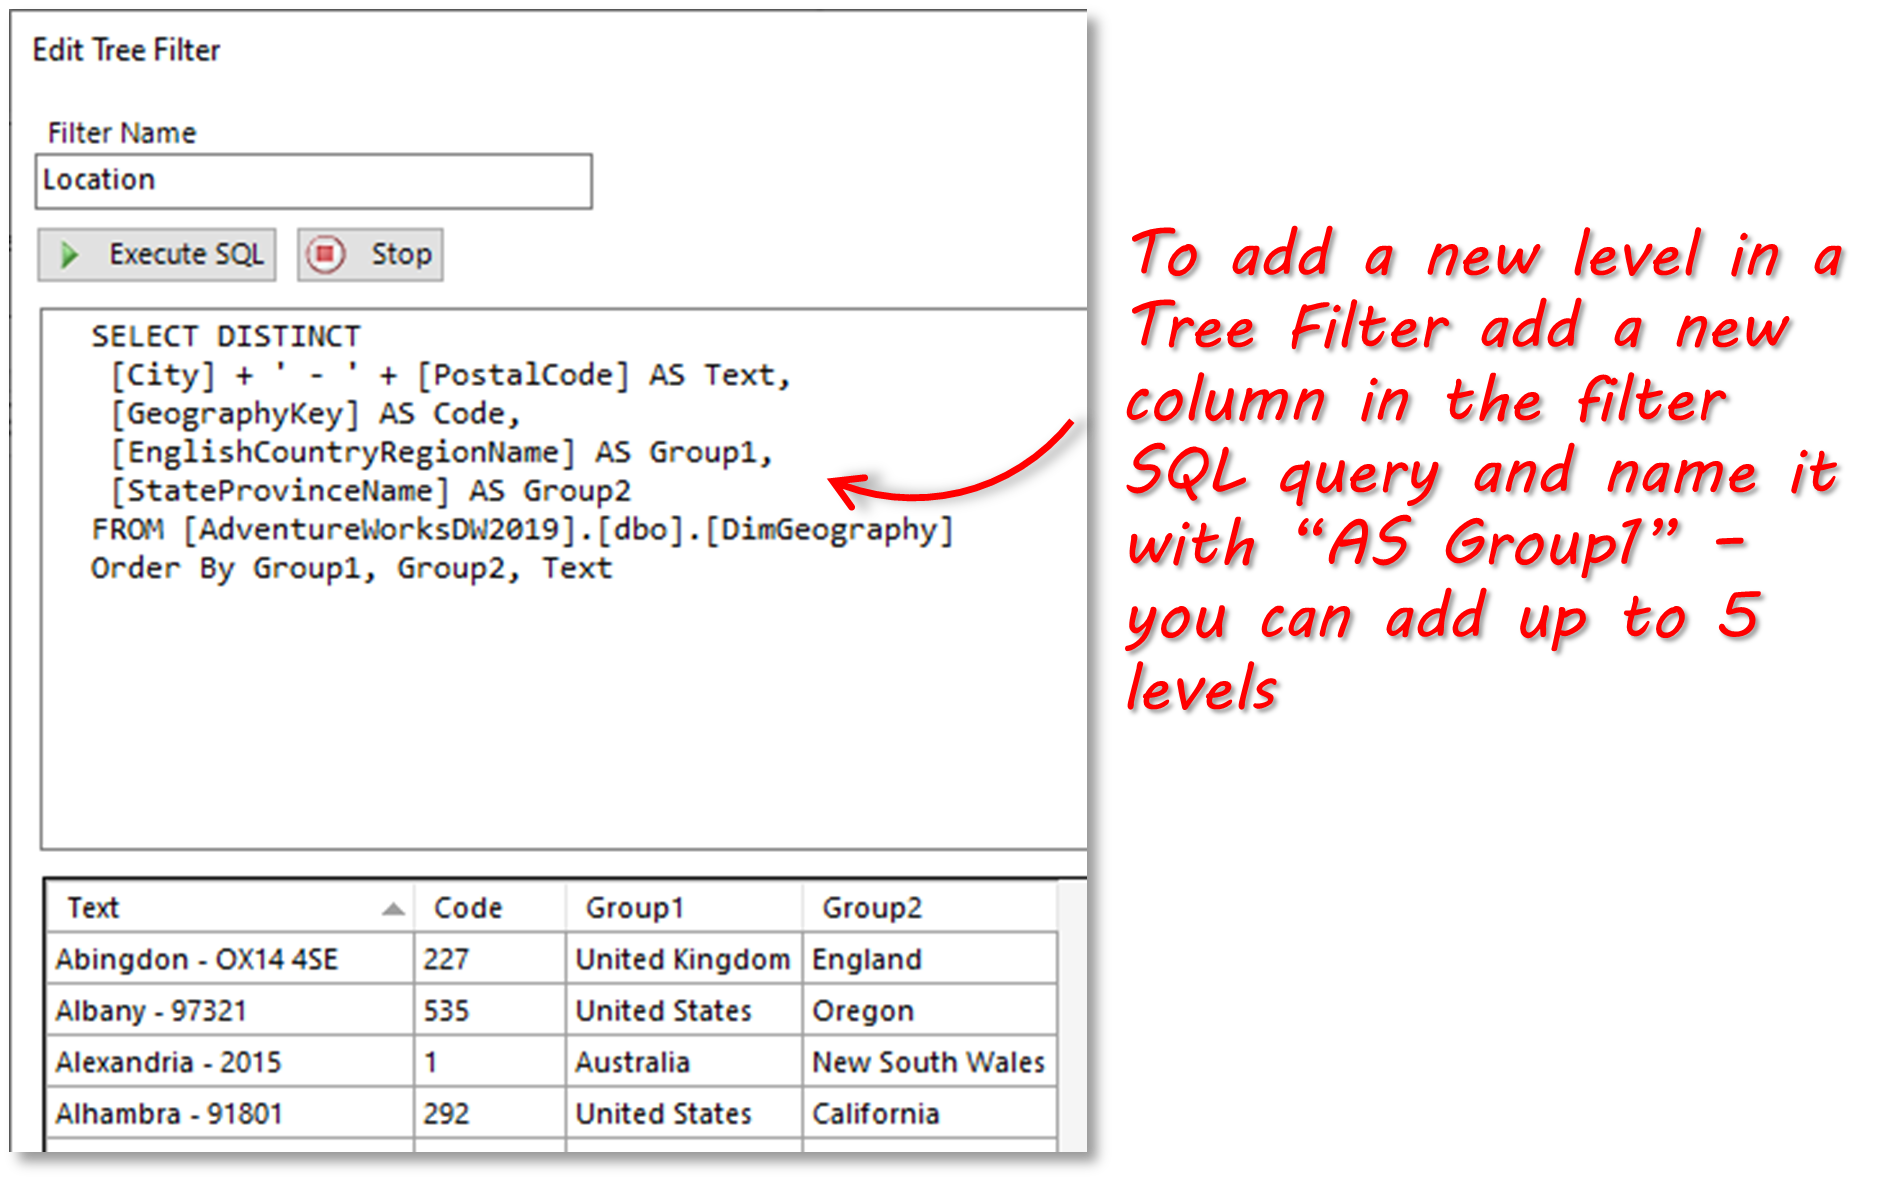
Note that we can change the order in which items are displayed in the Tree Filter by including an ORDER BY statement.
- Enter a name for the filter – e.g. ‘Location’ and click OK.
- Click OK again to close the Set Up Tree Filter dialog. The Location filter will now be displayed below the Business Type filter in the left hand pane – note that you can change the order that the filters are displayed, by using the Up/Down buttons in the Setup Tree Filters dialog:
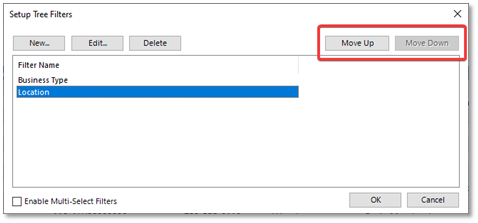
The Location Tree Filter won’t work now – we still need to tell SQL Spreads to filter the table data based on the Business Type and Location selections that the user has made. We do this by editing the existing Custom SQL filter that we created earlier. - Click on the Filter tab in the SQL Spreads Designer and select the Custom SQL Filter that we created earlier. In the query editor box, change the WHERE clause to the following:
[DimReseller].[BusinessType] = @Business_Type_Code
AND
[DimReseller].[GeographyKey] = @Location_Code
This clause specifies that we want to filter the DimReseller table based on both the BusinessType and Location filter items that the user has selected. We could change it so that it will filter based on either of the filter items selected by using an OR statement instead of the AND statement.
- Click Save. Now when you select a Business Type and a Location from the Tree Filter, the table will be filtered accordingly.
Multi-Select Tree Filters
It is often the case when using Tree Filters that you want the user to be able to select multiple individual filter items, or to toggle to show all items. This is where the new multi-select tree filter functionality introduced in version 7.0 of SQL Spreads comes in handy.
In this example, we’ll extend the hierarchical Tree Filter to include a multi-select option.
- Click on the Setup Tree Filters button. In the bottom left-hand corner of the dialog is a check box labelled ‘Enable Multi-Select Filters’. Check this and click OK.
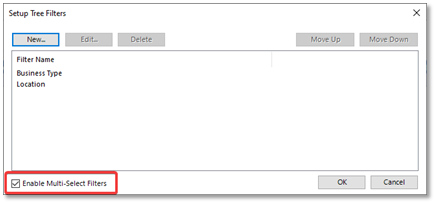
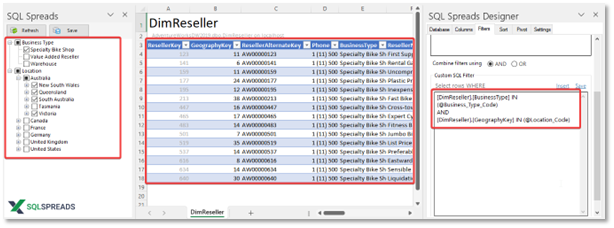
- The Tree List filter items now have checkboxes next to them to enable the user to select multiple individual items, or all items at a group level.
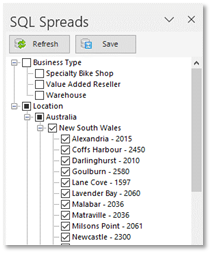
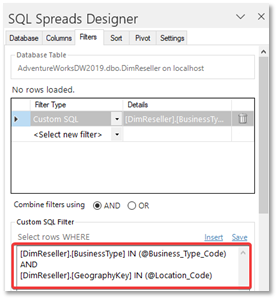
- Before we can use the multi-select functionality, we need to update the custom filter query in the SQL Spreads Designer. Here is the new query that we’ll need to use:
[DimReseller].[BusinessType] IN (@Business_Type_Code)
AND
[DimReseller].[GeographyKey] IN (@Location_Code)
You can see that we need to use an IN statement – this is because the user is selecting multiple items as a list , not a single item.
- Click Save. Now you can use your multi-select Tree Filter! In the screenshot below I have chosen to display all Resellers of type ‘Speciality Bike Shop’ in all Australian states except Tasmania.
Restrict Users Access to a Tree Filter
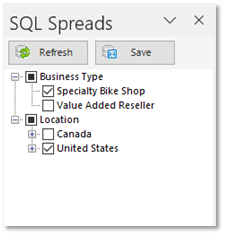
Sometimes you may want certain users to only see specific items in the Tree Filter that is displayed to them. This could either be to prevent them seeing sensitive data (e.g. financials), or to hide items that are not relevant to them (e.g. certain geographical regions). An easy way to achieve this in SQL Spreads is to add row-wise user access to a Tree Filter.
In order to create the user access, we first need to create a User Access table in SQL Server that controls each user’s access to items in the Tree Filter. Secondly, we need to update the SQL query for the tree filter to include a reference to the User Access table. Note that once it has been created, the records in the User Access table can be maintained from Excel using SQL Spreads.
Create the User Access table
We’re going to enter the data for the User Access table in Excel, and then use the SQL Spreads Table Creator feature to create the table in SQL Server.
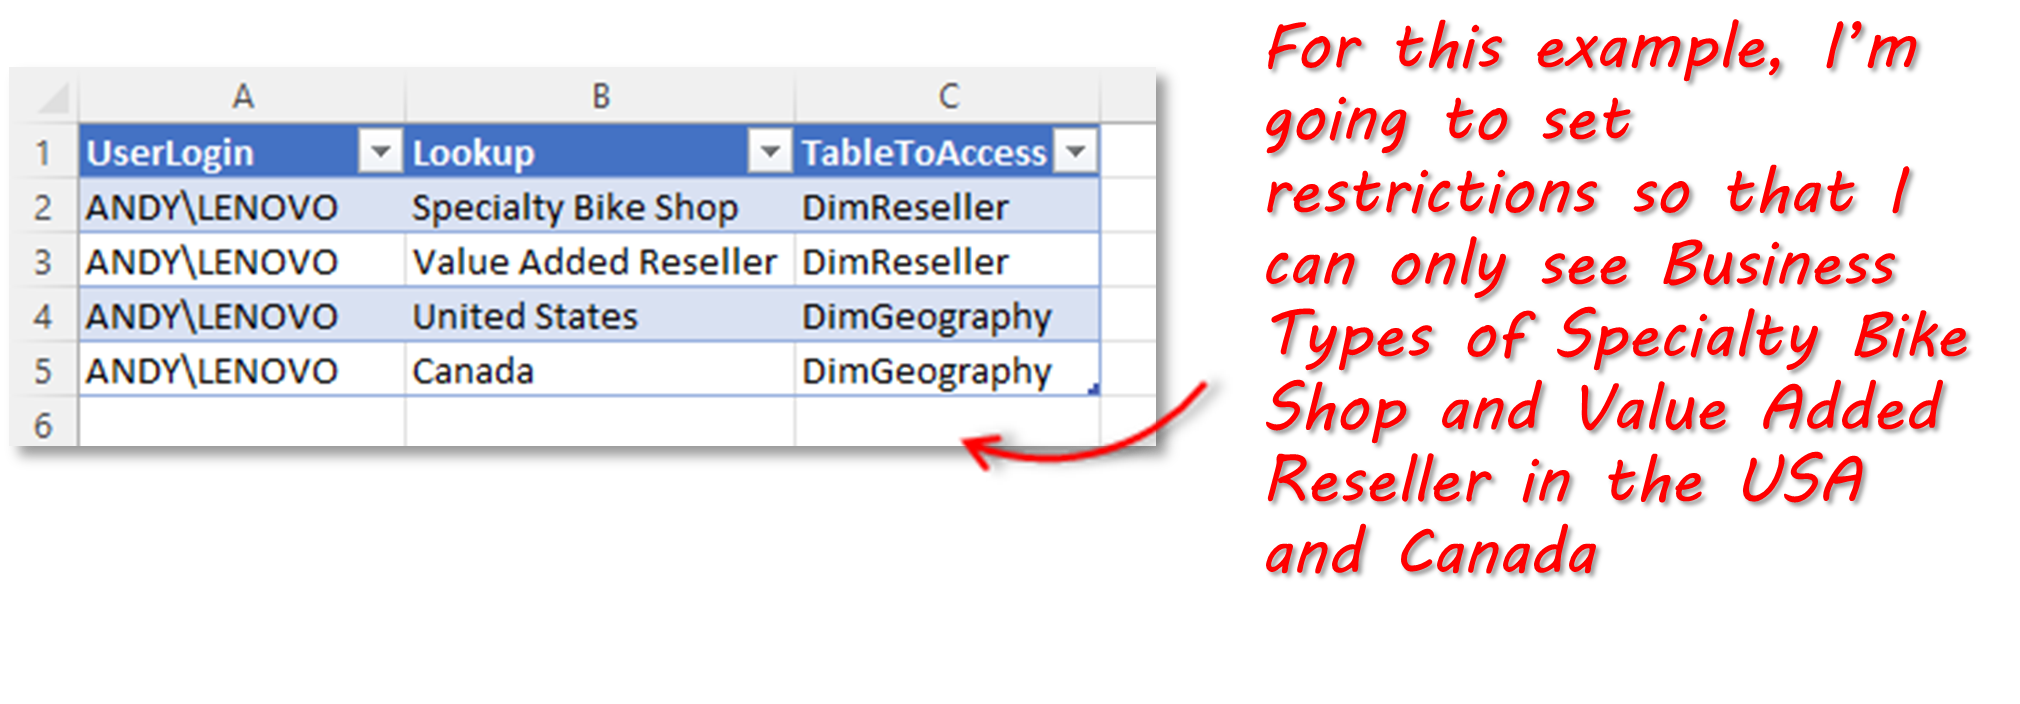
- Create a table in Excel with the following columns:
- UserLogin – This will store the User’s Windows Login in the format Domain\UserName
- Lookup – This will store the Filter items key or code/text value that we want to give the user access to
- TableToAccess – This will be the table that this user access row is valid for (by adding this column we can use the same access table for several filters or tables)
- Click the Create New SQL Table button in the SQL Spreads tab in Excel

- In the Create SQL Server Table dialog enter a name for the table (e.g. meta_UserAccess) and select an existing database to create the table in.
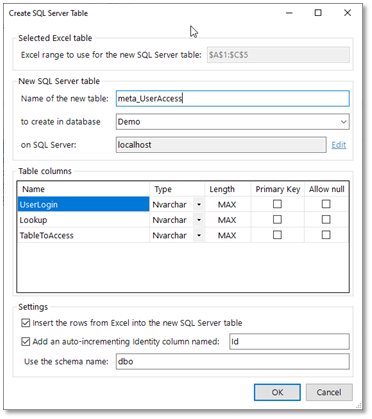
- Click OK to create the table in SQL Server
Update the Tree Filter SQL Queries
We now need to alter the SQL code that retrieves the Tree Filter items from the database so that it does a look-up to our access table (meta_UserAccess).
The row-wise security will always use the Windows Login name of the authenticated user that is running Excel, so it will be independent of how you connect to SQL Server. The parameter @WindowsUser that is used in the example contains the authenticated Windows user’s name (in the format DOMAIN\LOGIN).
Here is the revised code for the Business Type Tree Filter:
SELECT DISTINCT
[BusinessType] As 'Code',
[BusinessType] As 'Text'
FROM [AdventureWorksDW2019].[dbo].[DimReseller] as BusinessType
INNER Join [Demo].[dbo].[meta_UserAccess] as Access
ON BusinessType.BusinessType = Access.Lookup
WHERE
Access.TableToAccess = 'DimReseller'
AND Access.UserLogin = @WindowsUser
And here is the revised code for the Location Tree Filter
SELECT DISTINCT

[City] + ' - ' + [PostalCode] AS Text,

[GeographyKey] AS Code, [EnglishCountryRegionName] AS Group1,

[StateProvinceName] AS Group2

FROM [AdventureWorksDW2019].[dbo].[DimGeography] as Geography

INNER Join [Demo].[dbo].[meta_UserAccess] as Access

ON Geography.EnglishCountryRegionName = Access.Lookup

WHERE Access.TableToAccess = 'DimGeography'

AND Access.UserLogin = @WindowsUser

Order By Group1, Group2, Text
Here is what our Tree Filter now looks like with the row-wise user security in place:
Summary
In this article we’ve looked at one of the ways SQL Spreads makes it easier for users to view and maintain data in SQL Server – the use of Tree Filters to filter data. Tree Filters are easy to set up in SQL Spreads and intuitive for end users to use. The new multi-select feature makes Tree Filters in SQL Spreads even more powerful.
If you’re a SQL Spreads user and haven’t tried using Tree Filters before, give it a go – your end-users will thank you! If you’re not currently a SQL Spreads user, download the trial version and give it a try today.


