End users love working in Excel. They know the tool, and they are free to do what they want. That’s the heart of the much-loved Excel application, but also the start of problems for the people taking care of the data. When there is no structure in place, the result is that your data lies outside of your centralized system in many different Excel sheets. This adds no value to your business’ reporting and core strategy. Take a look at how to import that data from Excel to SQL Server.

There is a major drive around the world to get this unstructured, floating data imported back into a centralized database, such as SQL Server. In this comprehensive guide, we show you how to leverage Excel and SQL Server with different tools and methods. The focus is on the SQL Spreads Excel Add-In which ends up being the simplest way, time and time again, to import data from Excel to SQL Server.
Overcome Excel challenges: Import Data to SQL Server
Usually, the updating or collecting of some “not-available-in-our-systems” data from colleagues is often done by mailing out some Excel file or putting a spreadsheet on a file share. This process works well as an Excel spreadsheet is easy to understand, manipulate and share.
But, the freedom to add cells and enter “whatever-you-like” values causes huge problems when trying to centralize, store and summarize the data in a structured way.
When users update data in an Excel spreadsheet that should be saved or updated in an SQL table, problems like these usually occur:
- Cells in the spreadsheet can contain invalid data types.
- There will be problems when users change the layout of the sheet.
- Difficulties to keep track of previous versions of the Excel spreadsheet.
- Hard to track who has changed a specific value in a sheet.
- Troublesome to extract Excel data (with a tool such as SSIS).
- There can be a delay of several hours between when a user enters the figures and when they appear in the database.
In finance, IT and other fields, structured data is a vital part of the operations. In those fields, there is a way that you can — literally in minutes — let your end-users update data in structured SQL tables themselves – using Excel. No coding experience or extensive training is necessary.
Why should you connect Excel to SQL Server?
A simple way to connect Excel to SQL Server is through an Add-In. SQL Spreads is like a bridge between Excel and SQL Server, making it easy for users to update SQL Server data right from Excel. With SQL Spreads, you can connect Excel directly to SQL Server to view and edit data. You can even perform tasks like adding or deleting entries. It’s packed with features like filters, validation, and auditing to ensure data accuracy and security. Plus, it includes handy tools for basic SQL Server tasks, all accessible within Excel.
To demonstrate the benefits of connecting Excel to SQL Server using SQL Spreads, let’s look at an example.
It is a common requirement for a BI department to update certain dimension tables for a business periodically. This could be a DimProductCategory, DimCustomer or DimEmployee table. It would be much easier to get the business data owner to update it directly into SQL Server from Excel.
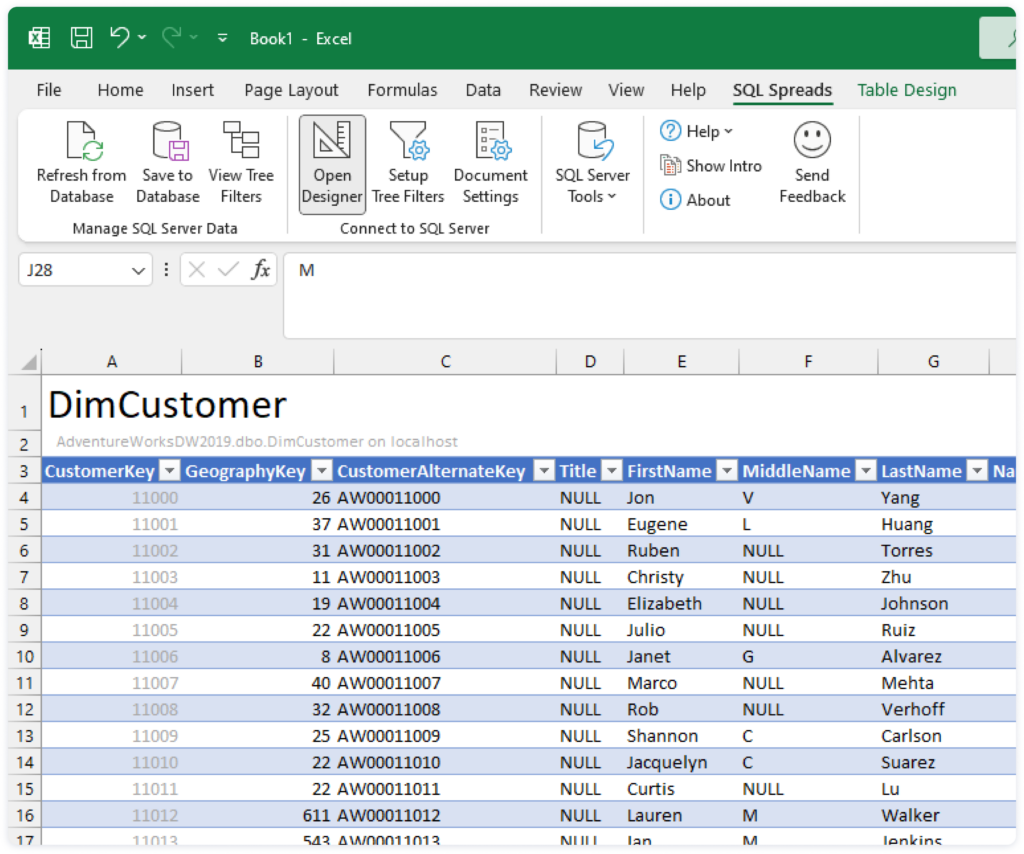
So, to summarise, the benefits of connecting Excel to SQL Server are:
- To have access and view up-to-date information
- Using one single, trusted data source
- Perform on-the-fly analysis or aggregation of the source data using simple Excel functions like pivot tables
With that in mind, the benefits of using a tool like SQL Spreads are:
- Quick and easy to get a production-ready solution setup
- Foster a culture of accountability and reliable data
- Adapt to changing requirements easily for new projects
- Easy to work with relational data
- User adoption made easy with familiar Excel platform
- No coding required
- Rely on top notch Microsoft security mechanisms
Which capabilities are required to import data from Excel to SQL?
In this section, we’ll explore the toolbox of SQL Spreads, a neat solution for executing data operations with finesse by any end user. Whether you’re inserting new data, updating existing records, or navigating through large datasets, SQL Spreads has got the tools you need. We will take you through the steps of how to get up and running on SQL Spreads to better show you the inner workings of each capability.
Connect Excel to SQL Server
Firstly, you would need to get connected to your database from within Excel. First, you need to install SQL Spreads. And to be able to do this, you need to download the free 14-day trial. Now you are ready to follow the step-by-step guide below:
Step 1: Gather the database connection details
You’ll need the following information to connect Excel to SQL Server, so make sure that you have this on hand:
- SQL Server Name
- Database Name
- Table or View that contains the information you need
- Login details (if not using Windows authentication)
The form of the SQL Server Name will depend on whether SQL Server is installed locally, on a network, or a remote location. Note that this is the same name as when you connect to SQL Server in SQL Server Management Studio.
| Typical server name | Case |
| Localhost | When SQL Server is installed locally |
| localhost\sqlexpress | When SQL Server Express is installed locally |
| Domain\Servername | When SQL Server is installed in a corporate network |
| IP-address | When SQL Server is installed in a remote location |
| myazuresql.database.windows.net | When using Azure SQL Server |
Step 2: Connect to SQL Server
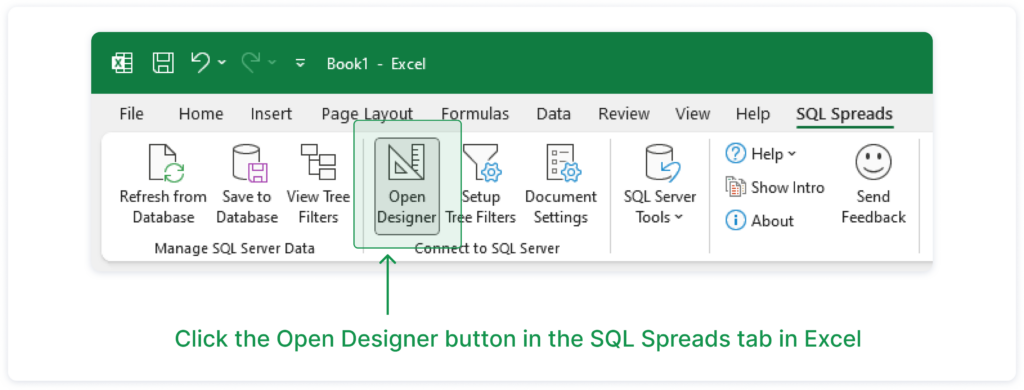
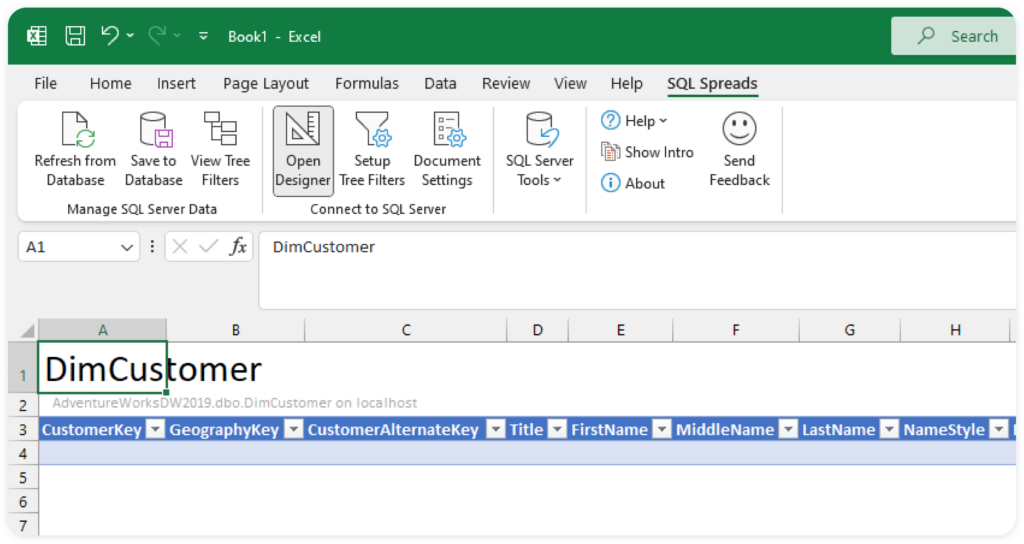
Once SQL Spreads is installed, you’ll see it as a new ribbon tab; go here and click the Open Designer button.
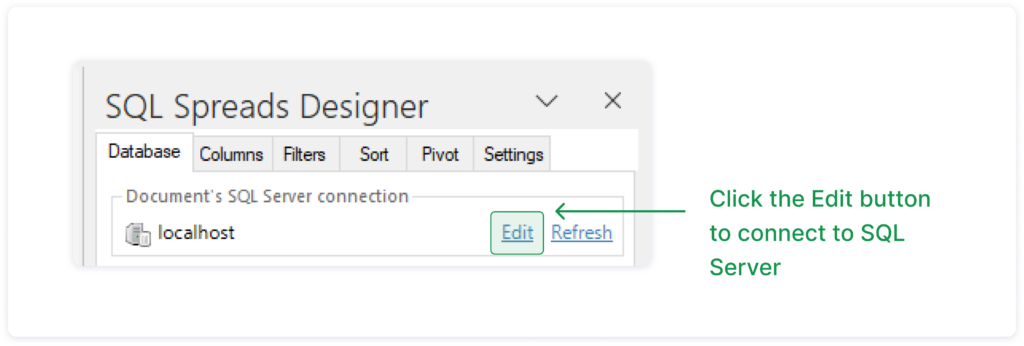
In the SQL Spreads Designer panel on the right side, click the Edit button to open the SQL Server connection dialog.
Enter the name of your SQL Server into the SQL Server name field:
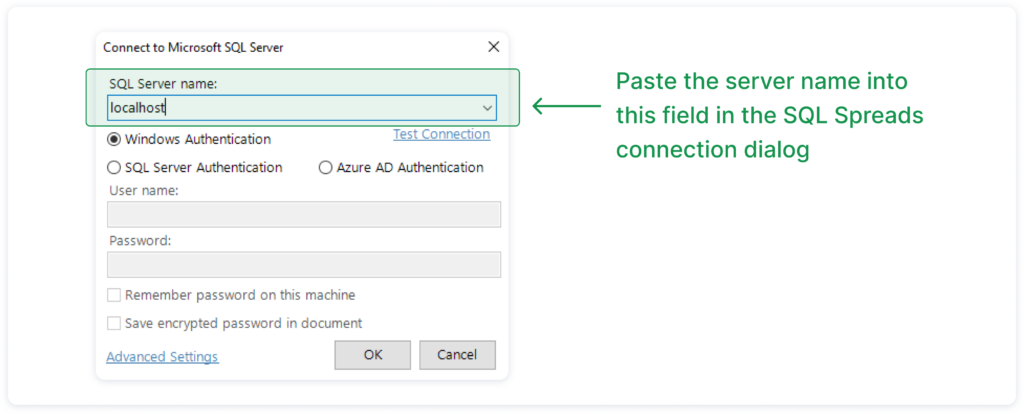
Select if you should connect using your Windows login (Windows Authentication), or enter a user name and password (SQL Server or Azure AD Authentication). Azure AD authentication is the more secure of the three options.
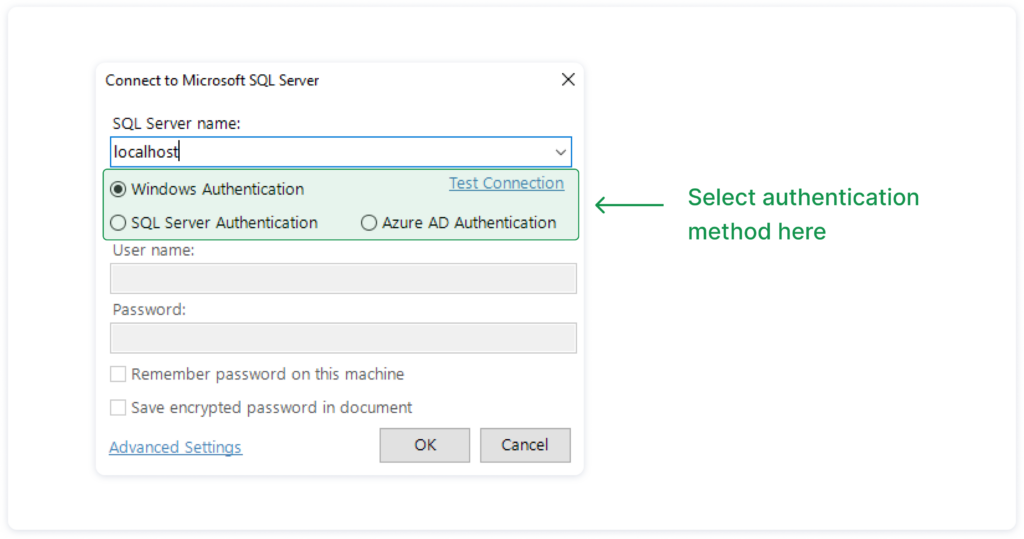
Click OK. SQL Spreads will try to connect to the database. If the connection is successful, your databases will show up in the SQL Spreads Designer panel.
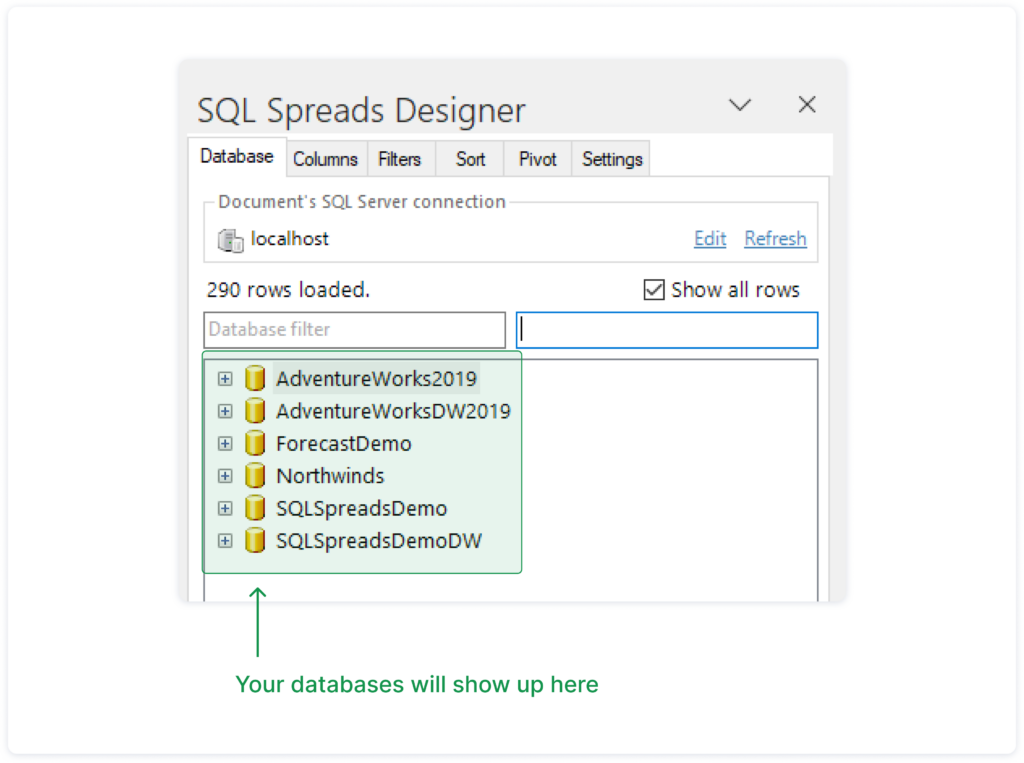
Step 3: Select the relevant table in SQL Server
Now that we’ve created the connection from Excel to SQL Server, we can select which table of data we want to use in Excel. In the SQL Spreads Designer, click on the database and then select your table.
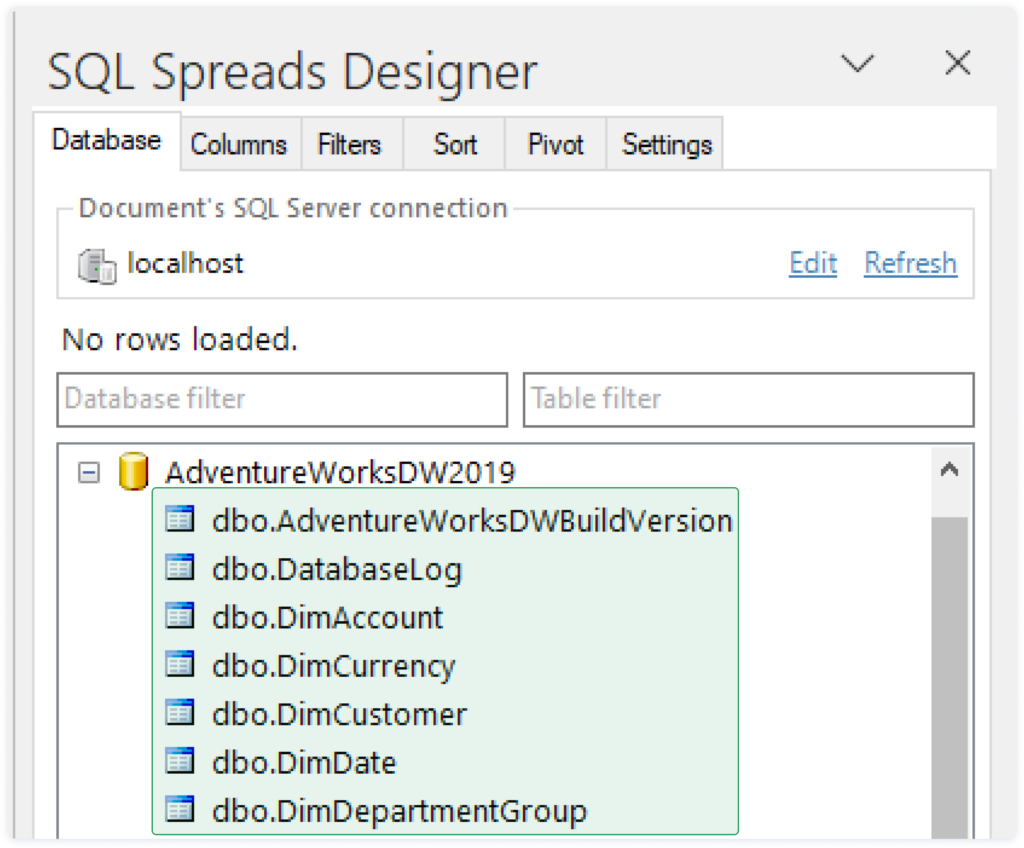
As soon as you select a table, the data in the table is populated in the Excel sheet. Luckily, SQL Spreads works on the premise of a Primary Key recognition. So if this is setup in your database, then the table will load automatically. Now, you can see all the data in your SQL Server table and use it in your Excel workbook.
Inserting data into SQL Server
This is where you start to see the real power behind SQL Spreads – the ability to insert new data in a table in SQL Server directly from Excel.
Once you have selected your table from the SQL Spreads Designer, you are ready to import your new data into SQL Server. Firstly, scroll down to the first empty row and type in your new data. Or you can just paste a set of rows copied from another Excel workbook:
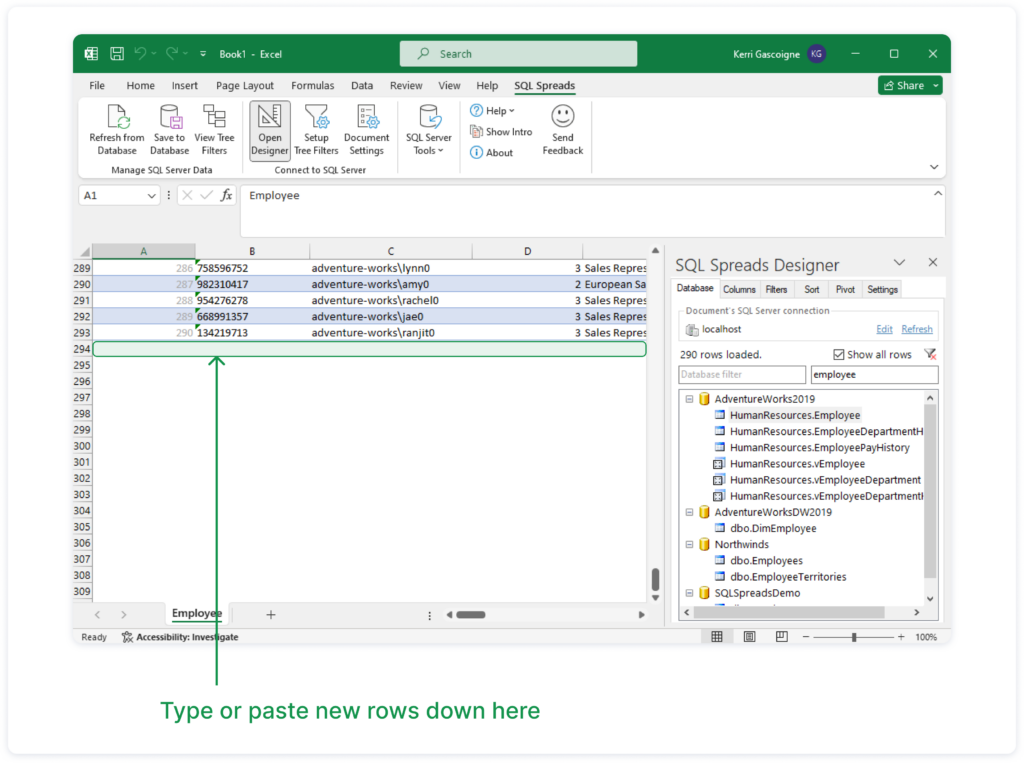
Once you’ve added or pasted the new rows, click the ‘Save to Database’ button. This will get all of the changes written to the table in SQL Server.
The built in data validation will prevent any incorrect data types being entered and saved back to the database. An error message will pop up and the end user will have to enter the correct data type. This makes sure that the data is accurate and reliable.
Take a look at our blog article How to insert data from Excel to SQL Server for details on inserting data into SQL Server tables.
Bulk insert of data into SQL Server
We’ve seen how easy it is to insert a new row into SQL Server using SQL Spreads. And it is just as easy to do a bulk insert. You can copy and paste multiple rows into SQL Spreads and then click on the Save to Database button. This will then import the data into SQL Server just as you did with inserting one row at a time.
Often there are times when you want end users to do a bulk insert without updating existing data. This can be achieved by enabling the Only allow inserting new rows option in the SQL Spreads settings.
Once this has been enabled, an end user will only ever see a blank table in front of them. They will copy and paste multiple rows into the table and click on Save to Database. This will finalize their bulk insert into SQL Server. Once the save has processed, the rows will be removed from the table view and will be ready for the next bulk insert.
Update existing data in SQL Server
Now that you have learnt how to connect and insert data from Excel to SQL Server using SQL Spreads, it is time to update your existing SQL Server tables and Views.
To set up an Excel document to update an SQL table in SQL Server using SQL Spreads, follow these few simple steps:
1. Go to the SQL Spreads tab in Excel and click on Open Designer:

2. A list of databases will appear on the right. Choose the database you are using and select an SQL table or View to update from Excel.
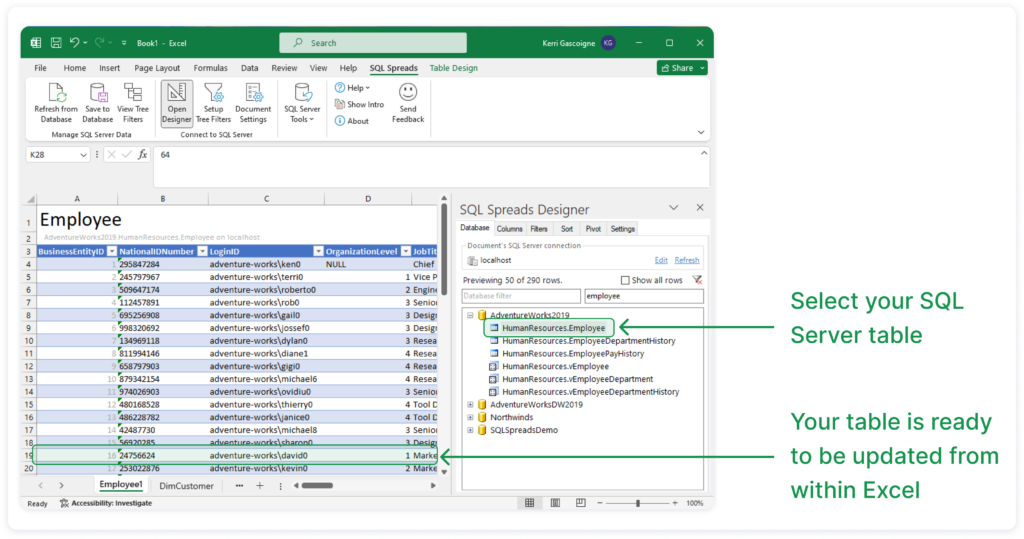
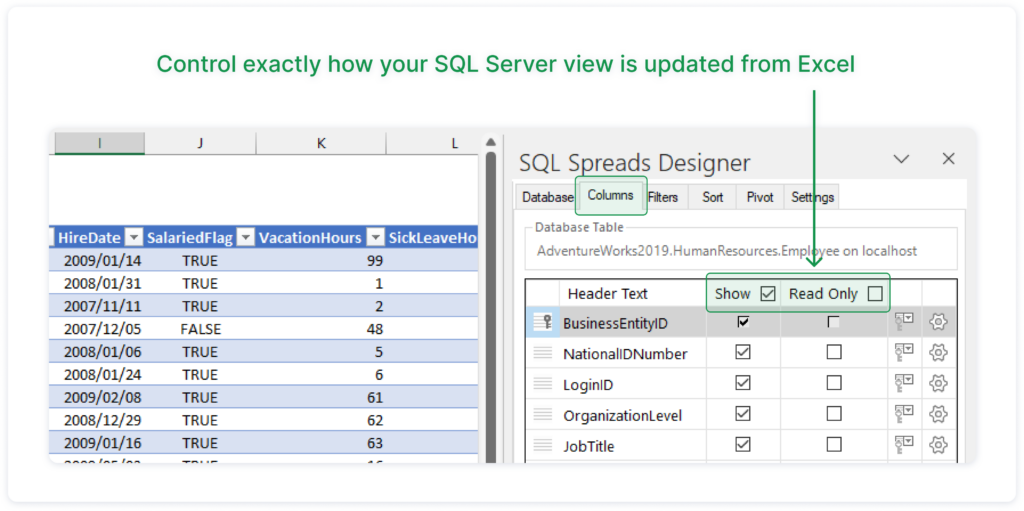
3. From the Columns tab you can fine-tune how your table is presented in Excel. You can select the columns you want to update, rearrange them into the order you prefer, and change their names if desired.
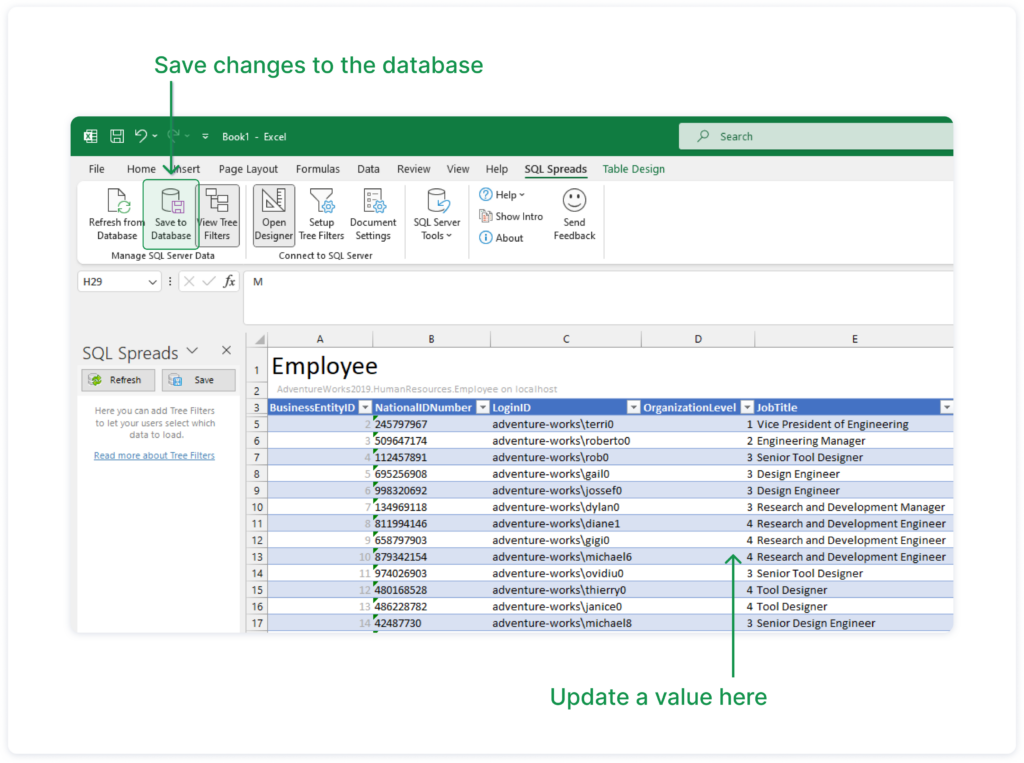
4. When you are finished fine-tuning your table, go to the spreadsheet and start updating the data from SQL Server. When you press the Save button the changes will be saved back to your SQL Server table. For example, I can update Job Titles in the employee table directly in Excel, and save the changes back to SQL Server!
Read our blog article How to update an SQL table from Excel for more information on each of these steps.
Valuable configuration settings when updating data in SQL
There are several benefits of the Designer to easily connect an Excel spreadsheet to a table in SQL Server. For example:
- Set which columns are editable and which are “read-only”
- Select which rows in the database are loaded into the Excel spreadsheet
- Enable Change Tracking and the application will then insert the date and time when a row is changed, as well as the user making the change.
- Show drop-down lists where the user can select a readable text instead of a key value for columns relating to other tables.
- Working with Views
Deleting data in SQL Server
A lot of the time, end users shouldn’t be able to delete data in a database, and SQL Spreads caters for this. A SQL Spreads Designer can restrict an end user from deleting data by disabling the option to Allow delete rows in the SQL Spreads Designer Settings:
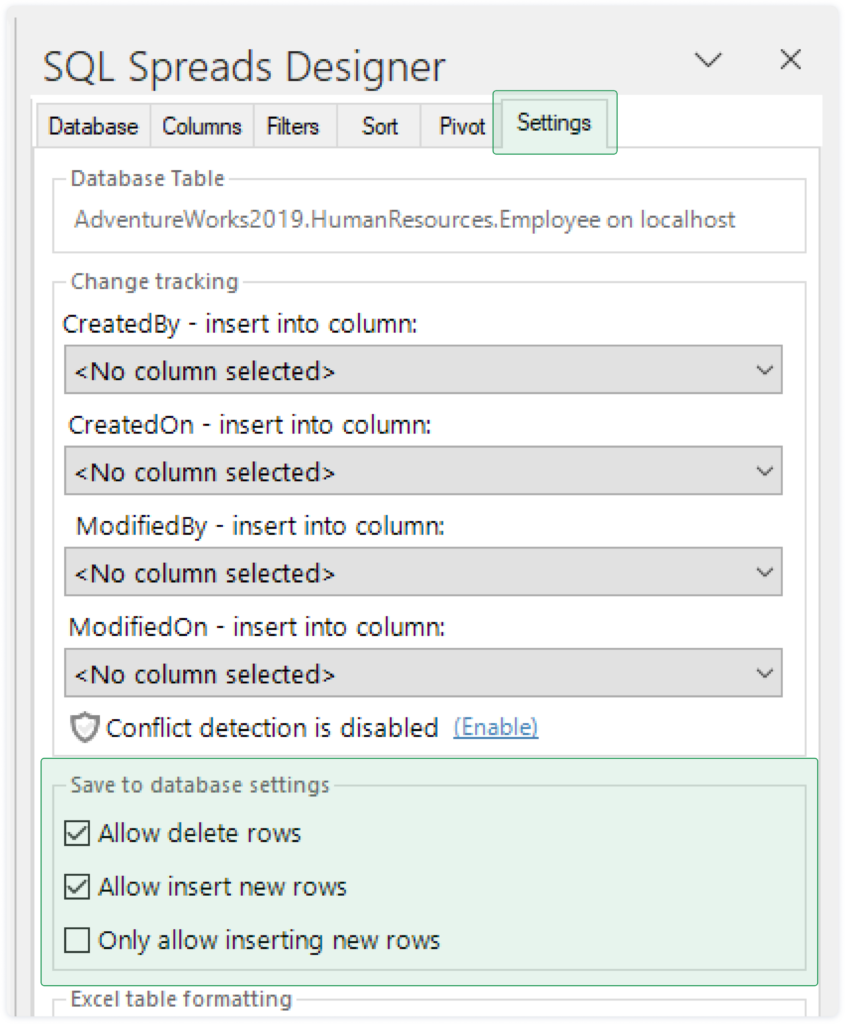
But there are times when you would like an easy way to delete some data in your database. And when you’ve enabled the Delete capability in the SQL Spreads Designer, it is easy to complete this action.
You can delete a value by highlighting the cell and clicking on delete on your keyboard. Once the value has been deleted, click on the Save to Database button. A confirmation dialog will appear making sure you are certain that you would like to save this change back to the database. Once you have clicked on OK, the deletion is saved back to the database.
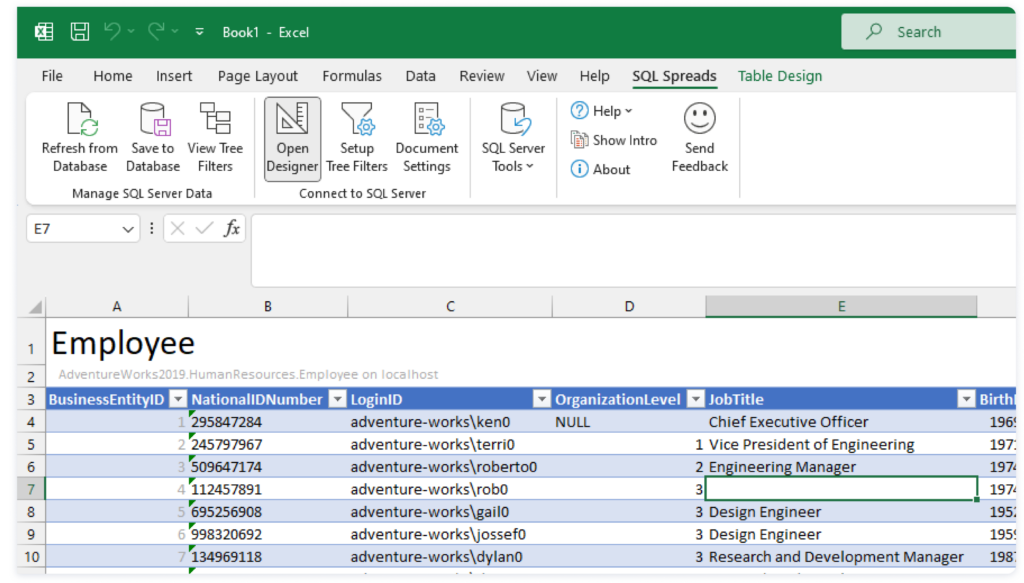
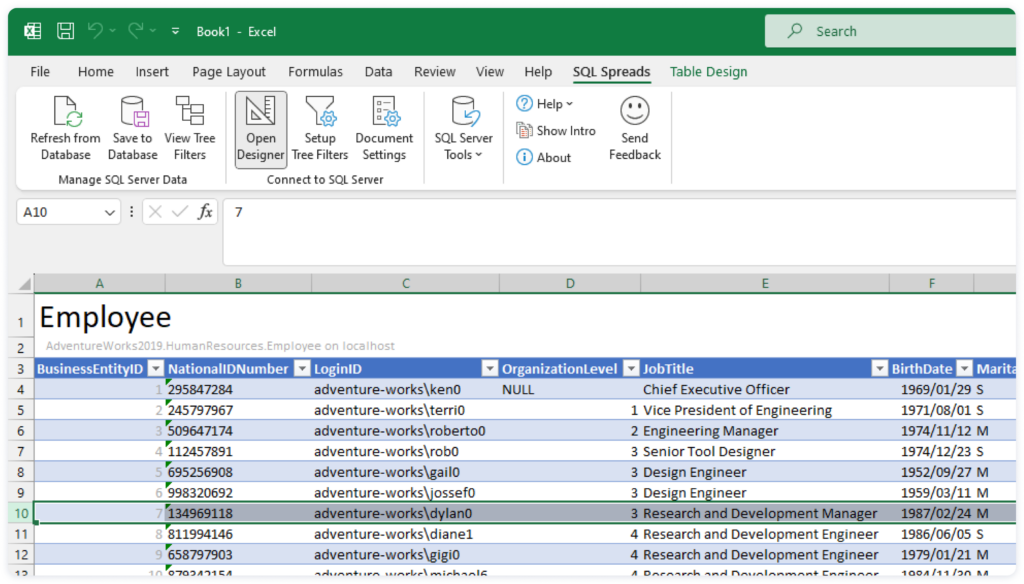
A similar action is required to delete an entire record from a table. Highlight the entire row, click on delete and then click on Save to Database button:
Updating data in large datasets in SQL Server
It is common practice to come across large datasets in organizations. These become problematic to update because of the sheer quantity of data to display. SQL Spreads has come up with a clever solution to this challenge in the form of Tree Filters.
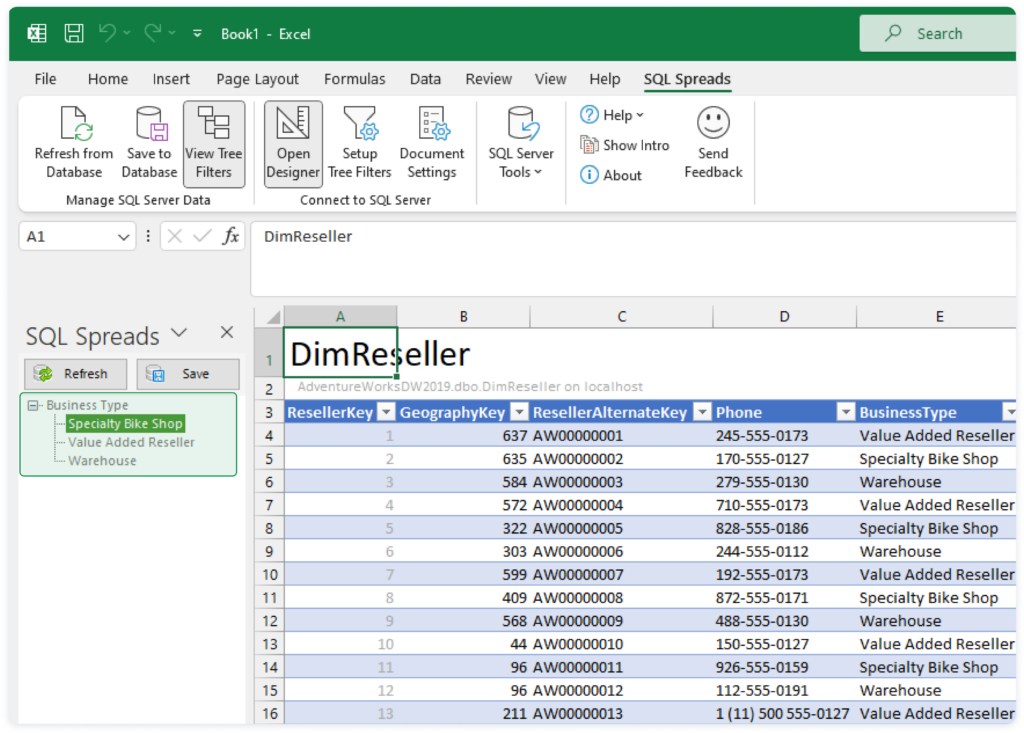
The SQL Spreads Tree-Filters are a powerful data selection feature that enables efficient navigation and selection within extensive datasets, allowing users to precisely filter and load specific data from tables that contain millions of rows. Our blog article Tree Filters: an easy way to view and filter data dives into this topic in quite a lot of detail.
How to setup a Tree Filter for large datasets
We will add a simple Tree Filter so that users can select which Business Types to display in the DimReseller table.
1. Load the data from the DimResller table into Excel by connecting to the AdventureWorksDW database and selecting the DimReseller table in the SQL Spreads Designer.
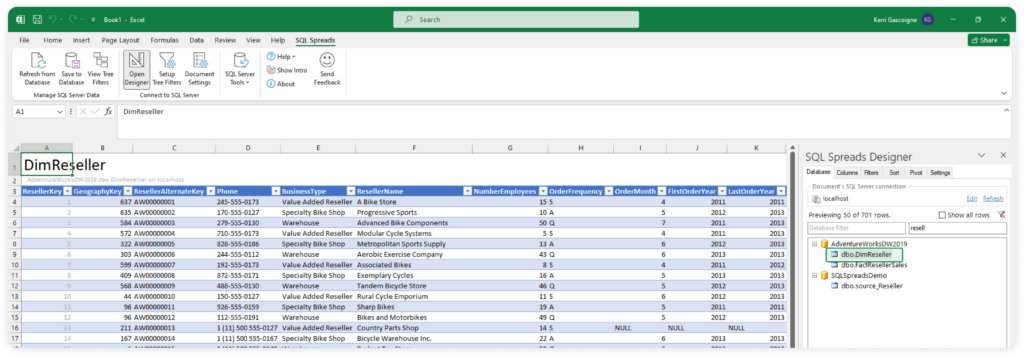
2. Click on the Setup Tree Filters button and click on New in the Set Up Tree Filter. Enter the following query into the Edit Tree Filter dialog.
SELECT DISTINCT

[BusinessType] As 'Code',

[BusinessType] As 'Text'

FROM [AdventureWorksDW2019].[dbo].[DimReseller]
The Tree Filter SQL query must return two columns – Text and Code. Text is the filter items shown to the user. Whereas the Code can be used as a key value when filtering the rows to load from the database. In our example we’re not using a key value, so the Text and Code values will be the same.
Note also that we need to include a DISTINCT statement to remove any possible duplicates from the list of returned filter items.
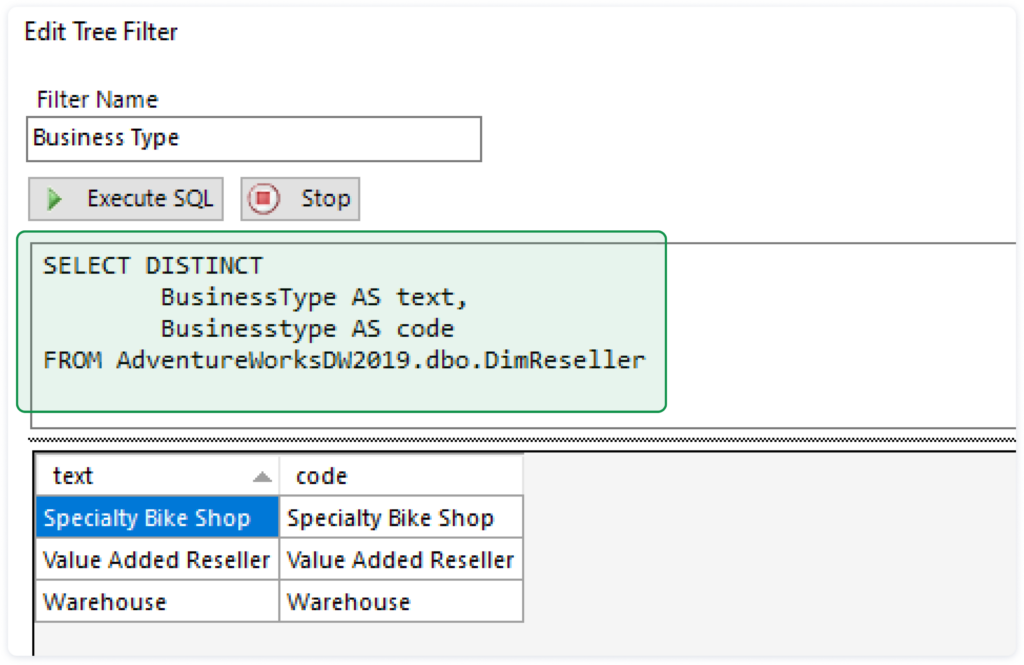
3. Enter a name for the filter – e.g. ‘Business Type’ and click Ok. The name will be displayed on the Tree Filter, so it needs to be meaningful to the end user.
4. Click Ok again to close the Set Up Tree Filter dialog. The Business Type filter will now be displayed in the left hand pane. But the Tree Filter won’t work yet. We still need to tell SQL Spreads to filter the table data based on the selection that the user has made.

Matching and updating records in SQL Server
There will always be cases where you receive an Excel document with data that needs to be updated in a database. A common use case is the need to update prices in a Product table in SQL Server.
Prices are usually updated every quarter or even monthly in some instances. As an example, you would need to update the prices for about 100 products in a database that holds a few thousand product rows. But sometimes the records in the Excel file aren’t easy to match up to the database table making this process a headache. You could manually look up each product by the product key, change the price and maybe a few other columns and then repeat this for your 100 products. But that would be so time consuming!
This is a challenge because how do you easily match those records to update them without spending many hours setting this process up each time? You could write a complicated SQL query each time but that would require a skilled developer. A better, simpler solution is to use the SQL Spreads Matched import solution to automatically update the products in the database.
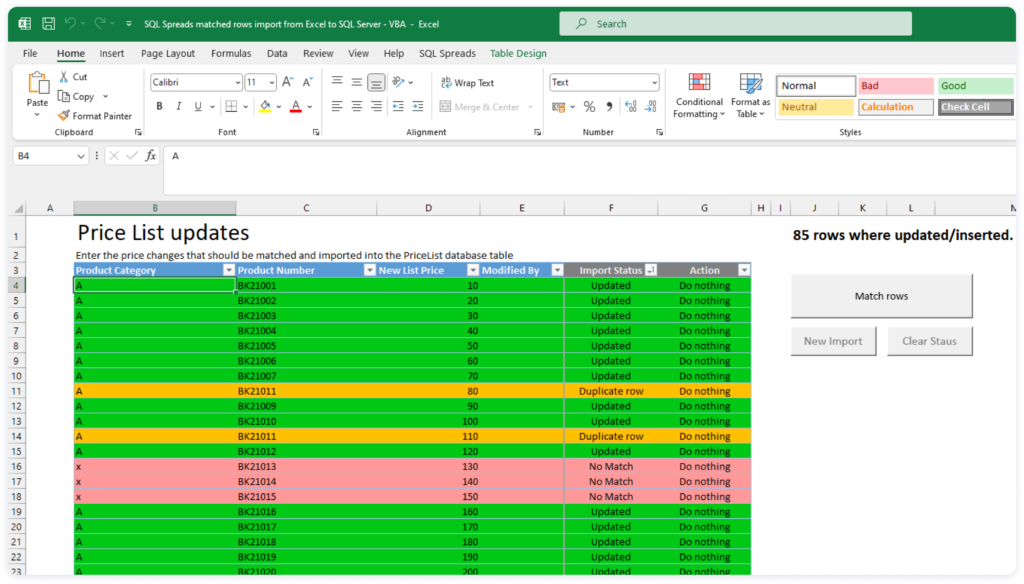
How to setup a matched import solution
These are the steps required to get this solution up and running:
- Download the SQL Spreads Matched Import template.
- Adjust it to match your database table names, unique identifier and Excel file columns
- Copy and paste your Excel file data into the template
- Click the Match Rows button.
- Allocate an Action to any exceptions such as dealing with duplicate rows, no matches or new record.
- Check that your updates look correct in your SQL Server table view.
- Click on Save to Database. The SQL Spreads template will take care of any matching in the background. Then, you can manually run through the exception list to control what to do with inserts or duplicates. The only caveat is that each record will need a unique identifier to assist the matching in the background.
For more information, run through this knowledge base article on the SQL Spreads Matched import solution. It has step-by-step instructions including a downloadable demo that you can play around with.
Tools and Methods to import data from Excel to SQL Server
Traditionally, when it comes to importing data from Excel into SQL Server, there’s often a reliance on developer-driven tools. And these are typically managed by a single individual, often a Database Administrator (DBA) or developer. This brings in a layer of complexity by removing the end users from the import process. In turn, this introduces a whole host of challenges such as delays in getting data into the database, errors, increase in costs of getting an expensive developer to make the change.
However, distinct from these developer-centric approaches is the realm of solutions like SQL Spreads. This introduces a paradigm shift by enabling end-users to make changes directly, with immediate effectiveness upon saving.
In this section, we’ll explore a variety of tools and methods used for Excel-to-SQL Server imports. They range from traditional file-based/developer-driven approaches to more user-driven and immediate solutions (SQL Spreads).
End-user-driven tools
- SQL Spreads: SQL Spreads gives end-users a user-friendly interface within Excel, allowing for direct importing of data from Excel to SQL Server. It focuses on an end-user centric solution and challenges traditional ideas of having a middleman (usually a developer or technical resource) gate keeping all SQL Server data which usually leads to major delays in data centralization and reporting with high costs.
- Microsoft Access: With its familiar interface, Microsoft Access enables end-users to import Excel data into SQL Server. Its intuitive tools and functionalities facilitate data management and manipulation, making it accessible to users without extensive technical expertise. Unfortunately, a business can outgrow Access quite quickly and will start looking for solutions that provide better security, performance, data integrity and collaboration. Take a look at our article diving into an Alternative to Microsoft Access using SQL Server + Excel.
- Master Data Services (MDS): MDS offers end-users a platform for data governance and master data management, including the import of Excel data into SQL Server. Within a controlled environment, users can manage and standardize data, ensuring its integrity and consistency across the organization. MDS is a feature-rich tool to use for master data management, but it can quickly become unnecessarily complex. This leads to organizations searching for simpler tools such as SQL Spreads.
- Custom web applications: Tailored to specific business needs, custom web applications give end-users intuitive interfaces and workflows for importing Excel data into SQL Server. These applications are designed to simplify the import process, catering to users with varying levels of technical proficiency. The cons are that the development process can be costly, drawn out and the maintenance afterwards can be a nightmare.
Traditional Developer-driven tools
- SQL Server Import Wizard – a wizard-based import tool inside SQL Server Management Studio. Ideal for one-time imports when you have an Excel document that you need to import into a table in SQL Server. The pros include flexibility and lots of settings to fine tune the import. The biggest drawback is that you need to run through a dozen Wizard dialogs with lots of settings each time you need to import the data. Read more about the SQL Server Import Wizard.
Advanced Developer-driven solutions
- SSIS – this is the oil tanker for moving data between different sources. You can do almost any task you like, but you will need to put in lots of time to get started. Maintenance and adjustment of the solution take time too. The pros include good versatility and plenty of available features. But the main con is the time you will have to put in to learn the tool. Read more about SSIS.
- SQL Server Copy and Paste – An easy method to import data into a table via SQL Server Management Studio. But only if you have access to SSMS and the right technical skills which is usually limited to developer type resources. It is much easier to use SQL Spreads for these types of updates and inserts into a SQL Server table because of the accessibility of Excel as the front-end.
- Microsoft Azure’s Data Factory – A cloud-based service for data integration, including Excel to SQL Server import. It automates data movement and transformation via pipelines, offering scalability. However, setting up pipelines may require a learning curve and incur Azure costs. It’s geared towards experienced developers, data engineers, and IT professionals, unlike more user-friendly tools like SQL Spreads or SQL Server Import Wizard.
- The BCP utility – a command line-based tool that offers a huge number of settings – if you are a coder, this is the tool to use. Read more about the BCP utility.
- OpenRowSet – This method allows developers and tech-savvy people to query and manipulate Excel data directly from SQL Server using familiar T-SQL syntax. This approach offers flexibility and immediate results without relying on intermediate software. However, it requires a high level of SQL proficiency to use.
What about the Microsoft Get & Transform Tool?
A special mention should be made of the Microsoft Get & Transform Data tool. Recently, Microsoft has enhanced their data import capabilities in Excel by introducing Power Query Editor under the Get & Transform Data group on the Data tab. These tools offer more than just simple data import functionalities. They enable users to shape data from external sources by tasks such as removing columns, changing data types, and merging tables to meet specific data needs.
But it doesn’t form part of our list above as there is no way to import data from Excel back to SQL Server easily. It becomes quite convoluted and complex to generate code to import data back to SQL Server. Thus, it is not seen as a valid solution to import data from Excel back to SQL Server easily.
File Formats in Excel
There are two file formats that are used extensively by business users but for different reasons. Namely, Excel file formats and Text file formats. Either can be used to import data from Excel to SQL Server. But each have their pros and cons, and a part to play in this space. Let’s start diving into the differences between these two file formats.

Excel file formats
Business users across various organizations commonly use an Excel file format. This is due to its user-friendly interface and extensive functionalities for data visualization and analysis.
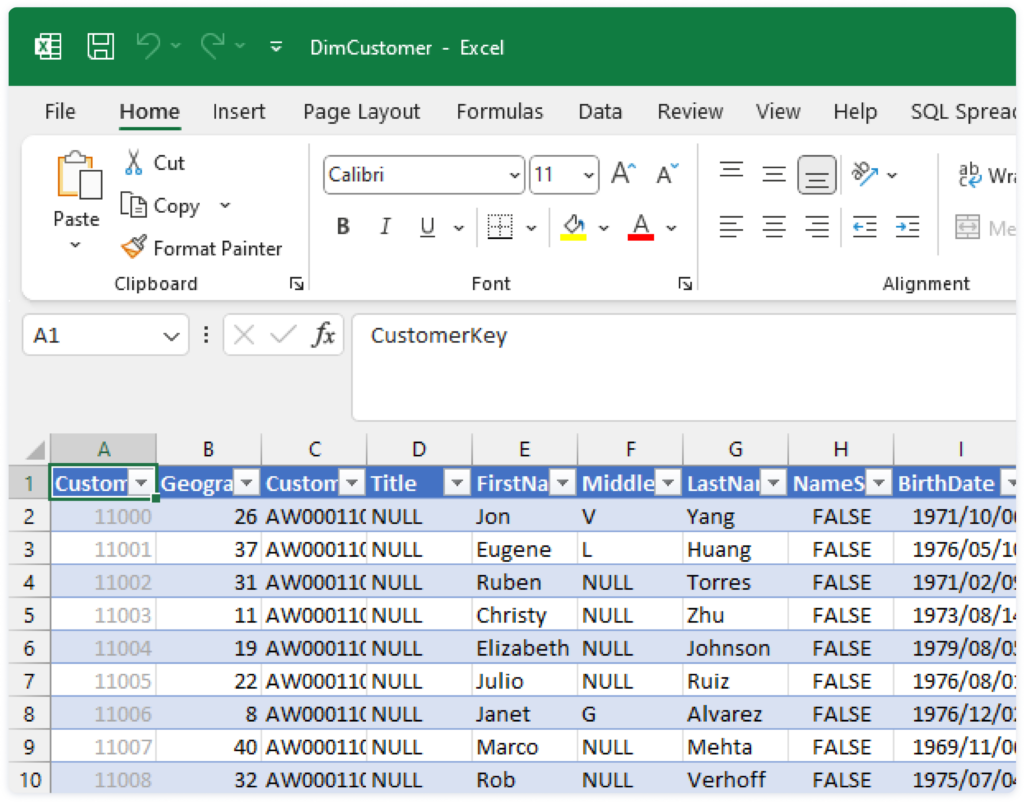
Depending on the Excel version being used, these are the most commonly used Excel file formats that are in use:
- .xlsx (default XML-based file format for Excel 2010, Excel 2007 and later versions)
- .xls (Excel 97 – 2003 Workbook)
- xlsm (Macro enabled workbook)
These Excel file formats offer a familiar environment for manipulating data, generating reports, and performing analyses. The Excel file format is excellent for many tasks and is easy to share with others. However, it hasn’t traditionally been the go-to method to import data back into source systems such as SQL Server. This is usually reserved for a Text file format such as .csv file format which we will discuss in the next section.
Luckily, SQL Spreads fills the gap in the market. It allows businesses to continue to use the standard Excel file formats listed above. And with that, the ability to get the data back into a SQL Server source system easily.
Although, there are other ways to import Excel file formats. Some of them we have already discussed in the above section “Tools and Methods to import data from Excel to SQL Server”. Let’s have a quick look at those that specifically import Excel file formats:
- SQL Server Import and Export Wizard
Text file format – CSV
Comma Separated Values (CSV) files are commonly used to exchange data from one system or application to another. The simple format of the csv file makes them ideal for exporting data from one place and importing it to another.
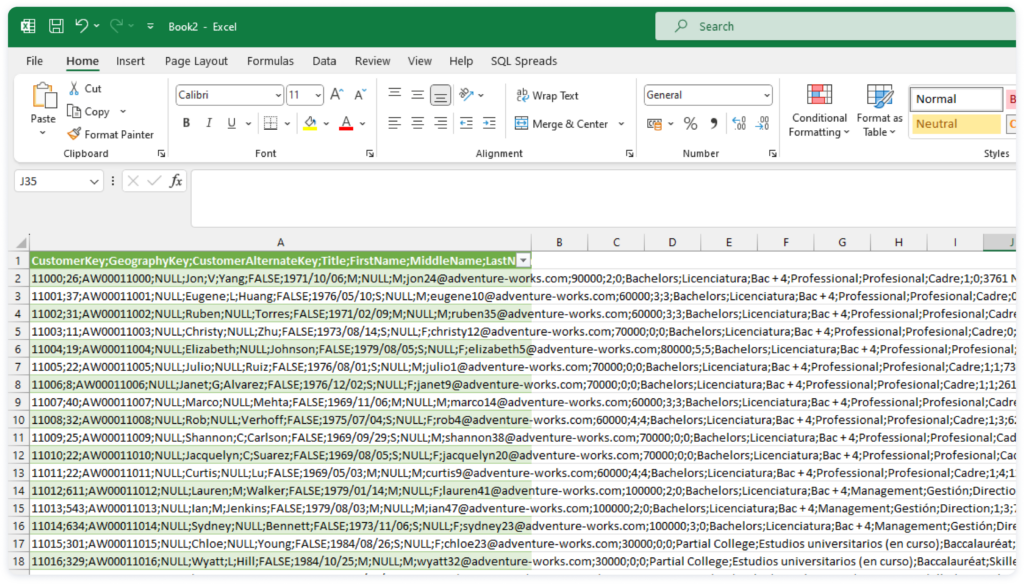
A common use case, for example, is to export the data from an accounting or sales application as a csv file. Then open it in Excel using the From Text/CSV option. Once in Excel, users can view and manipulate the data, and prepare reports, often using pivot tables or charts. But there are times when you want to perform more complex data manipulations or store and manage the data in a database.
Ways to use CSV to import data into SQL Server
These are some of the options available for importing csv to SQL Server:
- SQL Spreads Table Creator – You can use SQL Spreads to create a SQL Server table directly from within Excel and pre-load them with the data in your CSV file. It simply requires that the .csv file is opened in a table format in Excel. Once opened, you can configure the server, table name and data types using the SQL Spreads Table Creator. Upon saving, the table can now be found in your SQL Server database!
- A SQL script – The SQL script to import CSV to SQL is quite straightforward. It simply involves creating a table and then performing an insert of the data. But whilst this is fine for a small dataset, if you need to import lots of data, then it will be slow and error-prone. It also requires intervention by a technical resource like a developer.
- The SQL Server Management Studio (SSMS) ‘Import Flat File’ wizard – Because csv files are so common, SQL Server Management Studio (SSMS) has a standard way of importing them to SQL Server. This once again requires the skills of a technical resource such as a developer or DBA.
- Other – There are other options too. For example, you can create an SSIS package to do the import, or write a PowerShell script. However, the ones above are generally simpler to work through.
Take a read through our blog article CSV to SQL: How to convert, open and import which runs through the above solutions in more detail.
Experience first hand the ease of importing data from Excel to SQL Server
In wrapping up, importing data from Excel into SQL Server is crucial for businesses in this day and age. It’s all about centralizing scattered data into a structured database like SQL Server for better and more inclusive decision-making.
This guide has shown how tools like SQL Spreads make this process a breeze. They let regular Excel users update SQL Server data without needing to dive into coding. By smoothing out common Excel headaches like inconsistent data and version control, SQL Spreads makes importing easy, boosting data accuracy and ease of access.
Exploring different methods and tools, from old-school file-based and developer-driven approaches to user-friendly options like SQL Spreads, highlights the importance of picking the right tools for the job. Choosing modern solutions like SQL Spreads not only simplifies importing but also keeps data clean and ready for strategic business moves.
The best way to understand how easy this tool is to use is to download the free 14 day trial.
For more information on SQL Spreads and how it can help you with your SQL data management, contact us or visit our website to download a free trial.
Jump to start