
This is the first of several articles on SQL for Excel users. The aim is to show you why it’s so useful for Excel users to be familiar with SQL and to introduce some basic concepts and queries.
Why is it important to learn SQL?
In a previous article, SQL and Excel: Why you need both, we showed that for many businesses the use of both SQL Server and Excel is an optimum approach to data management. In today’s world, there is more data than ever, and everybody in the workplace needs to be comfortable using data in some way. Excel is the data tool of choice for the vast majority of people, but as we highlighted in the previous article, it has some shortcomings. This is where SQL Server steps in, and why you need to use both.
Organizations that use SQL have dedicated people or teams to manage their SQL estates. These Database Administrators (DBAs) or other professionals are experts in their field, so why should you need to learn how to use SQL? Furthermore, a tool like the SQL Spreads Excel Add-In makes it very easy for Excel users to connect to a SQL table and perform updates to it from within Excel. The answer, is of course, that you don’t have to learn SQL in order to use data from a SQL database, but there are some real advantages of learning some SQL for Excel users:
- it makes it easier to talk ‘data’ to your DBA team;
- it will help you understand the importance of data structure, and may improve the way you use Excel;
- you can start using SQL query tools (like SQL Server Management Studio) to view and query data yourself, instead of asking a DBA to do it for you;
- learning a new skill can be a fun and rewarding exercise.
Finally, it’s worth pointing out that as an Excel user, you are already familiar with many of the key concepts in SQL. It’s therefore just a case of learning some new terminology. For example, when you use the following in Excel, there is a corresponding feature or query in SQL:
| Excel | SQL |
|---|---|
| Tables / Sheets | Tables |
| Filtering | Query with a “where” statement |
| Sorting | Query with a, “order by” statement |
| Removing duplicates | Query with the “distinct” keyword |
| If statements | Query with the “case” statement |
| Pivot tables | Query with a “group by” statement (and “sum” or “count”) or the “pivot” statement |
| VLookup (or Index/Match) | Query with a “join” statement |
There are more, but this is a great starting point, and we’ll go through most of these in this article.
What is SQL?
SQL (Structured Query Language) is used to access and manage data in a relational database. Relational database management systems (RDBMS) are the pre-eminent database technology. Almost all of the different RDBMS flavors use SQL. Some commonly used RDBMS are Microsoft SQL Server, MySQL, Oracle. We’re going to focus our articles on Microsoft SQL Server.
Data is stored in tables in a relational database. Those tables usually look like one sheet in Excel, with rows and columns. We can use a set of instructions (written in SQL) to retrieve data and perform analysis. Strictly speaking, because we’ll be using Microsoft SQL Server, we’ll be using the Transact SQL (T-SQL) flavor of SQL. T-SQL is a proprietary Microsoft extension of the SQL language which provides all the functionality of SQL but with some added extras.
Generally, when most people say, “use SQL”, they are referring to the underlying RDBMS and the language as one.
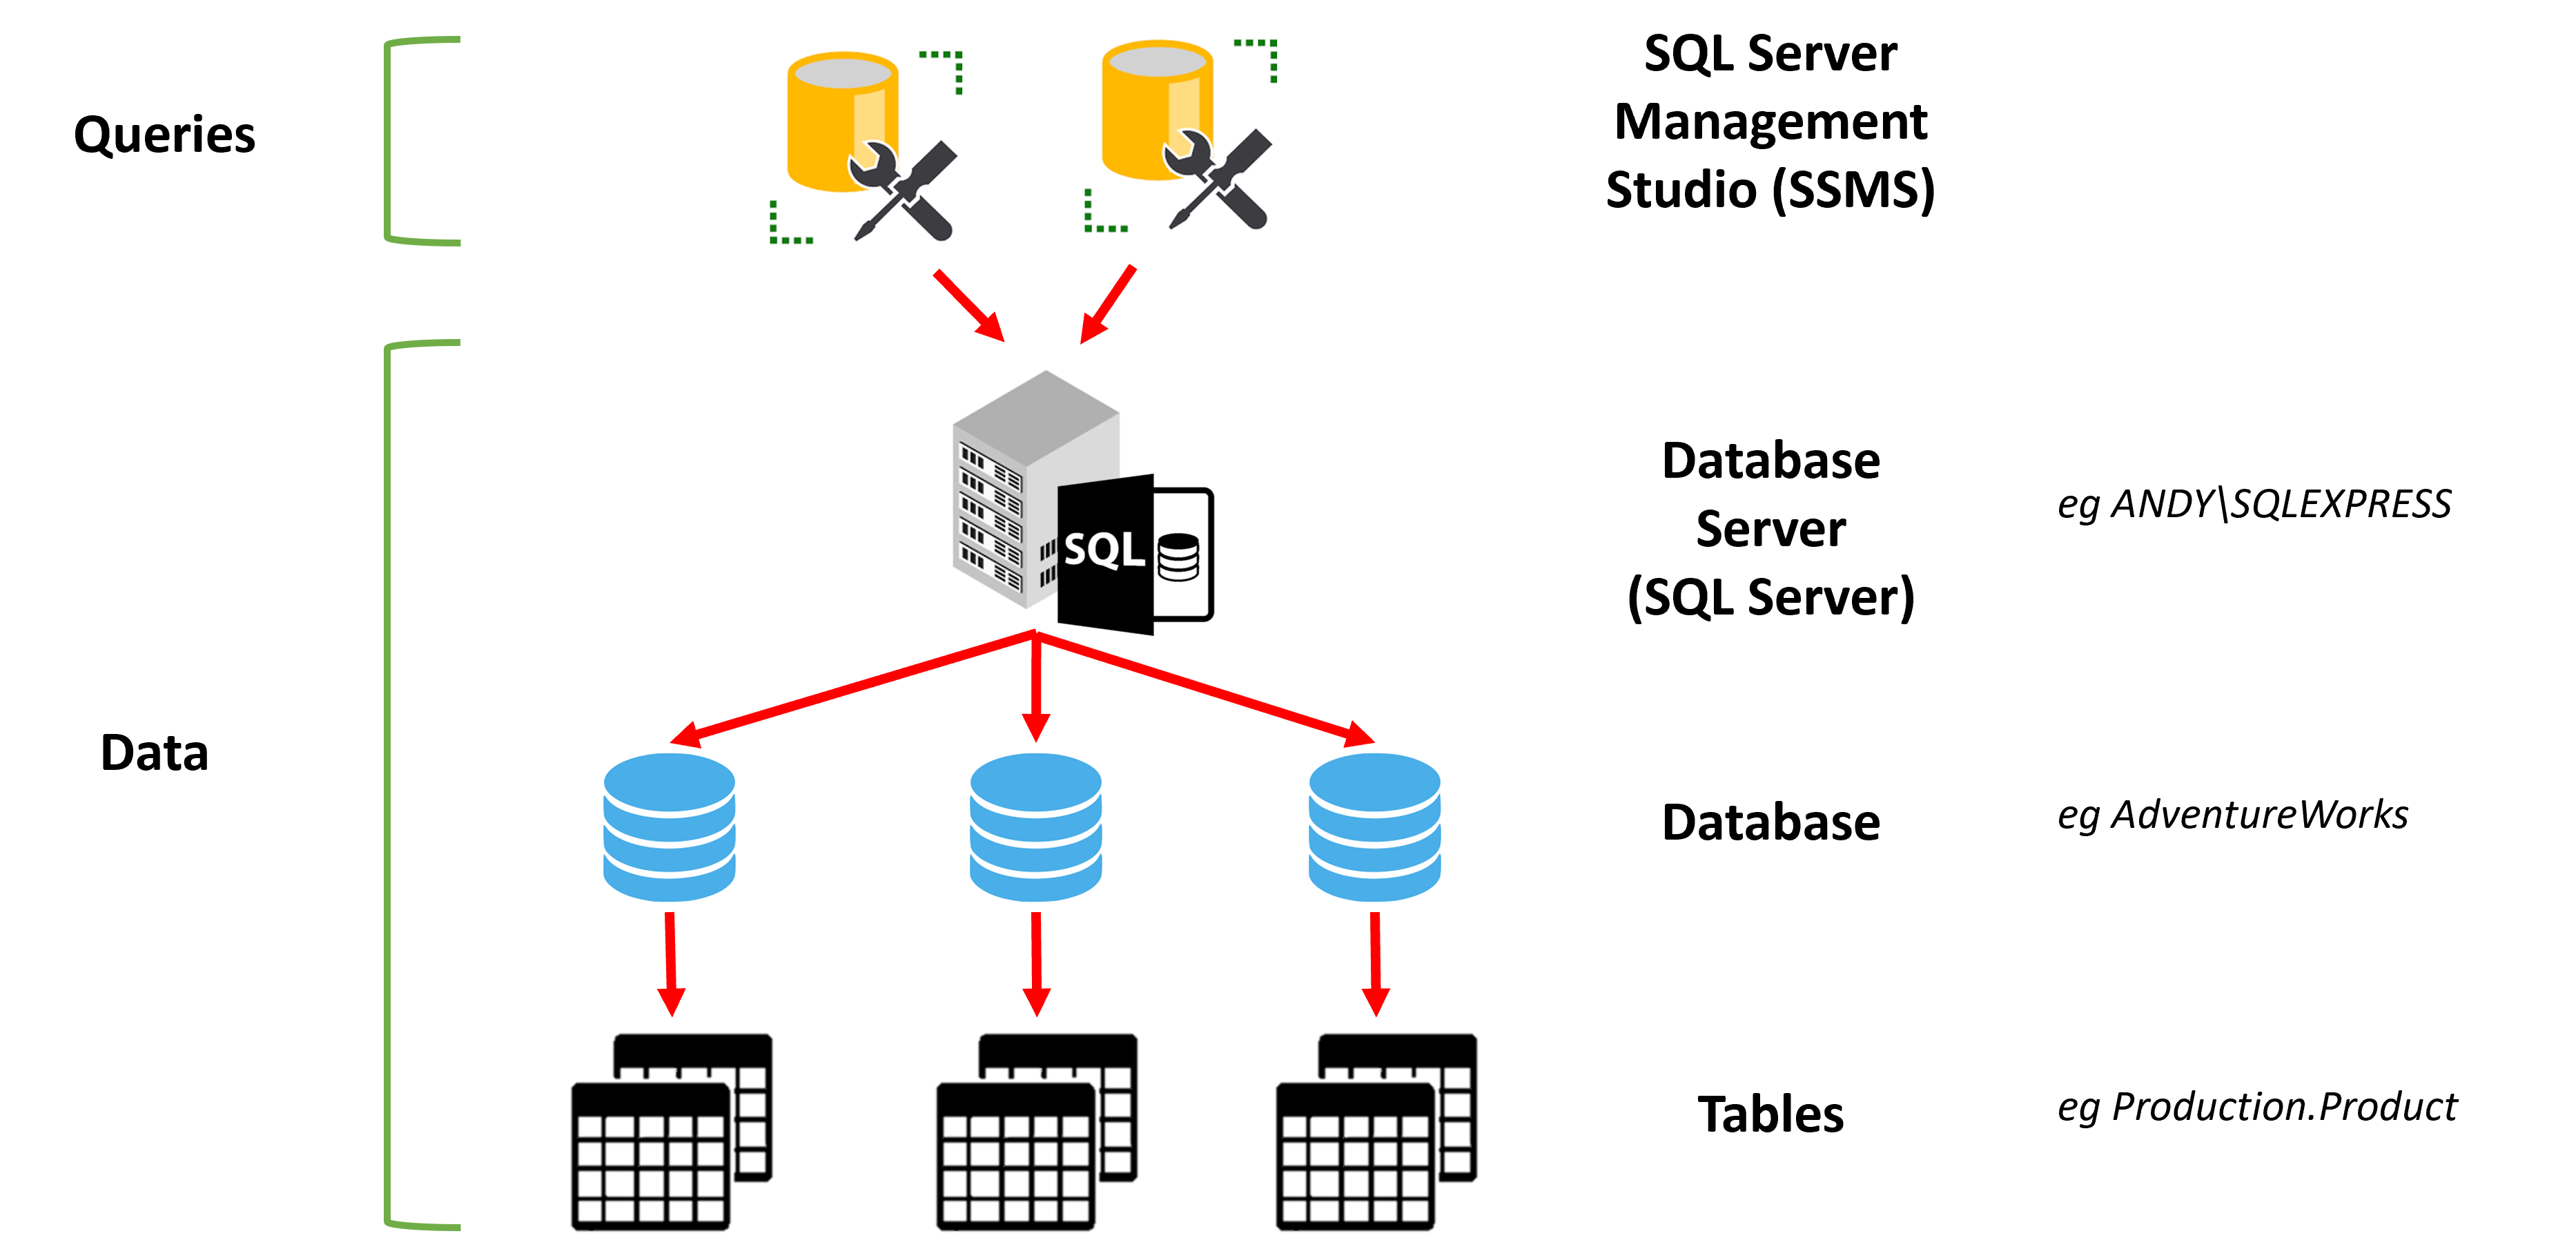
The diagram below shows how queries are written in SSMS and executed against data stored in tables in a database on a database server. There are a couple of other things to note:
- multiple users can run queries against a database from their own local SSMS installations;
- a database server can have multiple databases installed on it;
- a database can have multiple tables in it.
Getting SQL Server
To start using SQL Server you can either download and install it (on your own machine or a server), or use the cloud-based Azure SQL suite. We’ll look at the download and install option first.
Installing SQL Server
The latest version of SQL Server is SQL Server 2019 (15.x). There are several editions available: Enterprise, Standard, Developer, and Express. The latter is free and is a really good way for you to learn SQL. You can get the download for SQL Server Express here.
The installation process is very easy to follow, but if you need more information, there is a good article here.
It’s important to note that the installation wizard will also install SQL Server Management Studio (SSMS) for you as well, so once you have completed the installation, you can open SSMS and start querying data! Before you can do that, however, you’ll need some data to query. A good way to start is with the AdventureWorks sample database from Microsoft. You can get the file and installation instructions here.
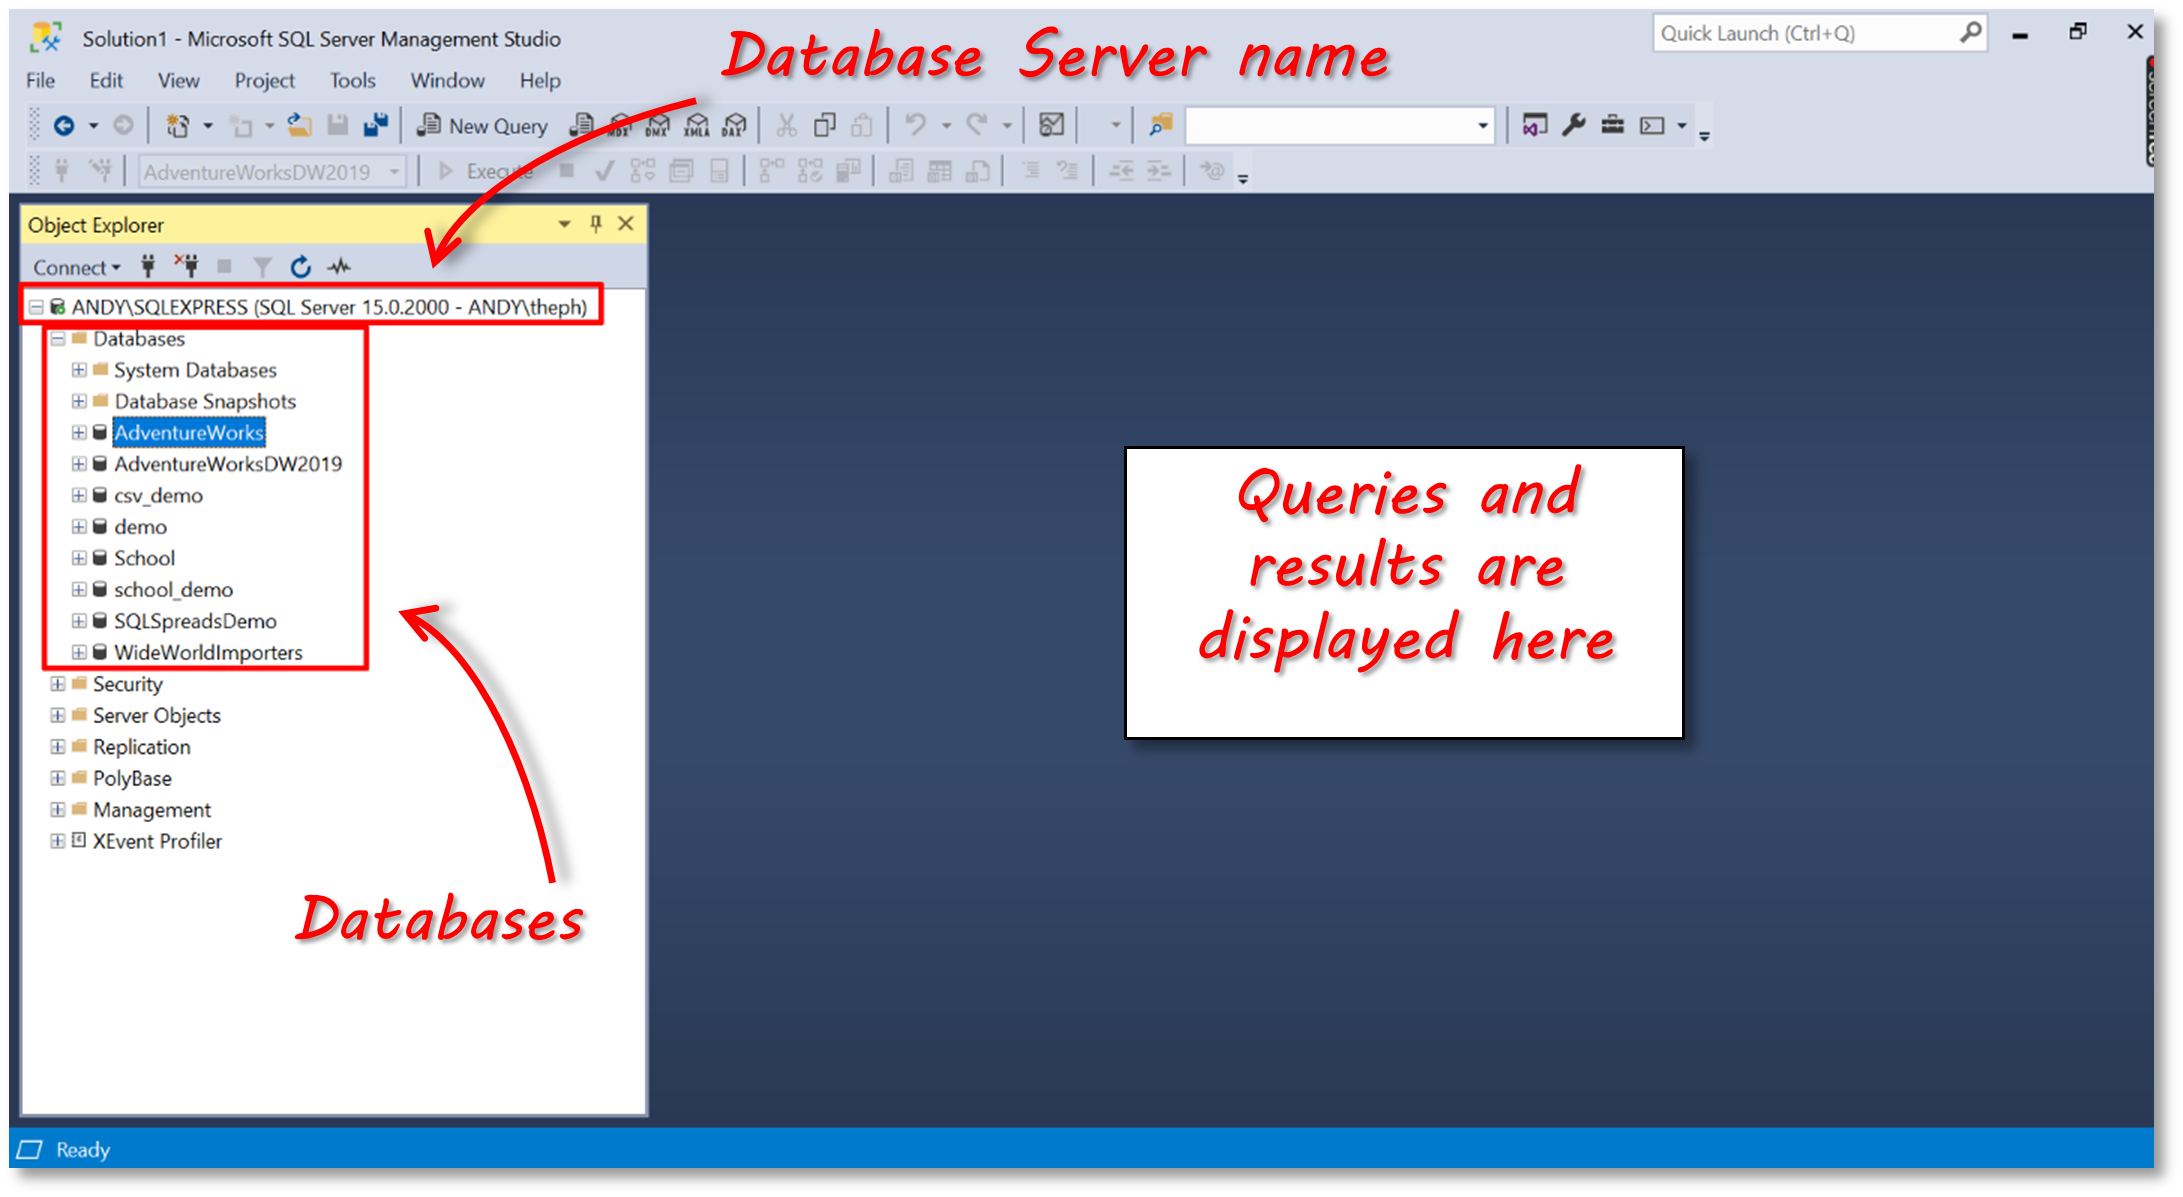
When you open SSMS, you’ll see the Object Explorer on the left. Here you can see the name of your database server and below it, the list of databases.
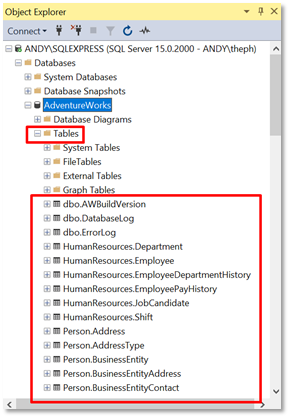
Click on the AdventureWorks database to expand it, and you’ll see all the tables in the database.
Azure SQL
First off, you’ll need an Azure subscription. If you don’t already have one, you can sign up for a free Azure account here.
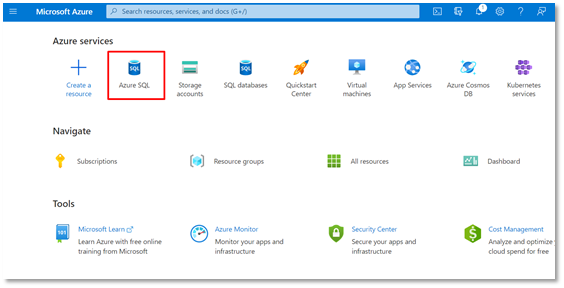
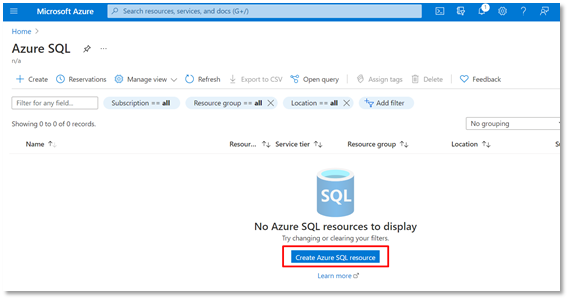
Once your account is set up you can go to the Azure portal home page. On the home page, click on Azure SQL under the available services (if you don’t see it, you can search for it in the top search box).
On the next screen, click on the ‘Create Azure SQL resource’ button.
On the next screen, click on the SQL Database option.
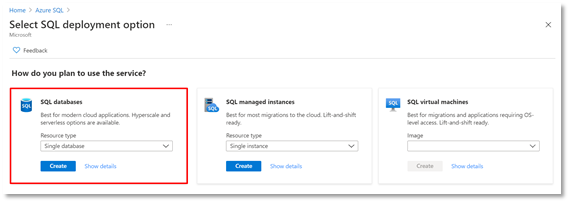
Full instructions for setting up your database in Azure SQL are here.
Ok, now it’s time to start querying data!
Note: the examples in the following sections refer to the AdventureWorks database; if you have installed the AdventureWorksLT database sample as part of your AzureSQL configuration, then some of the table names will differ slightly.
Performing a simple Select query
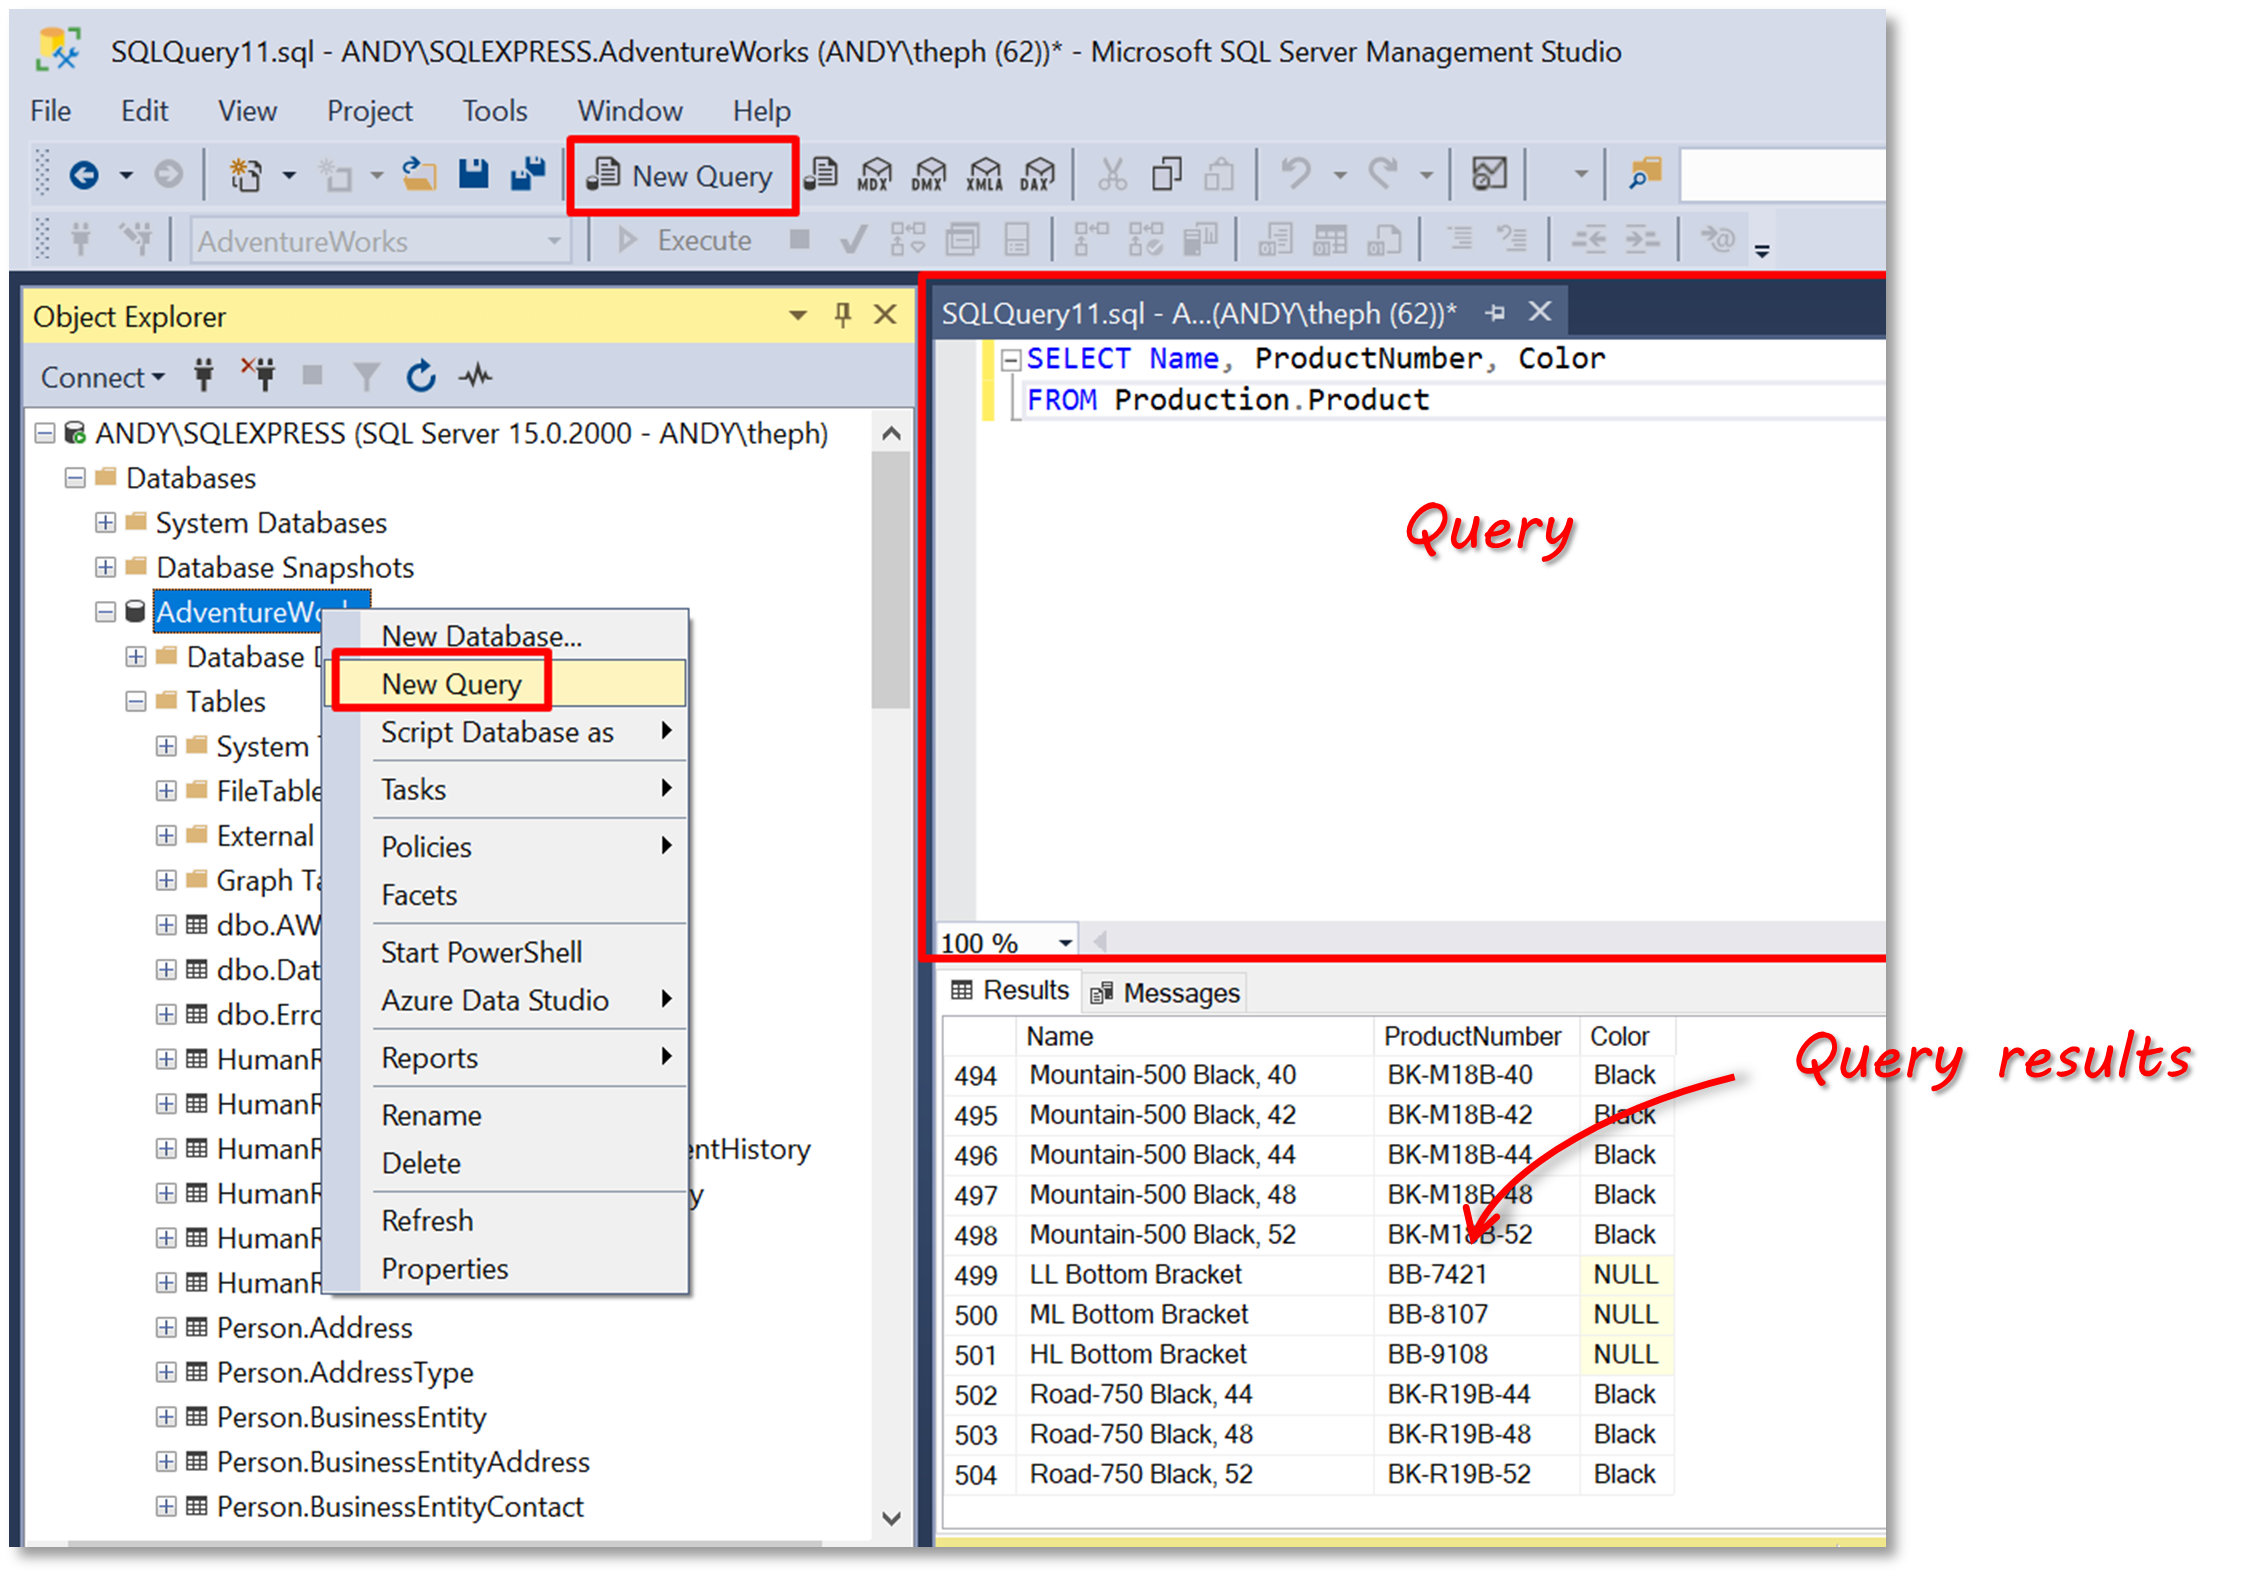
We’re going to run a simple query to select some data from one of the tables on the AdventureWorks database. Click on AdventureWorks, and then right-click and select ‘New Query’ (you can also click ‘new Query’ in the menu bar). In the new Query window that opens up, type the following:
SELECT Name, ProductNumber, Color
FROM Production.Product
then press the ‘Execute’ button (or press F5) to see the results displayed in the lower window.
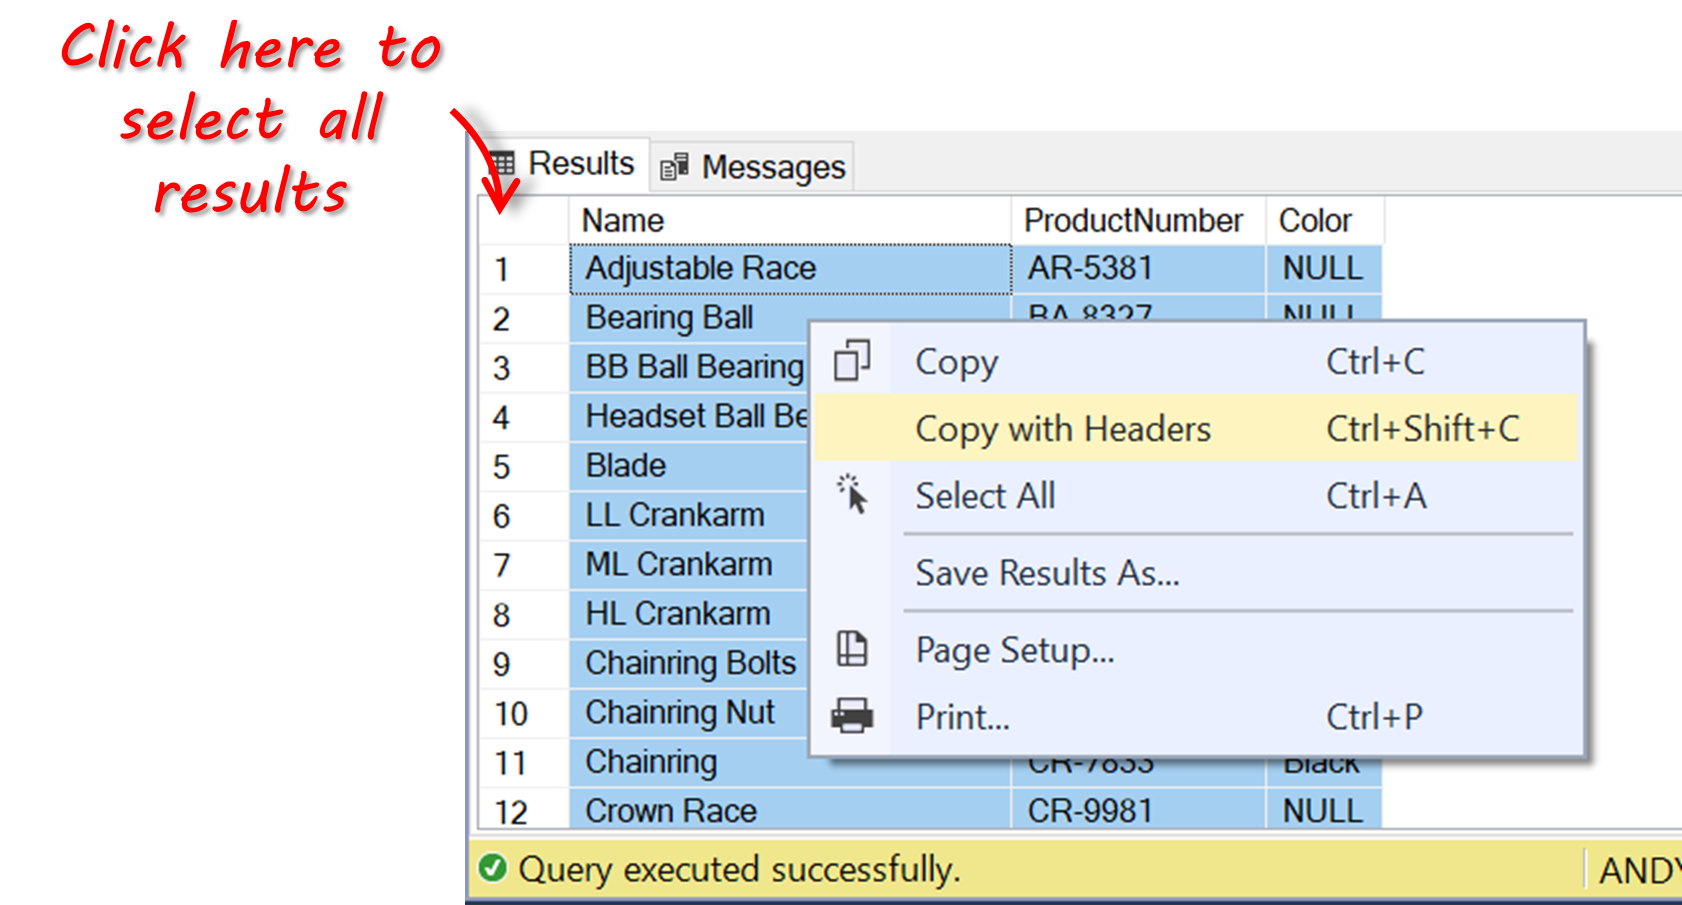
Tip: we could copy and paste the results directly from the results pane and paste them into Excel! Just click in the grey header in the top left corner of the results table, right-click and select ‘Copy with Headers’. You can then paste it into Excel.
Let’s just recap what we just did, and look closely at the query we ran:
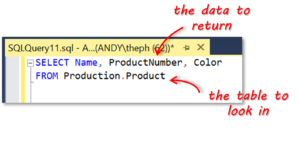
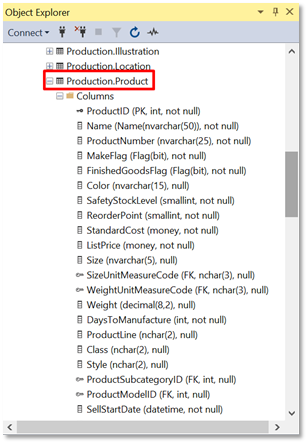
This SELECT statement simply gets the specified columns from the specified table and returns the results. Now, you may ask yourself, how do I know which columns to specify if I don’t know what columns there are in the table? You can, of course, click on the table in the Object Explorer to see all the columns in the table (including their data types).
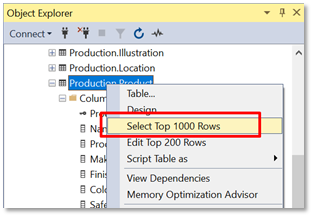
Whilst it’s useful to see the column names, you often need to see the actual data to check whether you need to return it in a query. There is a quick shortcut to do this – select the Product.Product table, right-click and click ‘Select Top 1000 Rows’.
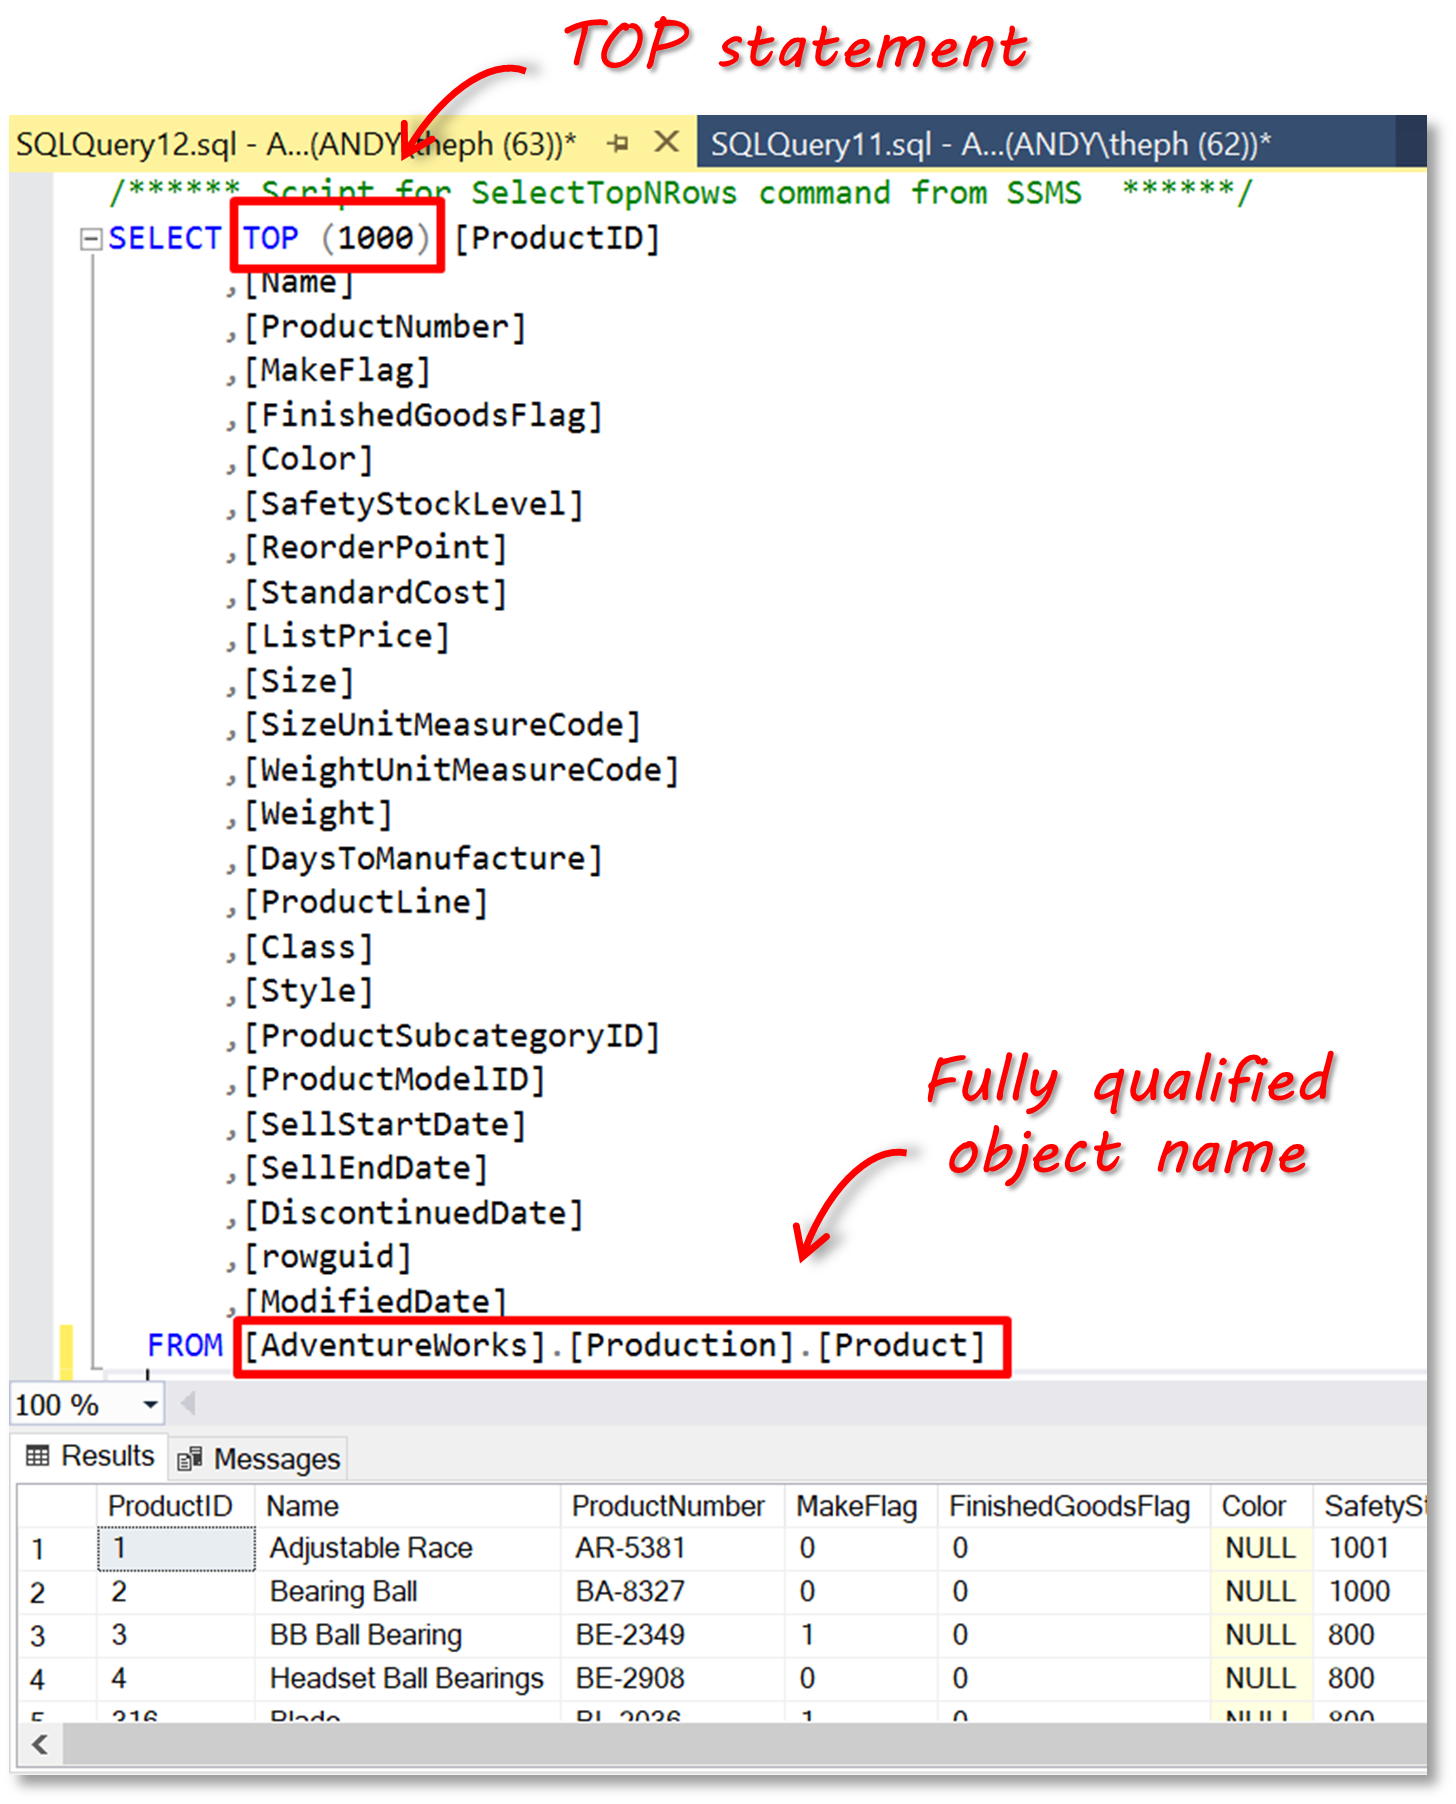
The query is displayed in a new Query editor and then executed to show the results in the bottom pane. You can see in the query that the TOP statement has been added to the query. Also note that the auto-generated script refers to the table with the fully qualified name format of [database].[table]. This is best practice because it avoids problems if you have the same table names across databases.
Tip: you can also get a quick overview of data in a table by typing the following:
SELECT Top (10) *
FROM AdventureWorks.Production.Product
The * in the query basically says “show me everything” in the table. A DBA would frown at you if you did this because it could return a huge amount of data and consume unnecessary resources – that’s why we limit the query with the TOP statement.
How to filter and sort
Let’s say that we only want to look at items in the Product table that are finished goods, and not components of products. To do this I need to add a WHERE statement. The WHERE statement is used to specify the condition(s) that need to be met for the data to be returned. In the example below, we’ve added the condition ‘FinishedGoodsFlag = 1’ after the WHERE statement.
SELECT Name, ProductNumber, Color, ListPrice
FROM AdventureWorks.Production.Product
WHERE FinishedGoodsFlag = 1
If we wanted to further say that we only want to see finished goods with a list price greater than 1000, we simply extend the conditions after the WHERE statement:
SELECT Name, ProductNumber, Color, ListPrice
FROM AdventureWorks.Production.Product
WHERE FinishedGoodsFlag = 1 AND ListPrice > 1000
There are lots of conditions that you can add such as specifying that values must be between a range of dates, or in a list and you can add complexity with multiple nested conditions.
Finally, I want to order the results from most expensive to least expensive. To do this, we add the ORDER BY statement at the end:
SELECT Name, ProductNumber, Color, ListPrice
FROM AdventureWorks.Production.Product
WHERE FinishedGoodsFlag = 1 AND ListPrice > 1000
ORDER BY ListPrice DESC
Querying Multiple Tables – the JOIN statement
Once you start playing around in SQL and writing some simple select statements you quickly realize that the data you need to see in the results is usually in more than one table. The classic example is when a table contains an ID number instead of an actual name in a column – to get the name, I need to look up the ID in another table. In Excel, we would use either the VLOOKUP function or the INDEX / MATCH functions. So, how do we do it in SQL?
Let’s go back to look at our Products table in the AdventureWorks database. In the table, there is a column called ‘ProductSubcategoryID’.
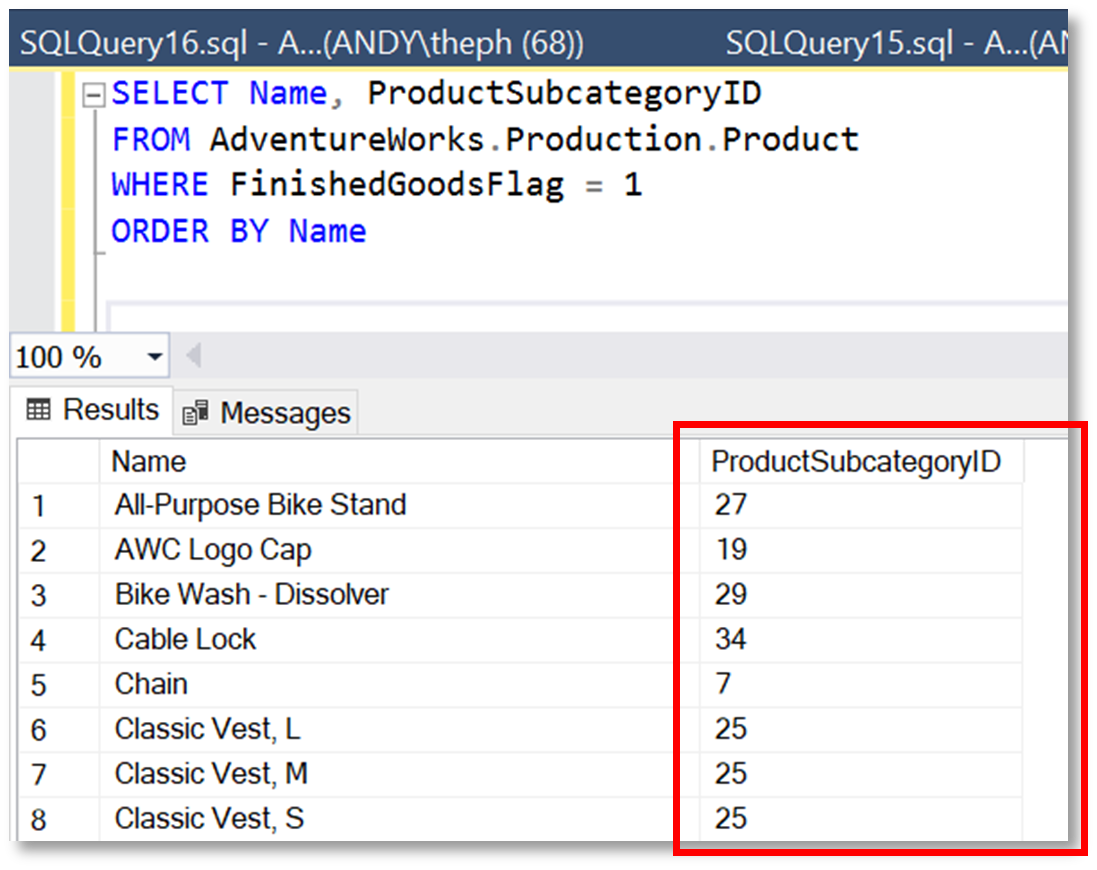
I want to look up the actual Sub-category name using the ID. To do this, I need to JOIN the Products table and the ProductSubcategory table. Let’s look at the query and the results and then work out how it works:
SELECT P.Name AS 'ProductName', SC.Name AS 'Subcategory'
FROM AdventureWorks.Production.Product AS P
INNER JOIN AdventureWorks.Production.ProductSubcategory AS SC ON P.ProductSubcategoryID = SC.ProductSubcategoryID
WHERE FinishedGoodsFlag = 1
ORDER BY P.Name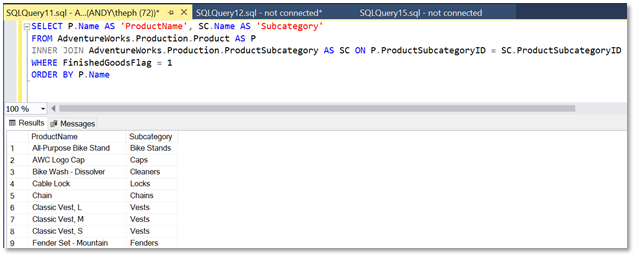
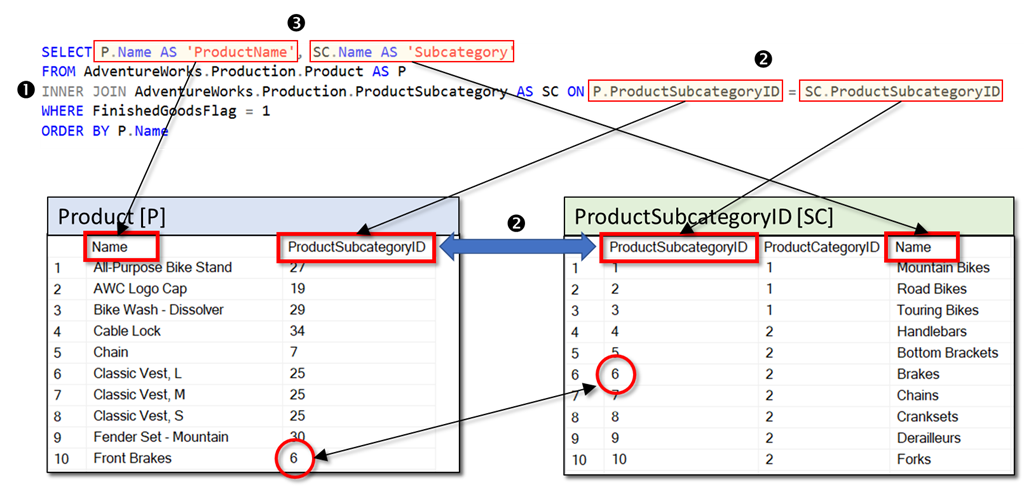
The INNER JOIN works using the fact that there is a common column between the 2 tables we want to join – in our example it is the ProductSubcategoryID column. The query therefore basically says “return the columns specified (ProductName and Subcategory) from the two related tables where values in the ID columns are equal”. Here is more of a breakdown:
- The INNER JOIN statement is added after the first related table is specified – the Product table. Note that we have added a ‘table alias’, P, for the Product table; this just makes it easier to read the query when we have long table names. Next, we need to specify the table on the other side of the join – the ProductSubcategoryID table. Again, we give it an alias, SC.
- Now we need to specify the columns we want to match values on – the ProductSubcategoryID column in each table. Note that we need to qualify the column names with the respective table alias names.
- The columns that we want returned by the query have the same name, so we need to assign new names (eg ‘ProductName’ and ‘Subcategory’).
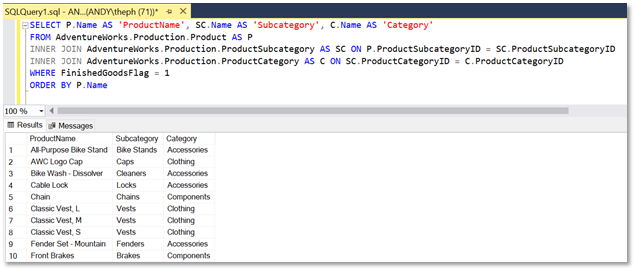
As you can see, querying data from multiple tables is quite straightforward. Let’s extend our example a little more by also adding the Product Category to our query. To do this we’ll need to join to the ProductCategory table Here is the query:
SELECT P.Name AS 'ProductName', SC.Name AS 'Subcategory', C.Name AS 'Category'
FROM AdventureWorks.Production.Product AS P
INNER JOIN AdventureWorks.Production.ProductSubcategory AS SC ON P.ProductSubcategoryID = SC.ProductSubcategoryID
INNER JOIN AdventureWorks.Production.ProductCategory AS C ON SC.ProductCategoryID = C.ProductCategoryID
WHERE FinishedGoodsFlag = 1
ORDER BY P.Name
And here are the results:
Aggregating Data – the GROUP BY statement
In the example we just looked at we ended up with a list of products that shows the sub-category and category they belong to. How can we get a count of how many products are in each category and sub-category? In Excel, it would be quick and easy to create a pivot table to do this. In SQL, we can use the GROUP BY statement:
SELECT C.Name AS 'Category', SC.Name AS 'Subcategory', COUNT(*) AS 'CountofProducts'
FROM AdventureWorks.Production.Product AS P
INNER JOIN AdventureWorks.Production.ProductSubcategory AS SC ON P.ProductSubcategoryID = SC.ProductSubcategoryID
INNER JOIN AdventureWorks.Production.ProductCategory AS C ON SC.ProductCategoryID = C.ProductCategoryID
WHERE FinishedGoodsFlag = 1
GROUP BY C.Name, SC.Name
ORDER BY C.Name
As you can see, the GROUP BY statement is added at the end of the query. We just need to provide the columns that we want to do the aggregation on. The aggregation itself is included in the list of columns we want to return in the SELECT statement – in our example, we want to COUNT how many products are in each category and sub-category.
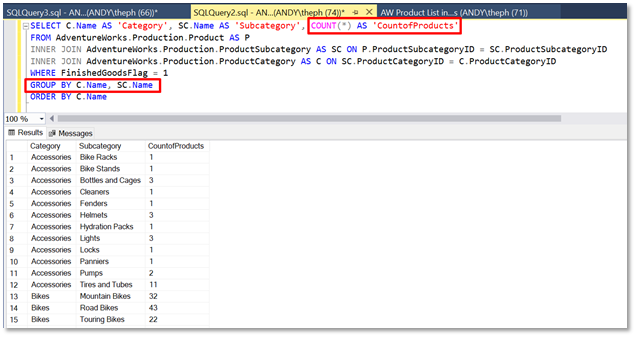
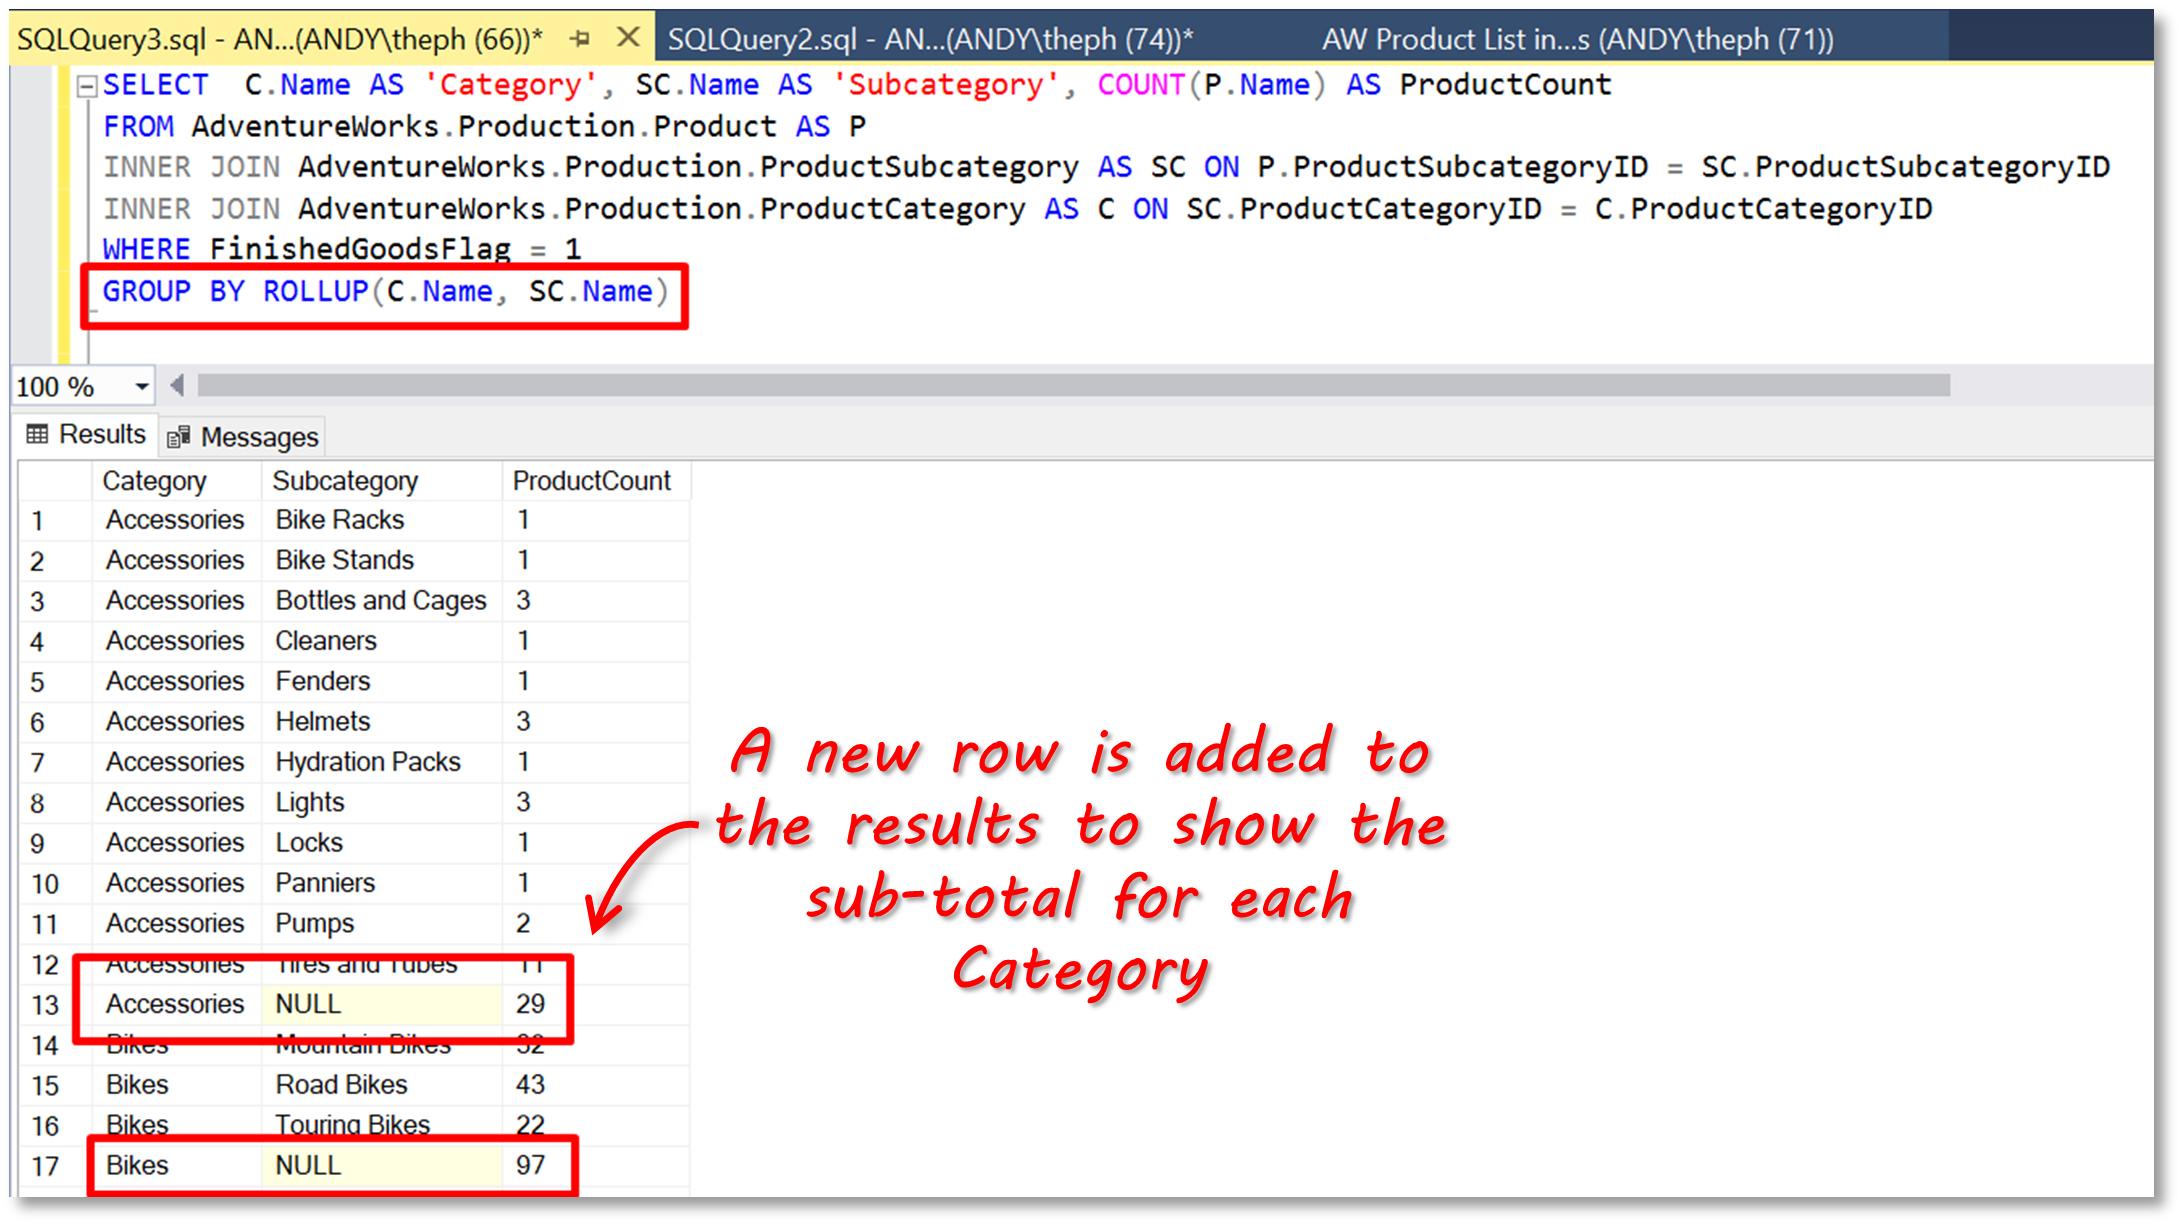
But where are the Category sub-totals? To get these, we need to use the ROLLUP extension to the GROUP BY statement:
SELECT  C.Name AS 'Category', SC.Name AS 'Subcategory', COUNT(P.Name) AS ProductCount
FROM AdventureWorks.Production.Product AS P
INNER JOIN AdventureWorks.Production.ProductSubcategory AS SC ON P.ProductSubcategoryID = SC.ProductSubcategoryID
INNER JOIN AdventureWorks.Production.ProductCategory AS C ON SC.ProductCategoryID = C.ProductCategoryID
WHERE FinishedGoodsFlag = 1
GROUP BY ROLLUP (C.Name, SC.Name)
The Category sub-totals are added to the results as new rows.
There is also the PIVOT statement in SQL; this is covered in more detail in our How to Create Pivot Tables in SQL Server article.
Summary
There is a lot to be gained for Excel users to learn how to write some basic SQL queries. In this article on SQL for Excel users, we’ve run through some simple examples which will help you get started. There are a lot of good online resources to help you learn more, and we’ll also cover some more advanced scenarios and examples in future articles.
In the meantime, if you are an Excel user and need to view and make updates to data stored in SQL Server, then try out the SQL Spreads Add-in for Excel. Download a free trial version here.
*This article was originally published on August 27, 2021 and was updated on July 4, 2022 to include updated information on the latest version of SQL Server.


Andy: I very much appreciate your SQL for Excel Users series of articles, and hope you keep these tutorials coming. As a fairly advanced Excel user (but a SQL novice), I am learning a lot from your tutorials. I am eager to learn what else I can replicate using SQL that I would normally do by writing an Excel formula or a VBA script. Thank you!
Thanks, David. There will certainly be a couple more SQL for Excel Users articles. Please let me know if there is anything specific you think would make a good topic.