In this article, we’re going to show you how to get started with Azure SQL. Azure SQL is one of the many services offered on Azure, Microsoft’s comprehensive cloud computing platform. And it enables organizations to run workloads and develop applications in regional data centers around the globe.
Introduction to Azure SQL
Azure SQL is a family of managed products that use the SQL Server database engine in the Azure cloud.
The products are:
- Azure SQL Database
- Azure SQL Managed Instance
- SQL Server on Azure VMs
The diagram below shows the products in comparison with a standard SQL Server instance on a physical on-premise machine, and an instance on a VM in a private cloud.
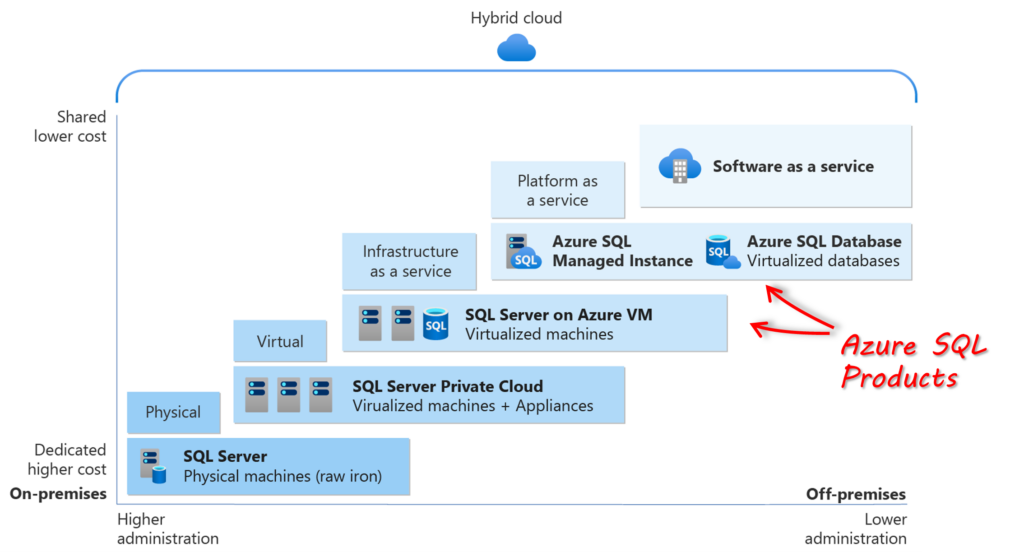
To get started with Azure SQL, you therefore need to decide which product you require. And this will depend on your specific needs.

For example, if you want to simply migrate an existing workload from your own physical/virtual machine to the cloud, the SQL Server on Azure VM is probably the best option. With this product, you can maintain full administrative control over the SQL Server instance as well as the underlying OS.
However, if you want to create a new database application from scratch, it may be better to create an Azure SQL Database. This is a managed service built on standardized hardware and software that is owned, hosted, and maintained by Microsoft. A variation of this is the Azure SQL Managed Instance, which is a collection of system and user databases with a shared set of resources.
Create your first SQL Server database in Azure in 5 minutes
To show you how quick and easy it is to get started with Azure SQL, let’s create a database in under 5 minutes.
1. Login to Azure Portal
First, log into the Azure Portal. Here you can create new resources or manage existing ones. In the Azure Services section, click on the SQL Database icon.
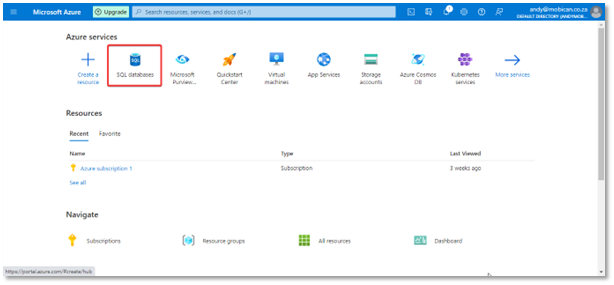
Then, on the SQL databases page, click on the Create button:
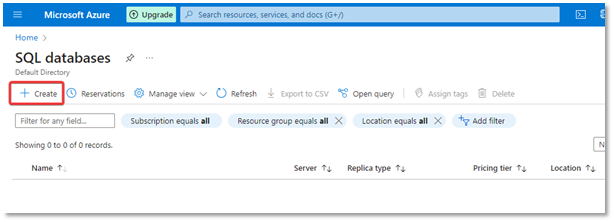
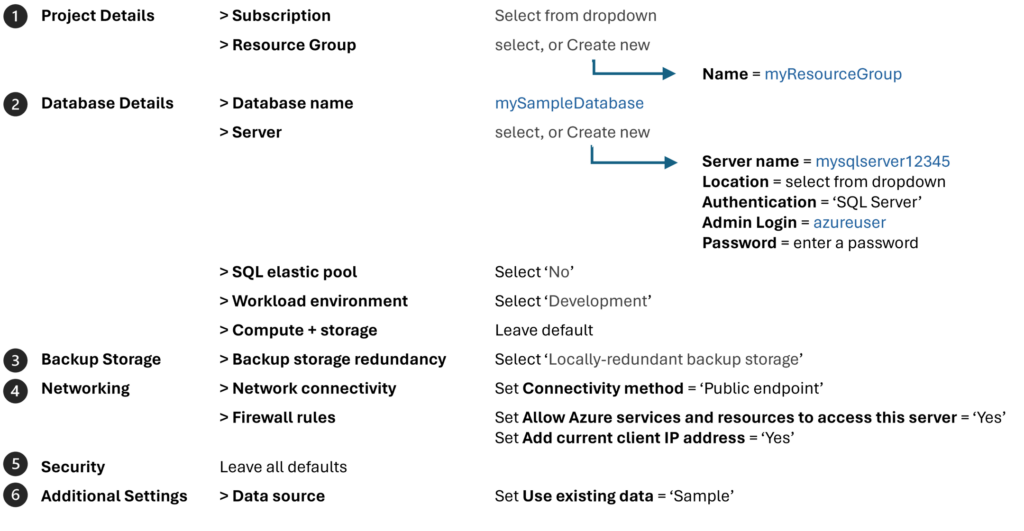
In the Create SQL Database page there are a number of tabs to go through to set up the configuration for your database. The diagram below shows the values to enter or select for each of the configuration settings.
2. Enter Project Details
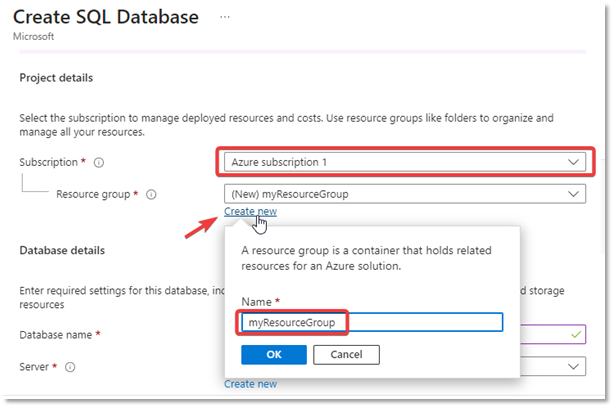
On the Basics tab in the Project Details section, select the Subscription in which the SQL Database will be contained. You’ll have created at least one Subscription when you first created your Azure account.
Next, create a Resource group which your new database will belong to, by clicking on Create new. Enter a Name of myResourceGroup and click OK.
3. Enter Database Details
In the Database Details section, enter the Database name, mySampleDatabase. Then, for the Server, click on Create new to go to the Create SQL Database Server page.
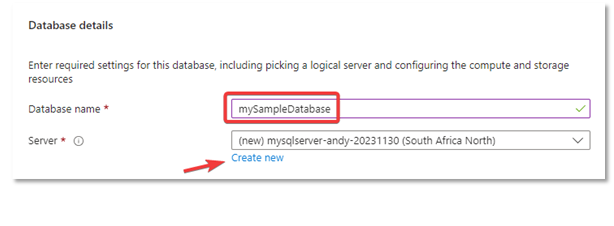
In the Create SQL Database Server page, enter the following:
- Server name enter a name, such as mysqlserver-andy-20231130
- Location select a location from the dropdown
- Authentication method chose Use SQL authentication
- Server admin login enter azureuser
- Server admin password enter a suitable password
Click OK.
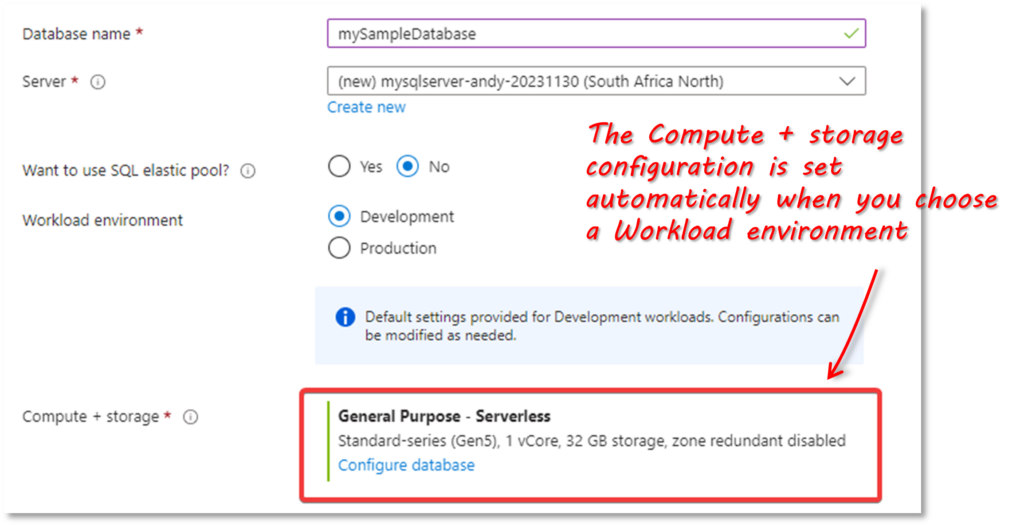
Leave the Want to use SQL elastic pool? setting on the default No option.
For Workload environment, select Development. When you select this, the Compute+Storage configuration is automatically set by Azure.
4. Configure Backup details
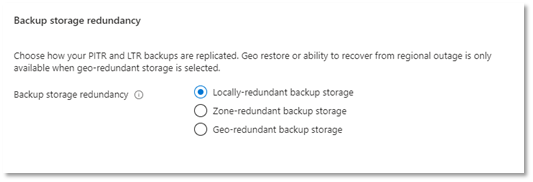
For the Backup storage redundancy option, select Locally-redundant backup storage. Even though this is the lowest-cost redundancy option, it offers the least durability compared to other options.
Click on the Next : Networking button.
5. Configure Networking details
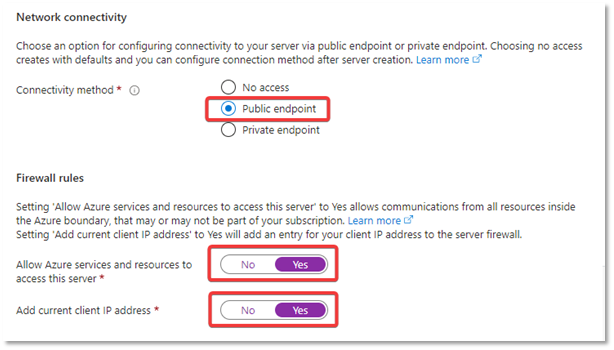
On the Networking tab, set the Connectivity method to Public Endpoint.
In the Firewall rules, set Allow Azure services and resources to access this server to Yes and Add current client IP address to Yes.
Leave the other settings on the Networking page on their default values and then click the Next : Security button.
6. Configure Security details
Leave all these settings on their default values, and click the Next : Additional Settings button.
7. Configure Additional Settings
On the Additional Settings page, set Use existing data to Sample (this will create AdventureWorksLT as the sample database).
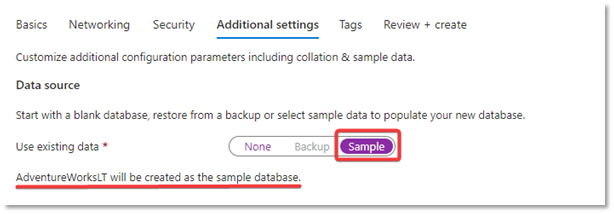
Now click on the Review + Create button at the bottom of the page.
8. Review + Create Database
On this page, you can review the configuration details and the estimated cost of the database.
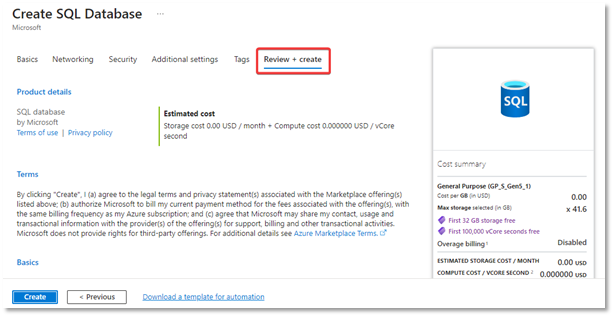
Click on the Create button at the bottom of the page.
Once the database has been created, you’ll see the following message saying that the deployment is complete and confirming the configuration details. Click on the Go to resource button to go to the database page, where you can run queries or perform other tasks.
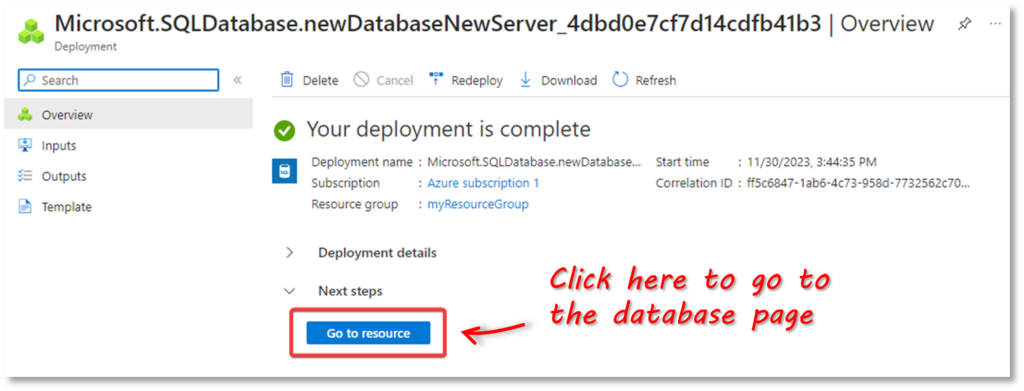
9. Review the Database page
The Database page contains a lot of information about the database, as well as an array of tools and other resources for managing it. For example, you can perform queries against the database, set up monitoring, create integrations with other services, and many more.
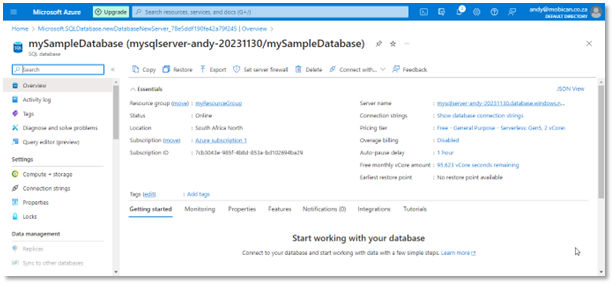
Often you’ll need to connect to the database from a client application such as SQL Server Management Studio, Power BI or Excel. In the next section, we’ll look at how to connect to our new Azure SQL database using a different front-end, SQL Spreads Add-In for Excel to perform updates to the data.
How to connect to an Azure SQL Database from Excel
If you don’t already have the SQL Spreads Add-In for Excel installed, you can download a trial version. Then follow these download and install instructions.
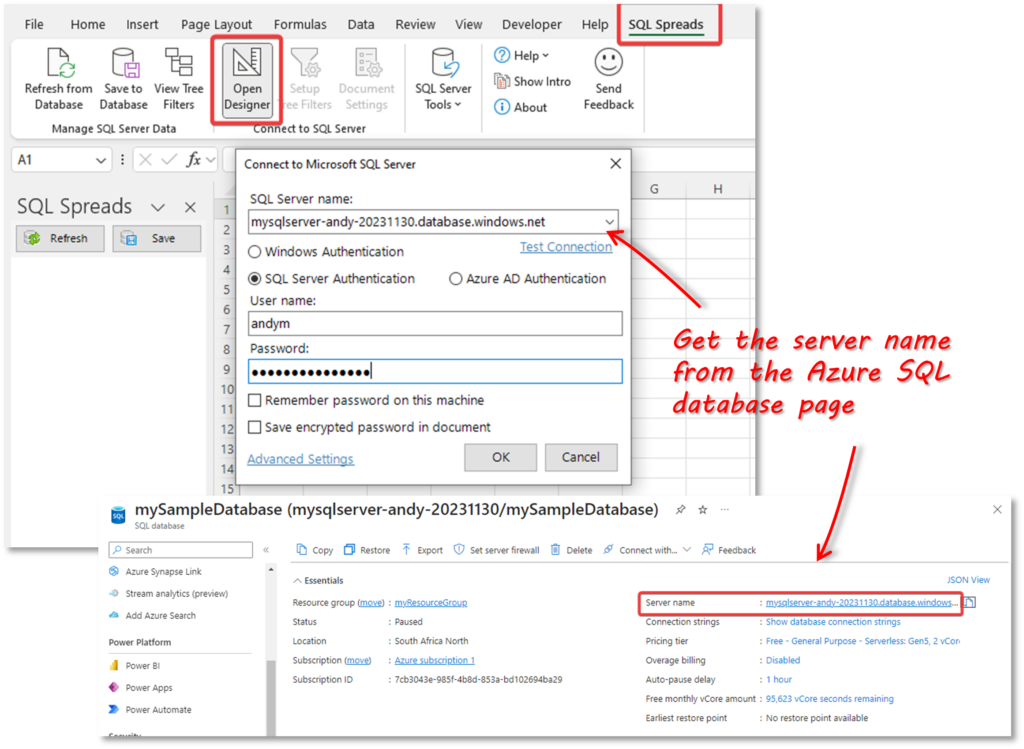
On the SQL Spreads ribbon menu, click on the Open Designer button. Thereafter, the Connect to Microsoft SQL Server dialog box will be displayed. Enter the server name that you created earlier, as well as the user name and password for SQL authentication.
When you click OK, a connection will be made to the Azure SQL database that we just created. The databases and tables on the SQL Server are displayed in the SQL Spreads Designer pane in Excel. Select the Product table on the mySampleDatabase database – the data will be retrieved from Azure SQL and displayed in the Excel sheet.
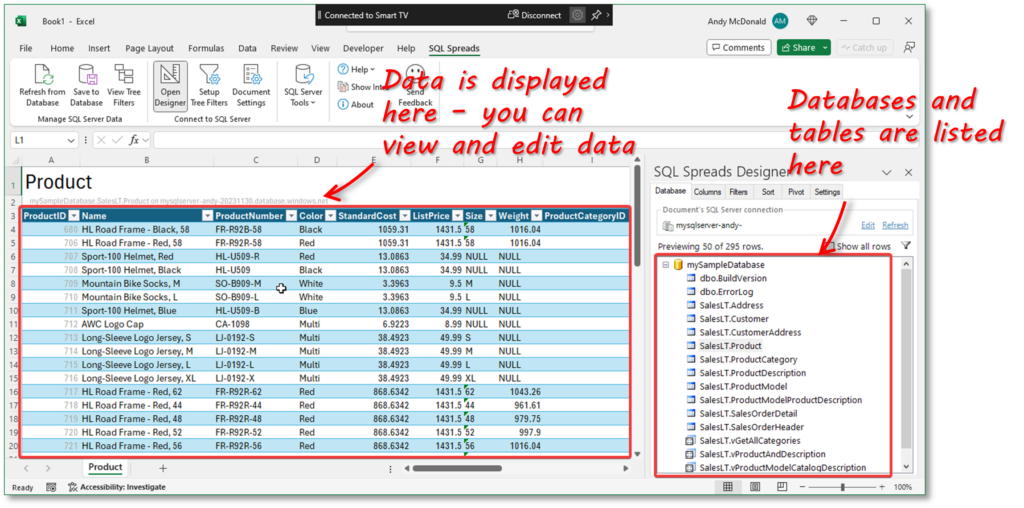
You can now view this data and, more importantly, make changes to the data and save the changes back to the Azure SQL database.
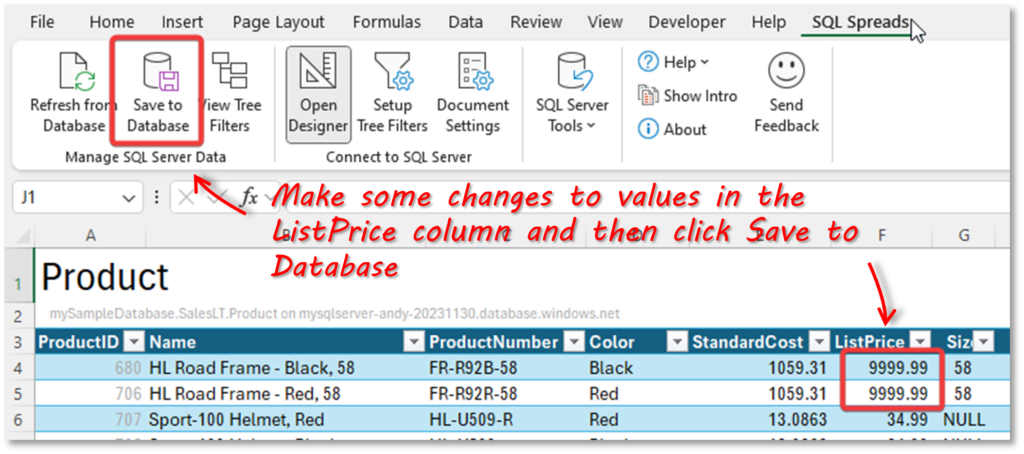
Let’s go ahead and make some changes to the ListPrice values for some of the records and then click Save to Database.
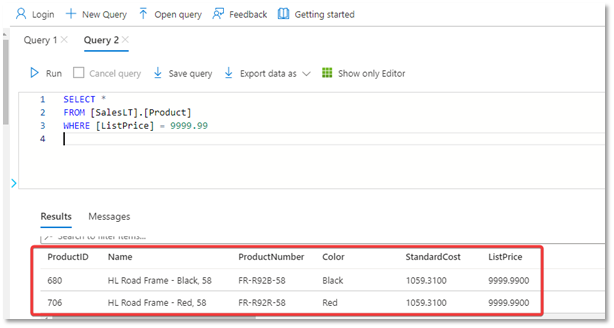
Now, lets go back to the Azure Portal and run a query to see the changes there. You can see in the screenshot below that the two records that we changed in Excel using SQL Spreads have been updated in the Azure SQL database.
SQL Spreads has other features like tree filters, data validation checks, change tracking and more which make it easy for your users to view and update data stored in Azure SQL databases.
Summary
In this article, we showed you how to get started with Azure SQL by creating an Azure SQL database in 5 minutes. The Azure portal has a simple wizard-driven approach to creating resources. And it helps you through the process by applying best practice default values to several of the configuration options.
Once you have created your first Azure SQL database, you can use the database page in the Azure portal to manage it and run queries. More often than not, you’ll want to connect to your Azure SQL database from a client application. In this article, we have shown you how to connect to an Azure SQL database from Excel, using the SQL Spreads Add-In for Excel. SQL Spreads is a great way to manage your Azure SQL data. Not only can you view the data, but you can make updates from within Excel and save them back to the database.
For more information about using Excel to manage your Azure SQL data, contact us, or download a free trial.
FAQs
What is the difference between Azure SQL and SQL Server?

Azure SQL and SQL Server share the same core functionality as relational database management systems, but they differ in deployment and management models. SQL Server is typically installed on-premises or on dedicated servers, requiring manual management of infrastructure.
On the other hand, Azure SQL is a fully managed, cloud-based service provided by Microsoft Azure. It eliminates the need for infrastructure management, offering benefits such as automatic updates, high availability, and scalability. While SQL Server provides more control over the underlying infrastructure, Azure SQL simplifies administration and provides a platform-as-a-service (PaaS) experience.
Is Azure SQL Server free?

Azure SQL Database does offer a free tier known as the “Azure SQL Database Single Database Free Tier.” This free tier includes 250 GB of storage with a limit of one database, providing an opportunity to explore and test the service at no cost. Keep in mind that additional resources or features may incur charges, and it’s important to review the Azure pricing details to understand the limitations of the free tier.
What features are not supported in Azure SQL database?

While Azure SQL Database provides a comprehensive set of features, there are some differences and limitations compared to a full SQL Server installation. Some features not supported or have limitations in Azure SQL Database include:
- SQL Server Agent: Azure SQL Database does not support SQL Server Agent, so scheduled jobs and tasks need alternative solutions such as Azure Logic Apps or Azure Functions.
- FILESTREAM: Azure SQL Database does not support FILESTREAM, which is used for storing large binary data outside the database file.
- Cross-database transactions: Transactions spanning multiple databases are not supported in Azure SQL Database. Each database in Azure SQL operates independently.
- CLR (Common Language Runtime): While SQL CLR is supported in SQL Server, it is not supported in Azure SQL Database due to security and multi-tenancy considerations.
- Extended Events: Azure SQL Database supports a subset of Extended Events compared to SQL Server, and some features may have limitations.


