The SQL Spreads Add-In does not show up in Excel
Problem: The SQL Spreads Excel Add-In does not show up in Excel
Solution #1: Repair the SQL Spreads installation:
- Type Control Panel in Windows search bar
.png)
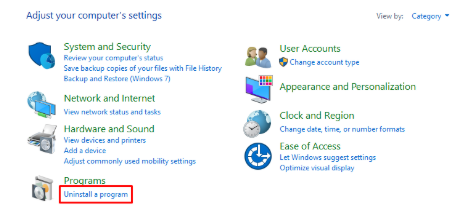
- Go to Programs and click Uninstall a program
.png)
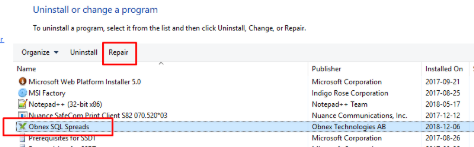
- Select the Obnex SQL Spreads and click Repair
.png)
- Restart Excel and the SQL Spreads Add-In should show up again.
Solution #2: Enable the Add-in Excel Options:
- In search field at the top of Excel, type and select COM Add-ins
.png)
- Locate and check the SQL Spreads Add-In and click OK.
.png)
- The Add-In should now show up in Excel.
If you do not see the SQL Spreads Add-In in the list: - In Excel go to the File menu and select Options at the bottom
- In the Excel Options dialog, select the Add-ins tab
- At the bottom of the tab, in the Manage drop-down list, select the Disabled Items
.png)
- If the SQL Spreads Add-In is in the list, select it and click Enable.
32-bit/64-bit warning when using the per-machine installer
During the start of Excel, the following error dialog is shown:
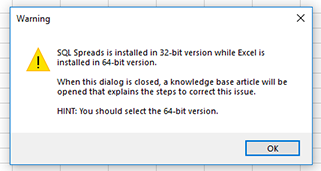
Solution:
This applies only to the Per-Machine installer.
-
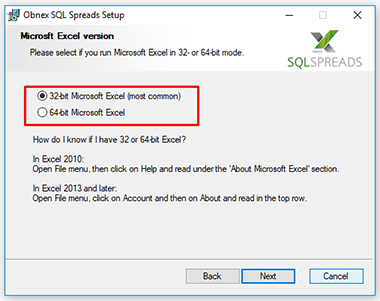
Uninstall SQL Spreads by following this step by step guide.
-
Run the SQL Spreads installer.
-
During the installation, you will be asked to select if you have the 32-bit or the 64-bit version of Excel installed.
-
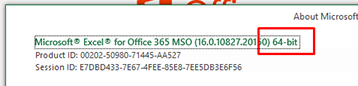
If you are not sure which version of Excel you are running, open Excel and click the File menu in the top left corner. Then select Account and click the About button on the right side.

-
In the dialog you will find the version at the end of the first row:
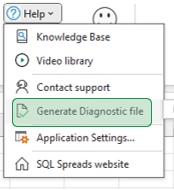
Generate Diagnostic file for troubleshooting issues
From version 7.6, there will be a new troubleshooting option that is available - the ability to generate a SQL Spreads Diagnostic File. This will collect anonymized setup details to help improve and expedite support interactions. It is found in the Help section in the SQL Spreads ribbon.
Create a log file for Excel Add-In loading issues
If you experience issues with the SQL Spreads Excel Add-In not loading either from time to time or permanently, you can enable a special startup logging and send that log file to us for investigation.
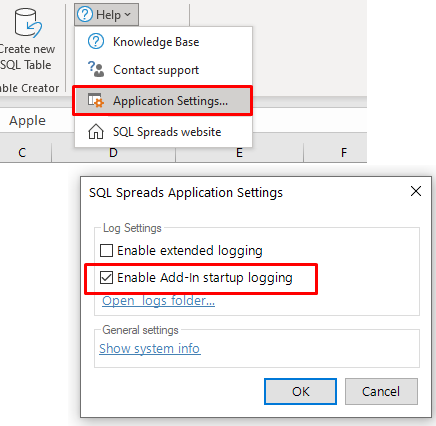
Enable startup logging from within the SQL Spreads Excel Add-In
If you experience this issue from time to time, go to the SQL Spreads tab in Excel and select Help > Application Settings. Then check the Enable Add-In startup logging checkbox:
When the issue has occurred and the SQL Spreads tab is missing, go to the folder C:\Users\ [YourWindowsUserName]\ AppData\Local\Obnex Technologies AB\SQL Spreads Desktop and look for the file SQLSpreads Add In.vsto.log
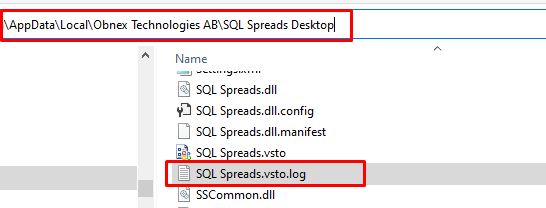
Send the file to support@sqlspreads.com
Enable startup logging when you cannot access the SQL Spreads Excel Add-In
If something goes wrong during the loading of an Excel Add-In, Excel can create a log with
detailed info about the issue.This logging is enabled by adding a new environment variable on the PC having the issue. Follow the instructions below to enable this startup logging:
- If you are using Windows 10, open the Windows search field and type
Environment variables
Then go directly to step 6. - Otherwise, go to the Control Panel in the Windows Start menu or type Control Panel in
the Windows search box (the magnifying glass in the bottom left corner in Windows) - Click System and Security
- Click System
- Click Change Settings
- Go to the Advanced tab and click the button Environment variables
- In the top section named “User variables for...”, click the New... button
- Under Variable Name, enter VSTO_LOGALERTS and set the Variable Value to 1
- Then restart Excel.
- If the SQL Spreads tab is not shown, enable the SQL Spreads Add-In under File >
Options > AddIns, and then restart Excel. See this article for more details. - When the issue has occurred and the SQL Spreads tab is missing, go to the folder
C:\Users\ [YourWIndowsUserName]\ AppData\Local\Obnex Technologies AB\SQL
Spreads Desktop and look for the file SQLSpreads Add In.vsto.log - Send the file to support@sqlspreads.com
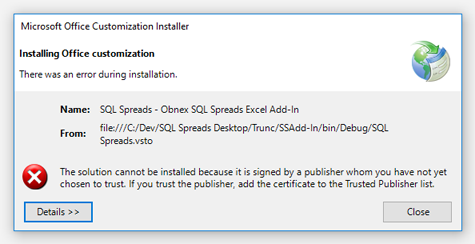
Error message during Excel startup: "The solution cannot be installed because it is signed by..."
When starting Excel after installing SQL Spreads an error message is shown with the following information: "The solution cannot be installed because it is signed by a publisher whom you have not yet chosen to trust."
Solution:
Your environment requires that you add SQL Spreads/Obnex Technologies as a Trusted Publishers in Windows. Please follow the steps in the answer below Adding SQL Spreads/Obnex Technologies as a Trusted Publisher
Adding SQL Spreads/Obnex Technologies as a Trusted Publisher
To add Spreads/Obnex Technologies as a Trusted Publisher, you will have to add the SQL Spreads/Obnex Technologies certificate into the Trusted Publishers in the Windows certificate store.
To do that, follow these steps:
-
Close all Excel windows.
-
Download the SQL Spreads/Obnex Technologies certificate for the SQL Spreads release you use from here:
Certificate for SQL Spreads 7.4.1 (Latest)
Certificate for SQL Spreads 7.3.0 or earlier)
Certificate for SQL Spreads 6.0.17 or earlier -
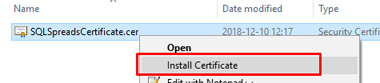
Right-click the downloaded certificate file and select Install Certificate:
-
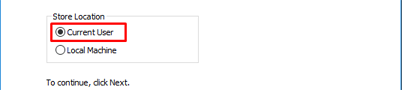
Select the Current User option:
-
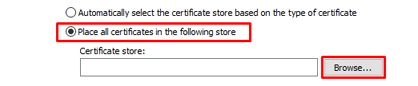
Select Place all certificates in the following store and click Browse
-
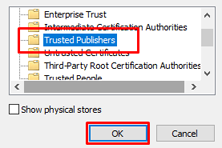
Select Trusted Publisher and click OK:
-
In the Certificate Import Wizard, click Next and then Finish and you will now get a confirmation message that the certificate was Successfully installed.
-
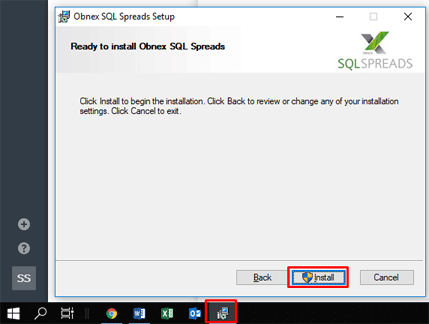
If the warning was shown during installation, bring up the Installer window from the program bar and click Install to continue.
-
If the warning was shown when starting Excel, close Excel and go to the Control Panel and select Programs > Uninstall Program
-
Select Obnex SQL Spreads in the list and click Repair at the top:
-
Now restart Excel and you should see the SQL Spreads Excel Add-In in the top of Excel.
The Design mode button is grayed out after I've upgraded office
In the SQL Spreads tab in Excel, I cannot click the Design mode button as it is grayed out.
Solution:
Please uninstall and reinstall the SQL Spreads Excel AddIn. You can reuse the same Activation Key as long as you have not changed to a new machine.
Check that you have not activated the Data Editor mode license key instead of the Design mode license key.
How to disable FIPS Encryption
On some Windows environment configurations, you may see an error message saying that FIPS encryption must be disabled.
To correct this you will need to disable the "Local Security Setting System cryptography: Use FIPS compliant algorithms for encryption, hashing, and signing" policy in Windows.
-
Go to Control Panel > Administrative tools
-
Select Local Security Policy - The Group Policy dialog appears.
-
Under the Local Policies heading, select Security Options.
-
Locate the “System cryptography: Use FIPS compliant algorithms for encryption, hashing, and signing” setting in the right pane and double-click it.
-
Set the setting to “Disabled” and click OK.