Intro to Hierarchical Tree Filter
Hierarchical Tree Filters are available in SQL Spreads Premium and above

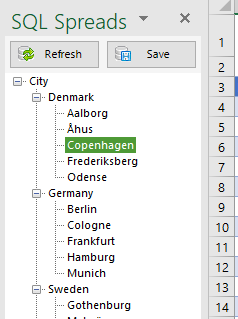
SQL Spreads can create a multi-level (hierarchical) Tree Filter.
The user always selects the item at the lowest level, like the City in the example below:

From SQL Spreads 7.5 you can add an unlimited number of Groups (In earlier versions you can add up to five levels).
Create a Hierarchical Tree Filter
To add a new level in a Tree Filter, add a new column in the filter SQL query and name it with AS Group1_Text as in the example below:
SELECT
   city.[CityName] AS [Text],
   city.[Id] AS Code,
   country.[Name] AS Group1_Text,  -- Show country
  'true' Group1Expanded            -- Always expand the countries
FROM
  [dbo].[Cities] AS city
INNER JOIN
  [dbo].[Countries] as country ON city.CountryCode = country.CountryCode
You can define an unlimited number of levels by naming columns to Group1_Text, Group2_Text, and so on:
Group1_Text
Group2_Text
...
Text, Code
Please note that you must name the columns using AS, eg “ AS Group1_Text” or “ AS Group1Expanded”, otherwise SQL Spreads will not detect the filter group.
In versions before SQL Spreads 7.5, the groups where named Group1, Group2, etc. In SQL Spreads 7.5 and later, you can use either Group1 or Group1_Text
Filter the data based on the bottom level in a hierarchical Tree Filter
To filter the loaded data based on the bottom node in a hierarchical Tree filter, create a Custom SQL Filter in the same way as for a normal Tree filter:
[Cities].[Id] = @City_Code
Filtering the data based on the Groups in a hierarchical Tree Filter
In some cases, you would like to filter the loaded rows using also the Groups in a hierarchical Tree Filter.
In the example below, each state appears under each Forecast period, so the state key is not enough, we need to also apply a filter on the forecast period.
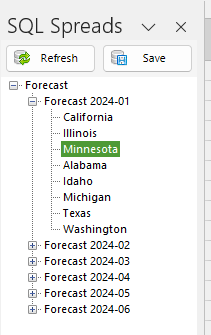
To do that, we can add a Code value also for Group1 which holds the Forecast PeriodKey. We will name the column with the PeriodKey Group1_Code:
SELECT
	[PeriodKey] AS Group1_Code
	,[ForecastPeriodName] AS Group1_Text
	,region.RegionKey AS Code
	,region.RegionName AS Text
FROM
	SQLSpreadsDemo.dbo.meta_ForecastPeriod as foreccast
CROSS JOIN
	[SQLSpreadsDemo].[dbo].[dim_Region] as region
In the Designer filter where we filter which rows that should be loaded into the spreadsheet, we will now be able to use the parameter @Forecast_Group1_Code which will hold the PeriodKey for the selected Forecast:
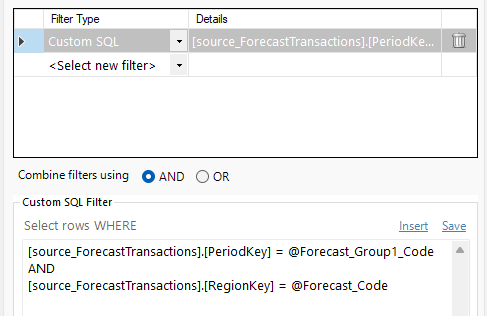
[source_ForecastTransactions].[PeriodKey] = @Forecast_Group1_Code
AND
[source_ForecastTransactions].[RegionKey] = @Forecast_Code
Collapse and expand by default
You can control if the group should be collapsed or expanded by default by adding a column named “AS GroupXExpanded” to the result set with a value of either 'true' or 'false'.
The column should be named “AS GroupXExpanded” where X is the number of the group to expand/collapse eg: 'true' AS Group1Expanded to expand the level Group1.